
The Egg Be Dammed!
by Brian Rubinfeld from Threshold Magazine issue 22An Adventure in Returned Blackmoor
I've returned once more to inject some gonzo, yet dark, science fantasy into Mystara. As seen in my article for Issue 20, Blackmoor has returned as a foreboding and twisted land. Gone are the days of noble kings and a fair (albeit imperial) nation, Blackmoor has been replaced by a totalitarian regime overseen by a madman. As the faults of the dystopian society become apparent, none are as damaging as the Cootsbane Dam. While other delves into mad science have been well maintained, avoiding disaster, this case is quite the opposite. In fact, multiple underground factions have caught wind of this and seek to exploit it.
This adventure acts as a dungeon crawl through a facility overtaken by lethally trained soldiers and fanatical revolutionaries, leading to the twist of a laboratory overridden with disgusting mutants and undead. Also, it's an unabashed homage to (among other things) the first mission from the 2002 video game, TimeSplitters 2. Some other inspirations include Original D&D Blackmoor/DA2 Temple of the Frog, John Carpenter's The Thing, Game of Thrones, Goldeneye and Wolfenstein.
Disclaimer. Many of the monsters are placeholders, as this acts as more of a gaming sandbox than anything tied to any one edition. The original game was made with a hybrid of Dungeon Crawl Classics and Mutant Crawl Classics in mind. However, the mechanics have intentionally been rendered neutral. Monster usage is intentionally vague and left to the DM, who is free to substitute ideas out for something more appropriate for their games in Returned Blackmoor. While there is no exact level for this module, I would recommend a somewhat-low-to-mid-range level party, based on the descriptions of monsters, as well as the dangerous effects and technologies described further down.
Adventure Information.
The Cootsbane Dam remains one of the aging facilities from Blackmoor's past, atop mountainous peaks, built up from years of artificial turf modifications. Factoring time from pre and post time jump, this facility was in operation for 210 years before ceasing operation just 3 years after the time jump. The compile was multipurpose, especially during Blackmoor's late monarchical years. Its initial use was to generate elemental water power, creating energy to help charge the various districts and wards throughout the region. Another was to drain out and excavate a historic dig site, turned quarry. After this dig was concluded and no more artifacts could be found, the site was converted into a military training site. Even before the quarry was converted, much of the dam was occupied by the royal armed forces of Blackmoor, as an outpost for surveying nearby areas as well as maintaining various federal conservation efforts.
However, that wasn't to say all scientific pursuits inside the dam were "for the greater good". Even before Allogost's takeover, several experimental laboratories were built on the side and into the caves beyond. All sorts of powerful and dark alloys were uncovered deep within the earthy crust, likely related to the very Egg of Coot that was banished so long ago. Experiments were done carefully, but ultimately discarded once Blackmoorian scientists reported the potential danger of using this unknown substance. However, order to shut down the project didn't occur until two scientists died suffering radiation burns and various disfigurements. The cave systems were sealed off, requiring high level clearance and significant protection to get through.
After the time jump, the lake beside the dam froze over and rendered its main function useless. Various personnel were slowly funneled and placed in other locations as the dam was put on hiatus. Following the coup by Allogost's forces, the dam has remained vacant for nearly a decade. As the lakeside thawed out enough, the new government of Blackmoor became intrigued by the abandoned dam. Upon sending forces to investigate the derelict structure, very little turned up at first. Besides water damaged technologies, there were a few hold out soldiers doing all they could to keep anyone from adventuring into the caves. Allogost's regime was more interested in eliminating traitors than combing the entire base. Following their removal, the dam was restored to some working order, at least as a temporary base while other projects moved forward. And in time, the experiments in the caves beyond were unearthed. While the previous regime had the wisdom to stop, the new one saw the unholy ore below as a potential power source to harness. However, strange things began to occur from those experiments. And even stranger, the winter-like conditions of the outside world began to creep back into the dam, freezing chunks of the artificial river beyond, as well as coat the nearby area in a snowy frost. Some theorize that the chaotic experiments tampered with Blackmoor’s weather devices.
The ore was utilized in various projects such as creation of super-soldiers, alternative power sources and new weaponry types. Like before, on a grander scale, various stationed forces fell to a strange sickness. Those who didn't die outright were pushed to a makeshift quarantine zone. Initially, reports were given back to their superiors and headquarters. Overtime, reports either became less informative or padded in order to hide the grotesque results of the experiments. Communications ceased two weeks prior to the adventure's current timeline. A task force was sent to investigate, but they failed to return. News of this was caught by a rebel group cell, who became interested in harnessing against the government whatever was in the dam. One week ago, a scouting team was sent out, only to be ambushed by the rebel group. While most of the survivors fled back to the capital, some were pushed further into the facility, where their death screams as well as the sounds of unspeakable horrors were overheard by their fleeing compatriots. As of the current timeline, a "cleaner crew" has been sent to exterminate all life around the dam, while collecting any information they can. So far, the crew has been combing the parameter looking for any hostiles. They have killed a couple of the rebels. However, attempts to recruit more agents to flush out the rebels has failed, as conditions around the dam have gradually gotten worse.
Adventure Synopsis.
Whether they’re outsiders who have proven themselves, trusted natives or curious trespassers; the party has stumbled upon a conspiracy in the decommissioned Cootsbane Dam. Originally, rumors or reports detailed a radical anarchist group holding up in the derelict. However, the truth requires the party to delve deeper. Within the actual compound is a series of caves attached to the facility, containing all sorts of vile experiments and dark secrets dating back to the original age of Blackmoor; the works of unhinged scientists who remained in the facility, long after it was closed down. These horrid things need to be eradicated, at risk of them escaping into the world. If worst comes to worst, destroy the dam and either trap or eliminate the mutant threat. To make matters worse, a team of exterminators is sweeping the compound for information and they’re just as itching to kill something as well. Plus, the escalating winter weather makes traveling too far away from the installation quite dangerous.
For the Dungeon Master.
This adventure expects a relatively lower level party, as the initial adventure deals with grunts and thugs, before switching up to mutants and abominations; something many low level parties might be ill equipped for. The initial conflict should focus on infiltration and covert assassination, as the enemies will mob against players if enough attention is brought up. After players discover the quarantine zone towards the end of the actual facility and into the caves, the game switches up into a brutal escape through survival and horror. Instead of avoiding militias/cleaners and radicals, players are pitted against disgusting mutants and magically crafted horrors, many of which could take out the party with ease. Even if players are from Blackmoor's military or part of a rebellion group, they will still be attacked by their respective equivalent. The soldiers and special operatives have a simple order, exterminate all life on the dam. Players loyal to Allogost’s cause would have been made aware of “investigators” already present and to keep out. Meanwhile, the rebels have become paranoid from their assailants. As for other rebels and anarchists? Seclusion and traumatic horror has left the current group paranoid and violent. Anyone outside of their cell isn't to be trusted and will be attacked, at risk of the outsider group being part of the sweeper teams.
A Treatise on Technology.
Much of the technology here should be treated as a magical item or a variant item (such as a weapon dealing a different kind of damage). On top of that, players from outside of Blackmoor should not be familiar with most of this technology. Unlike technologies for modules like Expedition to Barrier Peaks, much of the technology here isn't ancient. However, exposure to the elements still might have caused some damage. Like with most charts to deciphering technology, players should roll Intelligence rolls. Should enough successes occur, the player is able to understand and adequately explain the technology... in their own terms.
One method of both balancing Blackmoorian tech and allowing for minimal conversion is to make them function like common items and magic items of D&D. When a Blackmoorian weapon clashes against Blackmoorian armor, it functions as normal, except its damage might be similar to a magical spell (such as fire damage for a laser beam). However, these items might be more effective against primitive technology, effectively increasing attack rolls or damage against primitive armor or increasing AC against primitive weapons. Rather than upscaling damage or AC, this alternative proposal requires minimal extra math, adding simple bonuses for dealing with non-technological opponents.
An emphasis on higher technology weapons will likely put an outsider team at a disadvantage, as it will take time for them to properly understand any equipment that they might take from patrols. Should they come to understand what they wield, they'll quickly be put on more even ground. Otherwise, the adventure will turn quite deadly quite fast, by design. However, a lot of technology has similarities to classical Blackmoor, in part from the land's obsessive drives to preserve its culture. As such, the armored soldiers are just as likely to have a tradition inspired weapon (similar to an axe, sword or bow) as a power tool (such as a chainsaw) or firearm.
It is recommended that at least one
party member be from Blackmoor. Barring that, characters from
Serraine could have enough of an advantage in studying Blackmoorian
tech. Should that fail, the module will likely become significantly
harder outside of purely violent havoc on the equipment.
[Map:
Cootsbane Map 1]
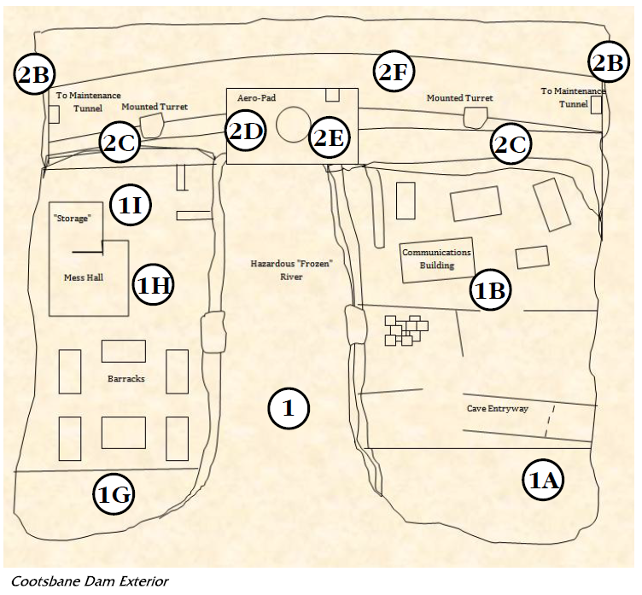
Caption:
Cootsbane Dam Outside
Cootsbane Dam Outside/Training Grounds
1. Semi-Frozen River. A frigid river stands between you and the other side. Parts of it MIGHT be thawed enough to cross, but jagged terrain would prove treacherous. Crossing it is probably a bad idea. Also, a massive mutated fish horror dwells in the secluded space and will try to eat players. (Said massive sea creature is likely to be well out of the players' capabilities. Should they want to cross the dangerous river, they will have to fight the monster. Should the players avoid this combat and later unleash the mutant hordes, they'll witness soldiers from the top of the dam using a variety of energy weapons and magic to fry it.) The river itself stretches past between a canyon pass for a long way, the terrain on each side of the river is treacherous from the jutting ice and rock alongside an unstable layer of ice over the river itself.
1A. Caved Tunnel. The rebel group that's squatting inside the dam have intentionally destroyed tunnel access without traversing a very dangerous mountain side. Luckily, the team can navigate through caved in rock and jutting pipes, albeit needing a relatively long amount of time of squeezing and twisting through hazardous terrain.
1B. Communication and Storage Buildings. Build on top of a flap carved rock, this space was meant to oversee the water flow as it made its way to the controlled river ahead. Since the dam has remained idle and much of the lake above frozen, not even a trickle escapes the dam. Mesh fencing keeps intruders out and authorized people from falling into the river, as it wraps around both sides of the lower outdoor area. A variety of signaling equipment carries a strong arcane presence. Beyond trying to reach out to allied groups of the PCs, they can decide to destroy the devices to prevent tampering from rival/enemy factions. Also, many of the storing buildings contain important documents relevant to the dam itself, as well as vague hints of strange experimentation with the dam's resources. It's best to destroy this evidence, lest it falls into other hands.
Outside - 1 - 3 patrollers will roam around, usually at different points of each side.
Building 1 contains various cabinets containing research notes, training schedules and files on the dam's operation amidst various office style furnishings.
Building 2 is some sort of lounge, for officers and employees not currently on duty. The lounge has seen better days. Some sort of entertainment machine in the back right corner is broken, there are rips on the couches, a refrigerating device is heavily stained with alcoholic beverages and sauce, some parts of the walls haven't been adequately cleaned. Several cleaners (at least 7), including 2 elite exe-corps members, are residing here lazily. If they've eavesdropped upon, they will scoff at the assignment, as they've fought both "monsters" and "terrorists" before. While either taking down or avoiding the outside guards is encouraged, fighting this whole troop at once would be dangerous.
Building 3 contains a communication console, with a variety of strange radio-like devices, atop a second floor. A large dish resides on the roof. The window overlooking the radio devices has a patched bullet hole in it and the radio console has some faint blood stains. To an outsider to Blackmoor, none of these contraptions make sense. Even to a native, this experimental technology hardly looks like anything seen before. However, a native might have a chance of deciphering the machine to send out a signal. However, the console is protected by the password. Thankfully, the password creator is smug and left a riddle jotted on a parchment. A security toggle opens the doorways to 1C and 1E, but it also requires the override password.
The riddle is as follows: "This being is ancient, older than the kingdoms of foreign lands. However, the village elders of the land are much older. Their ambitions toppled kings, but they fail to stomp a few rats. For such an incredible power, fear is their master. Who are they?" (It's Allogost.)
Building 3 (Ground) - Contains surveillance devices to help keep a look at the station. A key card is needed to grant access here. High ranking officers have one, there's another one on the upper floor by the radios.
Building 4 houses oil drum reserves. While much of the station is powered by arcane sources and hydraulics, a generator beside building 2 requires fuel to keep going. Igniting the barrels would cause an explosion that would take out at least this building. However, two cameras are stationed at opposite walls of this building.
Building 5 has a raided weapons locker. If a character looks hard enough, there are "countdown mines". While too obvious to be an effective weapon, they can be used to destroy evidence or create a distraction.
Cameras line the perimeter. Characters will either have to sneak through by luck, skill check or other means to evade them; especially if they're within range.
1C. Connecting Tunnels A. Areas dipping down and leading into the dam complex proper through Staircase A. Because of emergency lockdown, the door must be opened from the communication tower.
[Map: Cootsbane Map 3]
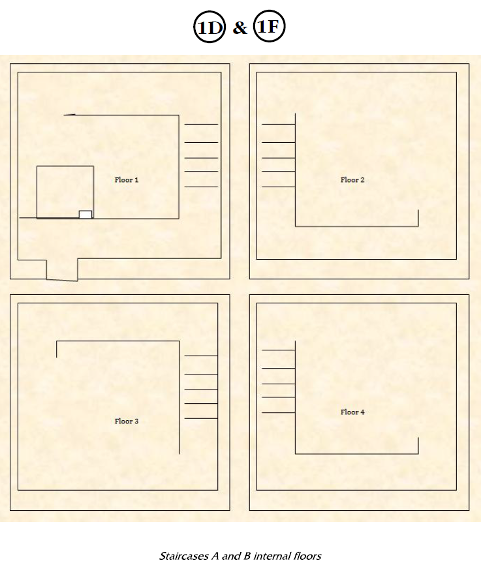
Caption:
Staircases A and B internal floors
1D. Staircase A.
Winding steel stairs that lead to the crossway, as well the top of
the dam. Beware of bursts of hot steam. The staircase connects to
areas 2A and 1C. There are three floors, broken up by a security
camera floor on the first, a hall with food storage on the second and
one with a broken steam pipe on the third. The steam from the broken
pipe can damage characters who don’t try to avoid it or fail to
turn it off, as relevant later. Each floor has one cleaner guard on
it. Should the security camera be triggered on the first floor, up
to 3 more guards will show up in that section!
1E. Connecting Tunnels B. Same as 1C, but the other side. It connects to Staircase B.
1F. Staircase B. This staircase functions much like Staircase A, but it leads from the opposite side of the dam. The staircase connects to areas 2A and 1E. The top floor hall has one camera, that will also send forth some guards. Otherwise, the second floor hall has 2 cleaner guards standing by.
After destroying the cave, the remainder of a rebel squad (2 - 4) will be (poorly) facing off against several (3 - 6) zombified soldiers on the bottom floor, facing 1E. More than likely, morale breaks as they retreat upstairs.
1G. Barracks. Thoroughly ransacked and devoid of anything useful, it's still likely to harbor various soldiers here though. Alternatively, rebels could be hiding in a barracks building.
Other Barracks random encounters:
A chest full of personal clothing, none of which are military related.
Random keepsakes and trinkets, all of which have some relevance to Blackmoor City.
A secret holdout weapon, either under the bed or in a special lockbox.
Lewd and inappropriate periodicals and books
An oversleeping soldier in night garb. His face has been drawn upon heavily.
A low-ranking key card (similar to one found later).
Hoarded rations, likely from storage.
A journal detailing either satisfaction with being stationed out here or feelings of contempt.
Numerous dead soldiers, murdered in their own beds.
State-approved books on various subjects, such as science/arcana, politics and hobbies.
1H. Mess Hall. A shoot-out between the terrorist cell (3 - 8) and the cleaners (4 - 6) is breaking out here. Tables are flipped on their side and various bits of scrap reinforce makeshift walls to duck behind. However, the two sides are more engaged with each other than the party at the moment. Plus, tables in the middle of the mess hall are still facing normally. One could either play the two groups against each other or attempt to sneak past the carnage through moving around the forces or crawling underneath the middle tables.
1I. Cold Storage. Various stored goods are kept safe here. It's possible a wounded soldier is ducking in here to avoid fire, ducking out of the fight in a craven manner. His weapons are depleted, save for a combat knife, and can be forced to give information if threatened or persuaded.
The Top of the Dam.
2A. Maintenance Tunnel. Blasting steam (as seen on staircase a) prevent going further, as a rebel team cornered in this chamber take down a few soldiers before focusing on you. Turning off the three steam pressure valves will allow you to continue. Each valve is in a small alcove hall on the left of the passageway. Without doing this, there is dangerous steam pouring out of broken pipes around the area. In fact, the two most dangerous valves block the doorway to Staircase B. Beware, two soldiers guard the area, as well as one mage of mid-level ability.
[Map: Cootsbane Map 2]
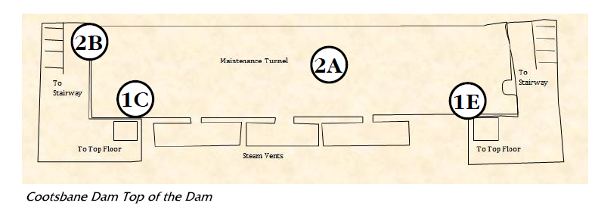
Caption:
Cootsbane Dam Top of the Dam
2B. Dam Staircases. On either side, a separate set of stairs leading to the top of the dam. However, until the emergency lockdown is lifted, access is denied. They are right across from either of the main staircase doorways.
2C. Turrets. Immobile machine gun turrets, fully stocked for defense... ironically against their own vessel. These heavy artillery weapons have enough bullets each to take down the enemy helicopter. Manning a turret requires the user to stand within the immediate circle of the gun. Training in ranged weapons applies to the turrets, which also grant a circumstantial bonus due to being docked on a platform.
2D. Aero-Pad Building. Within the center of the dam roadway, this building has a garage for taking in vehicles as well as a loading dock. Beyond the docking point is a small elevator as well as two ascending staircases that lead to the roof port. Approaching the garage door will trigger the troops to open fire and release an army truck with a couple of readied soldiers to spring on the party. One truck can fit between 2 and 10 soldiers. This could stack with the aero-copter, should the DM wish to do so.
2E. Aero-Pad. A small landing dock for a small flying craft. A launch pad is lit up with a circle of small green lights, while some sort of pole has a signal light. Besides granting slight cover from elevation, this location offers little in defense for any aircrafts. The helicopter-like vessel that was here has lifted off well before the players make it to this point, armed and ready to attack.
2F. Roadway. A large path capable of handling military vehicles, particularly all terrain. The short roadway connects to storage facilities within the dam, as well as tunnels that lead out into the mountain itself. 4 - 6 rebels are more interested in escape, as they have all the evidence needed to expose the regime. However, if provoked, they'll fight the team. The roadway cuts between the Aero-Pad building, connecting the dam staircases to snowed over paths within the mountain. Exploring beyond the dam is possible, but very treacherous.
[Map: Cootsbane Map 4]
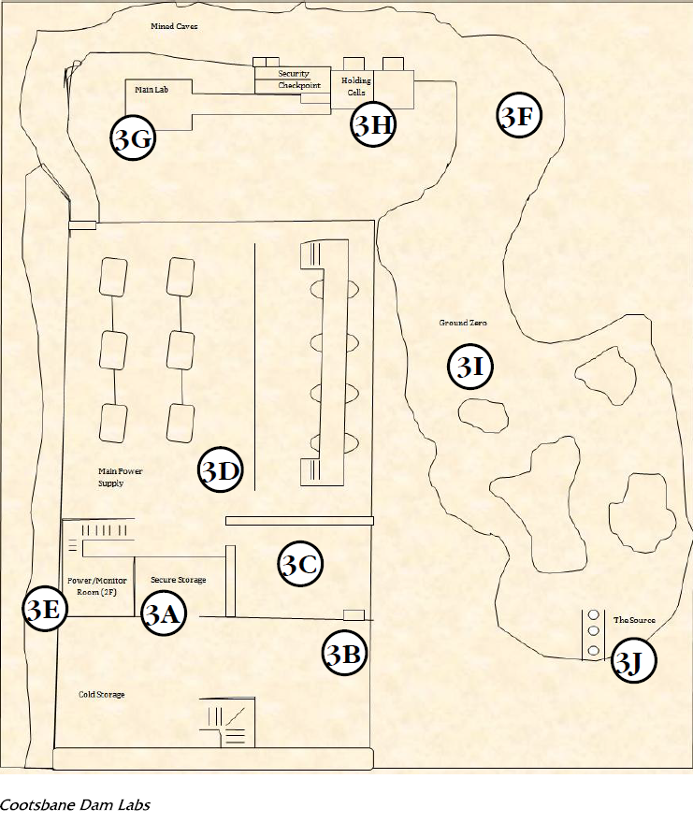
Caption:
Cootsbane Dam Labs
The Labs Below.
3A. Core Storage. Safety equipment, hazmat suits and more are stored with a room full of rectangular lockers. Most of them are secured through locks, but these can easily be picked or bashed off. Tools for cutting, measuring the power and others could be repurposed for weapons in worst case scenarios; making crushing, piercing, slashing or even fire or electrical weapons. In addition, basic weapons are kept in secured lockers. These include (1-10) combat knives, (1-4) small firearms and ammunition (clips included with small arms), as well as (1-3) flares.
If all lockers are searched, there's a chance players will find a combination for the generator. The paper recommends: 2-4-2-1
A secure storage unit has a variety of explosives, with a note saying that they were seized from various points of the dam. You'll need an authorized access card to reach it.
3B. Access Point. The security door that leads down into the main power station and the laboratories is locked off. Accessing requires a coded key card. The office beside it has a computer that requires a puzzle to upgrade the card gradually to master access. The puzzle used to power the device is detailed below.
A card device must be powered up by a makeshift generator. The generator has 4 switches. Each switch has a set of four lights above the switch.
A monitor is on the top, detailing how much power is charging the device, it goes from a 1 - 10 scale. If power goes beyond 10, there's a malfunction. There is a "power" button which attempts to power what it's connected to.
Each switch controls a certain amount of power. Should there be too little power, the card device won't boot up. Should there be too much, both the device and the generator will go haywire (and sometimes emit electrical shocks, causing damage).
To successfully power the card device, power must get to 10 monitor counts in total.
The first switch is the most powerful, giving 3 monitor counts per switch notch.
The second switch is somewhat broken and its number won't be added to the monitor. In reality, it only gives 1 count no matter what it's set to.
The third is the second least powerful, giving 1 count every switch notch.
The fourth is the second most powerful, giving 2 counts per switch notch.
All notches start at 0. Each switch must be used in order to complete the sequence.
Once a switch has been turned to a notch, the number on the monitor doesn't go down until "power" is pressed.
3C. Makeshift Barriers. Wooden slabs block access to parts of the lab set-up. They are crude and only make the maintenance areas look like they are under repair themselves. When the team first enters the areas, an ominous mist begins to filter into the area from the air vents. Vision is slightly blurred as two soldiers are killed by SOMETHING. It sounds unnatural and monstrous. It climbs up the wall, leaving large claw marks. It then slashes at an air vent and crawls inside. The remaining soldiers (2 - 3) are on high alert and will actively seek out the party (or more monsters). These soldiers are significantly stronger than ones faced prior, likely having Exe-Corps or Blackmoorian Knights among their ranks.
Note: After destroying the glowing ore and destroying much of the cave, the barriers will be destroyed as mutants run amok!
3D. Backup Water Systems/Power Control Chamber. A series of water vats line one part of the station, as fuel tanks like the others. Three better armored and armed soldiers act as securing down here, clearly protecting something big. As the party reaches arrives, they notice that the power stations begin to go haywire and shut down. However, backup generator systems activate, putting the station in an emergency power lockdown mode. Many functions of the dam will not be operational until systems are restored. Detonating enough fuel tanks and generators at once could destroy much of the dam, should things get desperate enough.
On the way back to the control room, after the quarantine zone has been breached, a mob of zombies has pushed their way into the upstairs control room. One soldier has already lost the fight, while another rapidly fires into the crowd telling them to "choke on it."
3E. Control Console. Along a few turns of grated stairs leads up to a sliding door containing an elaborate computer room, complete with large tape deck looking machines. All sorts of techno doodads line the area. Among them is a panel with large buttons. The large red one deactivates any security mechanisms that lock down the caves beneath the mountain. However, the area is put on high alert as alarms ring.
As the party leaves first leaves the console room and back into the main power control, a "gross visceral mush" is pushed out of another vent grate, making a sick plopping sound as it smacks the ground. Two lower level mages, alongside two soldiers and one elite soldier (choice of exe-corp or knight) file from the upstairs mess hall away to stop the team.
3F. Mining Caves. Dug through earthy magics and digging tools, these caves were originally used to study the minerals around Blackmoor. About 1/2 a mile from a rundown gold mine that's long since been picked clean, the staff wanted to see what anything near a riverside would wield. It gives a faint purple glow from crystals that have mostly been harvested. (They are worthless.) Curiously, much of the work was done thanks to erosion over time, revealing something ancient and sinister.
Warning and quarantine zone tape hastily seals off continuing further, but provides no real barrier. Warning signs detailing the corrupted minerals lines doorways to other rooms.
3G. Contamination Labs. To access, players must first go into a security room with two guards. One is in front of the blast doors, another is in the computer room. In any case, the panels must be released to access the labs ahead. The blast door opens to a hall containing different labs and an emergency door back to the cave. The first is a lab study containing several corpses of infected personnel. More disconcerting is the trail of viscera on various tables and the ground, but no other bodies are in sight... Even more disconcerting are disgusting trails of foot prints. The second lab details an equally morbid and grisly scene. A range of dismembered body parts to strapped down humanoids alongside a variety of testing tools, liquids and the accursed ore. Unhinged scientists are well armed with not only the experiment tools, but a variety of weapons. They were readied for the terrorists and the extermination team, but not your team.
3H. Quarantine Laser Fence Rooms. Housing various experimental creatures as well as reanimated lab techs and soldiers. The sickly monsters try to escape from their containment. Should you make it to the ore capsules, an explosion will damage the main controls in the generator room and they will succeed in their escape.
3I. Ground Zero. . Sludgy, green and sickly ooze covers the walls leading to remnants of the strange ore with an eldritch power all its own. It's a miracle that the rivers are still frozen and the dam is shut off, lest the contaminants be taken to nearby civilization. Horrible monsters line the area, all playing dead or waiting in the shadows. They all want to protect the ore, as if they revere it. The strange purple tint of the caverns gives way to a bile-like green glow.
3J. Biohazard Container Capsules. This is where the most potent ores are stored. Outright contact with it is deadly. Other fainter ores are still within the walls, but this is the crux of it (in addition to what has already been harvested). The ore itself counts as a monster. It unleashes a damaging radiation attack, unleashing energy damage upon foes when they start their round in a 20ft. zone of influence. Creatures that die from the aura come back as zombies under its control.
Campaign Option: To further tie in the lore used for Returned Blackmoor, the ore could be a mummified serpentine1 corpse drenched in dark magic and radiation. Perhaps an Oard killed2 from the Great Rain of Fire is still tainted by remainder of chaos magic from the ensuing event. The end reveal can easily be swapped out or altered.
What Happens Next?
Unless you have your own viable means of escape, the team is still stuck on the dam. The cave with the Coot-corrupted minerals may be crushed and the faculty either scattered or defeated, but it's a harsh and probably deadly trek back to safety. However, a couple of spare horse-like automatons might prove useful enough, if the snow isn't too deep. Also, there are digging tools in the dam that could be used to carefully excavate the collapsed tunnels out to the dam's transport hub at the other end. Should a message be sent, help could arrive either at the top of the dam or at the other end of the tunnel.
As the word of this horrible scandal gets out, Allogost is thrown into a panic. Depending on who the party aligned with prior to the module, this could be a boon for them or an issue all its own. Investigations double down within the prime hub of Blackmoor City, expanding slowly beyond. Less extreme rebels aid civilians in countering the investigations and subverting them. The maniacal cyber warlord begins to show weakness.
As for the dam itself, it could be seized by the team if they wanted. Should they abandon it, someone will no doubt stumble upon it, especially as the original lake thaws out and slowly floods the nearby region more. Whether or not it will be brought back to working order is uncertain. The rebellion from before would be foolish to try to make it a base, as it's widely known about thanks to their actions. Should they really want to make their mark, the team could try to further the rebels' own goals by blowing up the dam, using a variety of explosive devices.
Beyond Cootsbane Dam.
Blackmoor Royal Airfield. Despite being a decommissioned dam that became a top secret base, there exists other sites not far from the area. The Blackmoor Airfield is on its way to being restored to its former glory. Sustained damage from the frigid weather, alongside years of neglect have left much of the area in awful condition. However, efforts have slowly been made to bring the facility back to working order.
Temple of the Coot. Long since collapsed, it’s a cursed ground that radiates powerful evil. It is likely that its influence corrupted the grounds that Cootsbane dam was built on, at least so much as creating the evil ore that was used for deranged super-soldier experiments.
Technology Descriptions.
Aero-Copter. This drone-like transport craft has four arms with rotating blades on top of each "hand". Should a set of blades go out, each hand has a backup pair ready to take over for operation. The pilot and up to 3 passengers sit in two rows of two seats within the craft, entering from either side of doors that lift up from latches on top of each side. Two bars and a variety of switches, dials and knobs help the pilot to fly to great altitudes. In more advanced models, they are equipped with either automatic weaponry or explosive missiles. In some cases, both. While not equipped for combat, miniature versions exist for a quick getaway. And while not a supreme military war machine, the advanced aero-copter can sustain relatively heavy damage while dishing out lethal attacks. A flaw of the missiles is that they are oddly somewhat “slow” from long distances, giving a ranged character a small window of time to try to stop them from afar. Of course, too much damage at once risks it blowing out a major component or two, crashing or exploding in air.
Mechani-Mover. Or Mover for short, these are the cars of the Blackmoor universe. Ranging from bulky and industrial to sleek and cutting edge, these technologies hardly caught on outside of the elite and the influential. This is in part from effective public transport long since eliminating the need for pushing these creations to a mass market. Popular models for the military resemble heavily plated trucks, resembling the very suits of armor worn by Blackmoorian soldiers and higher ranking knights. Some are given motifs of animals, such as horses.
Eque-ndroid. Or known to some as the Horse-Bot. Blackmoor can never remove itself from its roots. As such, horse-like androids were created to simulate the great age of equestrianism. While horses still exist in Blackmoor, they are quite rare and considered national treasures.
Energy Blade. The evolution of the mighty sword. A small road unleashes a powerful laser-like light that allows the duelist to cut through surfaces far easier than with steel. However, it also cauterizes wounds on contact, due to the intense heat it emits. The limits are pushed with such weapons, as axes, polearms and even blunt weapons have been replicated through energy weapon technology.
Blast Gun. The staple laser and plasma gun lines. As smokepowder was being phased out, a deadlier weapon was born. Capable of shooting beams of magical light at the push of a trigger, they quickly replaced more traditional firearms. Deadly blasts shot holes into victims at a greater ease than the lead pellets and caps that were widely used beforehand.
Timer Mine. A timed explosive that deals enough damage to create a short but effective blast. It is the equivalent of a standard explosive device, but has the added benefit of latching to almost any surface before exploding.
Blam Bomb. Fragmentation Grenades, creating a 5ft. burst explosion from its point of attack.
Detonator Mine. Similar to the timer mine, but much deadlier and more effective. Its timer is set off by a device with a button on top.
Data Scrambler. A metallic spider-like trinket that hooks onto a port used for data devices. The construct proceeds to sample information and rapidly corrupt it, turning it into a garbled and ruined mess.
Monster/NPC Description.
Blackmoorian Knight. The proud soldiers in service to the great regime of Returned Blackmoor. Despite the nobility collapsing in favor of the new government, they remain loyal. Well trained, they're ready for almost any situation. Their gear is reminiscent of the knights of old (see illustration by Toni Roads, Threshold Issue 20), fortified and enhanced through heavily developed techno-magic. While much of their arsenal favors ranged firearms of various varieties, ranged and melee inspired by classical weapons remain just as popular. Swords, axes, clubs, staves, pikes, polearms and more have been reinvented thanks to high-technology against a society that still favors heavier armor.
Patroller. Weaker with less
impressive equipment. They'll have some standard issue arms and
armory that's a step above civilian grade. Their main purpose is to
act as security for the grounds, ensuring the perimeter stays
safe.
Soldiers. A true knight of Blackmoor. Harkening
back to the days of old, the soldier class are the equivalent of the
land's stalwart warriors in service to Blackmoor. The soldiers are
not only trained through both classical and modern tactics, their
ascension to their current rank is a mix of classical caste system
meets modern military training.
The Exe-Corps. Special Operatives in service to tackle exceptionally dangerous scenarios, such as this one. They are distinguished by darker armor, intimidating face plates and better weaponry on the average. Their tactics are relentless and ruthless, as per better training than the standard knights. Beyond improved stats and improved equipment, these soldiers are statically similar to the knights. However, they should be played smarter than the knights.
Rogues' Gallery. Ragtag spies, anarchists, terrorists, criminals, outsiders and more. Many are just desperate people doing anything to revolt against the regime, while others are far more extreme. While they're familiar with their own groups that traveled to the dam, they're overtly hostile towards anyone else. Some want to cause destruction, while others want to expose a dark conspiracy. They often rely on stealth. Barring that, the cells have done all they can to research the dam and harness that information for acts of guerrilla warfare. However, the pushback from the knights, as well as discovering mind shattering secrets below, has left many on edge and they are unlikely to trust anyone outside of their cells.
Mutants. All manner of unsightly and corrupted abominations. Originally, these were created by accident. The purpose of the experiments below the dam was to create super-soldiers using a strange new material found in a cave underground. The experiments went wrong, but they were secretly continued as bio-weapons none the less.
Zombies. Lowly mutants made from the corpses of subjects killed by the evil ore. They shamble slowly, but try to rush the party.
Hybrid Creature. Part humanoid, part something else. Despite its malformed features, it's quite durable, even against fire. It uses the tactics of the zombie, without bad speed and bad fortitude.
Ultra Mutant. Large and menacing. Its features are inflamed and muscular, but it is aggressive and stupid. This titanic creature is extremely deadly, capable of taking out multiple targets before any hope of dropping. This was the closest success to the desired super-soldier result.
1Serpentines were ancient enemies of Blackmoor, created by James Mishler in his Age of Blackmoor article in the Vaults of Pandius http://pandius.com/ageblack.html
2The Oard are a time-traveling cybernetic enemy relevant to the Returned Blackmoor backstory: http://www.pandius.com/retblkmr.html