Thoughts on a fast-paced BECMI campaign
by Anarion_ElendiliSo I think my original idea of going from 1st to 36th level is indeed overly ambitious. In particular, when I am looking at the higher end modules, I am not sure that I would enjoy that level of play, neither as a player or as a GM. But I can leave it open ended for now.
Here is my quick campaign check-list so far... Obviously, from here on out, There Be Spoilers:
1st level: Castle Caldwell -> Burned down fortified country manor of Mallek the Medium, half a day's travel from Specularum on the seashore.
+ Ties to Skarda's Mirror (with some minor adjustments in the backstory of that module)
+ Ties to the whole Elwyn & Hobgoblins plot (by making the cleric to be Elwyn herself if possible; I trust that the PCs won't try to murder her straight away, but if that happens, I can always claim that it was just an apprentice, and use the unholy symbol to link them)
+ Ties to the Veiled Society:
++ The employer is not Clifton Caldwell, but Fortunato Vorloi, a well-to-do merchant, hoping to renovate the place since the view is rather gorgeous
++ The PCs also get to meet their employer's lovely young daughter, Lucia, and witness her altercation with that brute, Stephanos Torenescu
+ Ties to the Iron Ring (and thus DDA3 and B10):
++ The cellar is being used as an Iron Ring safehouse; indeed, the 'traders' in the ruins are likely part of the Iron Ring. Also, I might shift the two mages into more Iron Ring thugs, and I am definitely going to reuse some familiar faces later in DDA3 and B10...
++ Introduce Alexei Schelepin (DDA3) and via him, Yolanda of Luln, who is running an anti-Black Hawk Barony operation, funded out of Specularum but primarily based in Luln.
++ Makes the Iron Ring a suspect in the murder in the Veiled Society
2nd level: Veiled Society
+ Might as well work it while it is hot.
+ Less work for me to convert.
+ The collapse of the Veiled Society actually makes The Iron Ring stronger.
2nd level: Eye of Traldar OR The Great Escape (i.e. Yolanda Has Been Kidnapped)
+ I keep vacillating between using DDA 3 and The Great Escape as the basis of this mission... I can make arguments for either, and I'd spare the other to use for the PCs to unmask the Iron Ring later on. My feeling is that DDA 3's strong connection to the Black Eagle Barony would make it a nice cap on the Karameikos portion of the campaign, so I am currently thinking of adapting The Great Escape into The Great Rescue.
+ If using DDA 3, rather than a magical MacGuffin, it is the famous singer, Yolanda, who has been kidnapped (possibly using the riots during the Veiled Society as a distraction) and in need for rescue. Alexei grabs the PCs for a rescue party at Specularum, and then it is off to the races. Most of the module should play out more or less as written, although since I wish to preserve the Iron Ring as baddies, they have a bit better operational security than in the module rather than gifting all their network to the PCs to expose. That can wait until after B10.
+ If using The Great Escape, the setup is quite similar as before, but rather than Fort Doom, the PCs track the kidnappers to a small fort in the foothills between Fort Doom and Luln. Maybe even needing to stop at Luln and get familiar with the NPCs who show up in DDA 3 later, to make events in that module strike harder. I am now more into this idea.
+ Possible consequences:
++ Yolanda has been unmasked as anti-Iron Ring, at the very least, so she needs to vanish. Maybe ask the PCs to escort her to Darokin and thus leading to the Caravan Ambush and the next part of the story.
++ The help gained from the operatives in Luln may have unmasked them, too, hence the issues during DDA 3.
So it has been 10 months or so, and I figured it is probably time to look back at what has happened. Spoilers ahoy, of course.
The Party:
Sasha: Traladaran Cleric of the Traladaran Trio (Halav, Petra (especially) and Xirchev)
Manuel: Thyatian Fighter whose family is temporarily embarrassed
Garibald: Thyatian Fighter from the gutter of Fort Doom
Hyatt: Halfling... Scout ("I am not a thief! That is racial profiling, that is!")
Sanjiv: A traveling yogi (mage) from Sindh
Specularum
(B9, GAZ1, B6; foreshadowing X4-5, X10) (PCs start at level 1, go up to level 2 after Caldwell, level 3 after B6.)
I mixed together B9 Caldwell's Castle with GAZ1 Davinos' Complaint that I merged with B6 (the riots were about Davinos' murder). Instead of Caldwell, I used Fortunato Vorloi that allowed me to introduce his daughter, the young and beautiful Lucia Vorloi, as well as her boorish would-be-suitor Stefanos Torenescu. I also introduced the PCs to Yolanda as well as some of the ducal elite, including the Duke's daughter, Adriana. I switched out the main bad guys in B6, making it the local Iron Ring cell, hoping to blackmail Fortunato Vorloi into keeping out of the castle that they had been using as a base, but fumbling it. The riot was all the Veiled Society, though, and we came very close to a TPK at the ambush in the Nest. A rescued elven NPC lost her life in that fight, but you know, never waste a good death...
Quotes/situations:
1.) One of my favorite things was when the PCs' found Lucia's body, and one player (Sasha's, the cleric's) commented unprompted: "Someone will die for this." So obviously I had managed to make the players attached to the bubbly, sweet girl in the couple of scenes that they had with her. (Don't worry, the Vorlois paid for her Raise Dead, since the PCs found her body so quickly.)
2.) Entering the office of the War minister Admiral Hyraxos , Hyatt: "Is there anything to steal?" (The player clarified that it was the player saying it, not Hyatt.)
3.) Another funny moment was when the main bad guy, the merchant/mage Turano, was tackled by the elven captain of the Elvenguard and his bag of gold coin spilled onto the street... Hyatt started picking the coins up and put them into his pocket, only to hear a soft elven voice behind him going: "One... Two...". He objected: "What?! I am only picking them up as evidence!" The elf gave a cheerful smile: "I know, I am just helping you to count!"
4.) The hooded figure looks at Garibald's two-handed sword. "Are you COMPENSATING for something?"
Garibald: "Yes! :D"
Mistamere
(Adapting Ned Leeds' In Search of Mystara Jumpstart that was posted on this forum...) (PCs at level 3.)
The PCs got hired to take the elven body to her people in Rifllian, as part of a caravan, which also took them out of Specularum so that they wouldn't have to dodge the Veiled Society assassins. They meet Retameron and Halia of Verge (link to X10), and they find out that there is a hobgoblin-filled old fortified manor out in the Dymrak Forest (I changed the location of Mistamere). The PCs decided that they'd do that after delivering the body, which they did and picked up an escort mission in a month's time (link to B7, more about that later). Well, the PCs start well, taking out the guards outside, but then it starts going wrong, as an alarm is raised and the PCs get overwhelmed when they give the hobgoblins (and goblins) time to get ready and concentrate their forces against the invading humans. Luckily for the PCs, the hobgoblins are in cahoots with the Iron Ring, and figure a bunch of healthy human adventurers would bring a pretty penny... Thanks to some judicious lockpicking, the PCs manage to escape, but when they come back with reinforcements, the hobgoblins have already left.
Quotes/situations:
1.) "Healing Garibald, roll 1d6+1, 1st heal roll 2, 2nd heal roll 2, 3rd heal roll 2, WTF." (The player of Garibald is famous for his bad dice luck.)
On the Road to Selenica
(homebrew + B11 and half of B12) (PCs go up to level 4 after these.)
The PCs pick up their escort mission, an elven 'youth' (not yet 100 years old) Hassandriel on his way to his betrothed, an elf named Rahasia, living north of Selenica in a secluded valley. In Penhaligon, they are offered a chance to make some money, only to be betrayed by the Butler (first half of B12). They continue onwards, and at Stellanford, their 'package' gets kidnapped by orcs (B11, adjusted)! Having learned from their mistake at Mistamere, they go in quiet, quick and hard, taking down the celebrating or the sleeping orcs. By the time the alarm is raised, only the leader and his bodyguards are left, and the magical might of the heroes is overpowering. The evil cleric is one of the men seen in Skarda's Manor (B9 Caldwell's Castle) earlier, but unfortunately he drinks poison before he can be interrogated. He is wearing a Hulean holy symbol, though. Oh, and the Butler's half-eaten body is found as well, in addition to some of the stuff stolen from Penhaligon. Clearly, there is a plot going on. The interrogation of the surviving orcs also hints that there is a larger goblinoid army being gathered in the mountains, reinforced recently by a group of hobgoblins and zombies led by a hobgoblin priestess, who sounded very familiar... (link to B2). The PCs noped out of that mission, when the castellan of the Duke's Road Keep asked if they could go and take a look at the nearby caves (B2), explaining that they had an escort mission to finish first.
Quotes/situations:
1.) "Combat starts, the enemy strikes. Garibald takes a critical from a rat...." "And he tries to jump over a pit. Crit fail." (Garibald's player wasn't even present so his char was NPC'd, and still the luck was atrocious!)
2.) Sasha [the cleric] managed to get himself involved with Milena, one of the rescued slaves from the Iron Ring. As Sasha gets ready to go rescue Hassan from a horde of orcs...
GM: "Milena has tears in her eyes as she embraces Sasha tightly and whispers fiercely: "If you don't come back, I will kill you." "
The player of Sasha: "Having Milena exist is SO going to bite me in the ass later X|"
GM: "She was just someone for you guys to rescue. I didn't make her Sasha's girlfriend, you did. :P"
The player: "Just.. dont kill her just to see how far Im willing to take Sasha."
(I do like it when the players get attached to the NPCs. :))
3.) Sasha is offered a bowl of porridge by the cowering orc females and pups and a stripped young orc female. He accepts the bowl but gives it to the young female.
GM: "Congratulations to the newly wed!"
But what will Milena say?! Fortunately, Sasha was able to hand his 'bride' off to a surviving orc who was apparently her sweetheart, the two leaving the cave hand in hand.
Sasha: "Well ain't that cute?"
4.) A rescued halfling, Harriet, joins the group. Sasha's high hopes are dashed, as Harriet turns out to be as shifty as Hyatt is, just a bit better at hiding it. Oh well, it confirms his opinions that all halflings are thieves and liars...
Selenica and Sewers
(homebrew, links to B12)
The PCs finally reach Selenica, where Milena recognizes a slaver who escaped the PCs back in the Skarda's Manor. They find out that at least some of the Penhaligon loot is being used to buy/bribe mercenaries, and that there is an Iron Ring cell operating here, in cahoots with some gang in the sewers. There is a night-time attack on Hassan and Harriet, who share a room, with the culprits managing to escape thanks to starting a fire. The PCs set up a meeting with the Iron Ring in a pub for the next day, but instead they are attacked by very smelly people, who soon afterwards turn into giant rats! They manage to win (barely, thanks to the light armor the PCs wore in the city, and the relative lack of silver or magical weaponry) and interrogate the leader of the wererats, before trying to bribe him to kill the slaver, setting up another meeting once they are back from their escort mission.
Quotes/situations:
1.) Manuel tries to shadow the mercenaries, only to round a corner and sees them waiting for him. "Uh... hi. Did you know that sword is stolen?"
GM: "Roll initiative."
2.) "A bastard throws an oil lamp at Hassan, The hit is a critical and the GM throws max 8 damage (d8) back to back. 16pts damage!" (Hassan almost becomes a crispy elf.)
3.) Hyatt: "What if I turn into a wererat?"
Sasha, muttering: "How could we tell the difference?"
Rahasia (B7)
As the PCs are finally getting close to delivering Hassan to his bride, they instead find the bride running into their camp, asking for help. Followed by a bunch of other elves who turn out to be hostile. (A bit more kinetic introduction to Rahasia and the Siswa.) Naturally, they offered to help. They did manage to deal with most of the SIswa, but they had to retire to rest and then do it again. Harriet got Charmed, separated from the group, and spilled the beans to her 'new friends'; the charm was broken, fortunately. After a hard fight, they defeated the Rahib, but this was not enough to break the spell on the Siswa. They did find out that the Rahib was apparently doing some ground work for an invasion from Hule! (Link to X4-5, X10, and everything else going on with those Hulean clerics.)
(They are currently exploring the Tower, as we are still in the middle of playing this.)
Quotes/situations:
1.) GM: "There is ALMOST no chance to kill him with one punch". Talking about the fragility of elves.
2.) Sasha gets hit twice by Garibald: once with a two-handed sword, once with a spear. Owie. (We have our own fumble rules.)
3.) Players got a bit of a nasty surprise as the Siswa Teachers had Weapon Mastery in Spear and were also using spells... (So yes, I boosted up the opponents a bit since the PCs were already on the 4th level, the cleric might already be on the 5th.)
4.) Hyatt: "I can't believe I am the voice of reason arguing for the use of less-lethal weapons while you guys are sounding really eager to kill!" (Clubs and other crushing weapons, which don't cause bleeding in our house-rules, and also have a slightly lower base damage, making insta-kill less likely.)
5.) Garibald rolls max damage with the spear-as-quarterstaff, cracking one Siswa's skull: "Oops." (But not impossible, as evidence shows.)
6.) Baik Telor, The Hawk of the Desert (char portrait Ardeth Bey from The Mummy), sees the dead Siswa. "Who did this?" Garibald lifts a hand. Baik Telor grins and swats him on the back: "Well done!" (Baik does not like the Siswa and the Rahib even less, as they attacked him during a parley.)
7.) Harriet confesses that she had told the baddies EVERYTHING, including that Rahasia is back in the village. (So is Milena, for that matter.)
Sasha's player: "........heck .... They wouldn't.... Well. Yes. They would. ****!" (Indeed, they would and they did.)
8.) The Rahib almost took down the party with a couple of well placed Hold Persons. But he made a mistake by stepping out of his hidden passage too early: he got backstabbed by Harriet and then piled on by Hyatt and Alki (elf NPC), and he went down like a sack of potatoes.
9.) While waiting for the rest of the party to unfreeze, Hyatt and Harriet and Alki wait. There is a knock on the door, followed by some elven voices letting Rahib know that they have his lunch. "Maybe he is asleep?" one elf says to the other, and they leave the tray behind. The two halflings act quickly, taking the tray in and eating the food. Just for deception purposes you know, so that they can put the empty tray back out again so that the elves think that the Rahib is still alive. And a free lunch is a free lunch!
So hopefully none of my players are reading this thread, so I can go for some spoilers about the grand plot, as well as tweaks made to the adventure modules.
One thing the people who have observed my posts is that I can't leave it well enough alone and I tend to tinker. That is very much the case with many of these adventures. Some tinkering is of course necessary to make them flow better as part of the big plot, but I take it a step further, starting to redraw maps. I spent way too long on the B11 map to make it look like something a river might have carved out of limestone. Did my players care? Perhaps? At least it gave them another interesting thing to note about the cavern, as well as possibly spot where something broke that natural formation. Not even Caldwell Castle escaped my tinkering.
So the grand plot... I am borrowing heavily from Ned Leeds' In Search of Mystara, where he made the Master of Hule the mastermind behind most of the stuff happening, and I decided to go that route myself, in order to have continuity from the start to X4-5 and X10. However, I do differ in some details. In addition, there are other players in there with their own agendas as well, of course. The Master's plan is relatively simple in overview: get local allies and keep Karameikos chaotic and distracted, while he attacks and mops up Darokin. Now the devil is in the details, and as everyone knows, overly complicated, Byzantine plans are rather easy to derail by a bunch of random adventurers. :P
In a nutshell, the Master, via his agents both from Hule and locals, is stirring up the humanoid population of Karameikos to step up their raids and attacks. This is mainly a sideshow, giving the humanoids something to do and the Iron Ring some merchandise. The big idea is to basically ambush Lady Arteris Penhaligon, kill her, and replace her with Illyana Penhaligon (B12), who would then 'drive the humanoids back', and possibly even recover the Bell of Petra (B9, Bell of Namyats), which was stolen by a renegade priestess named Elwyn (B9) and her acolytes. Elwyn had been corrupted by the Master's Immortal patron to switch sides. I am still not sure if I want to use Elwyn and the Bell later, as a impetus for X4-5. At the moment I think so, but not sure. Anyway, the idea is that with Penhaligon (lllyana), the humanoids, the Iron Ring and likely the Black Eagle Barony on his side, the Master can pretty much bottle the Karameikan Army inside Karameikos, or at least make them fight and bleed, delaying them before they can help Darokin. At the same time, his agent, the Rahib (B7) is seeking more allies, both magical and mundane, in order to attack Selenica when the time comes, and thus block that route even better, as well as distract Darokin with the east when they should be looking to the west. While the Veiled Society is not his puppet, the idea of a Traladaran uprising or at least riots and disorder in the capital of Karameikos suits the Master very well, so no doubt he would try to facilitate any such endeavors or create grievances, such as having the Iron Ring step up kidnappings and such to make Stefan look ineffectual or uncaring. The Master is unaware of Skarda's survival, but again, Skarda's plans fall very much in line with the Master's: an attempt to overthrow/capture Stefan is exactly the kind of chaos he wants Karameikos to be in.
Some alterations on the modules:
1. B9
Caldwell Castle became Skarda's Manor, burned down a couple of years back by Retameron and Halia. Thus connecting to that, even as Skarda appeared in the backgrounds of a couple of PCs, their families having been attacked and captured/killed by Skarda. It was bought by Fortunato Vorloi who then hired the PCs to clear it out, not Cliffton Caldwell. This was so that it would connect with B6, too, which worked beautifully as the PCs had a chance to meet and interact with Lucia, as I mentioned.
I redrew the interior map pretty much completely, especially the cellars, and made it into an Iron Ring hideout, used to hide their victims before they could be shipped to Thyatis or the Black Eagle Barony or Sind/Hule.
The PCs happened to arrive when Elwyn with her acolytes were waiting for transport. This was probably the weakest point in my adventure design, as Elwyn was way too understanding and disinclined to attack the PCs when they were already wounded from a fight with the goblins. It made sense that she didn't want to risk fighting a bunch of unknown heroes of unknown prowess, but after they had almost lost to the goblins, she could have tried to wipe them out or at least capture them for enslavement. But I didn't. so...
There was a bunch of the Iron Ring thugs as well, who had been bringing weapons to the goblins, and to organize the escape of Elwyn and her acolytes from Karameikos. The PCs did find the brand new weapons and armor that the goblins were using and storing, which led them to the trail of one Merchant Turano. Ostensibly the things were bought from the weapon smith and the armorer to be shipped to the Fire Shires for the halflings (hence the small size).
2. B6
I was running this with Davinos' Complaint and B9 Caldwell Castle pretty much simultaneously, although things didn't get too heated here until after the PCs had finished with the castle.
Lucia was intended to be kidnapped by the Iron Ring, so that they could blackmail Fortunato Vorloi to back off from Skarda's Manor or even allow his ships to be used for smuggling and slaves. However, she fought back and her neck was broken in the struggle.
I redrew some of the tunnels, so they reached farther out, all the way past the north wall to connect to a warehouse north of Specularum. They had been intended for smuggling (by the Iron Ring), and the connection to the Vorloi house had been a recent addition. The reason they dug through the Widow's basement was that the ground on either side was less suitable, so they had to.
Merchant Turano was in on it, and a Master (of this cell) of the Iron Ring. He was the big bad, not the Veiled Society.
Davinos' death and subsequent non-Raising (due to Alfric Oderbry playing his own power-games) led to the riot, both orchestrated by the Veiled Society, as was the assassination attempt during the escort mission. The Veiled Society was trying to stage the Torenescus as responsible for the uprising (as they had been patrons of Davinos) and planning a revolt against the Duke, which hopefully would have led the Torenescus falling in favor if not executed outright.
After some red herrings and trying to track down Merchant Turano who had apparently escaped from the city when the official attention was being made in his direction, the PCs stumbled on the potential murderer of Lucia Vorloi in a tavern, which led to a chase and the finding of the secret door to another hideout of the Iron Ring. That was a nice, tough climactic fight that almost went against the PCs before it didn't, and the arrival of the Elvenguard (summoned by one of the PCs) wrapped the thing up neatly.
Still, the PCs decided that this was way too big and political for them, so time to leave town, especially as two of them had betrayed the Veiled Society and were probably going to get targeted for assassination if they stuck around.
3. Mistamere (In Search of Mystara)
I moved it to the Dymrak Forest and made it a fortified manor.outpost on a spur of a cliff overlooking a small, misty lake. I also moved Verge to be south of Kelvin, on the road, rather than all the way to Threshold as I wasn't using Threshold as a base.
I redrew the basement map completely and didn't use the manticore. Instead, I gave Muti a pair of direwolves.
As described in a previous post, the PCs fumbled it a bit after a very nice start in eliminating the outer guards silently. However, as they were held prisoner, they did find out that the hobgoblins were working together with the Iron Ring, and that it was a larger, more unified operation rather than totally independent people. Also, a lot of the hobgoblin weaponry was also fresh from Specularum, hinting that Turano had been involved with that end, too.
They did manage to escape, of course, but rather than risk a new fight with low HP, even with a surprise on their side, they opted to escape. By the time they came back over a week later, with new equipment and allies, the hobgoblins had left, the trail leading northwest. The PCs opted not to follow.
4. B12 (start)
I decided to run the start of B12 first, since the PKs arrived to Penhaligon. I had decided that the Butler was going to be a baddie, having been bribed/corrupted by the Master's agents. While his master's adopted son was not at home, the Butler sought to hire some adventurers to raid Kavorquian's dungeon for the treasure: mainly a suit of magical plate mail and a two-handed sword, both with Penhaligon crests and kept there for safe keeping. These items would help to legitimize Illyana in the eyes of the people, once Arteris would be dead. Now, on the face of it, the Butler's spiel was pretty much as it was in the book, but one player instantly smelled a rat. Which I thought was pretty funny. He was right to be suspicious, of course, but the other players/PCs wanted to accept the mission so he went along with it.
Oh, there was no other 'evil party', since the PCs were the ones who had been hired to do the stealing! It would have made no sense whatsoever for the Butler to let another bunch of adventurers in, and it would have been a bit immersion breaking for me for these adventurers to be found there since presumably that hatch was still within the guarded manor house, not in some abandoned ruin somewhere. Same thing with the thieves: given how trapped and dangerous I made the place sound, it didn't make sense for a pair of thieves to be running around freely, although it would have made more sense than the heavily-armed party of non-thieves. That being said, they were a complication I didn't think I wanted to have, so I didn't.
The Butler did pull a double-cross at the end, poisoning their food and drink so that he could escape with all the loot and reward money that he had promised to the PCs. While telling the guards that he was taking them to the Penhaligon castle for safe-keeping. A PC woke up (having resisted the poison) and tried to wake up the rest (managing a couple who had either not eaten/drank or succeeded in their saving throws). However, with a couple of PCs and NPCs still fast asleep, they didn't chase after the Butler until in the morning. They themselves were caught by Lady Arteris Penhaligon and her entourage later in the day, as the guards started worrying what was keeping the Butler and alerted the castle about what had happened. The PCs were able to convince her of their innocence.
5. B11
Rather than having the orcs kidnap some random NPC, they instead managed to kidnap Hassan, the elf that the PCs had been hired to escort to his wedding in an elven village north of Selenica (B7). So, the PCs kinda had to go and save the guy.
The orc lair had been known about by the villagers, but the orcs didn't do these kinds of raids. Something had happened. The PCs found out that there was an extra group of orcs that had arrived from the north (B2, Caves of Chaos), and that they were supposed to have waited until given the orders to start raiding. But the orcs got bored and attacked the village too soon.
The PCs almost captured the evil cleric who was none other than one of Elwyn's followers from their first adventure. They also captured a half-finished letter that hinted at the larger plan against Penhaligon and the cooperation between the humanoids.
Interrogating their orc captives, they found out that things were not all great in the Caves of Chaos, as some hobgoblin priestess with wolves and a large bunch of zombies (the goblins and the hobgoblins the PCs had killed at Mistamere) had arrived and was making a powerplay against the orcs and bugbears in the caves. The bugbear in the orc lair had come to see about getting some help or get the evil cleric to intervene. I intended to use the hobgoblin priestess, Muti, instead of the temple of evil chaos in B2, and to give the PCs a chance of some sweet revenge. Alas, the PCs opted not to follow this route, so instead of potentially having allies against Muti and her zombie hordes, they will face a consolidated humanoid and undead horde if they go there later... They did warn the Duke's Road Keep (standing in for the Keep in B2) and Penhaligon about it, though.
They also found the Butler's body, half-eaten by ghouls, and some of the stolen Penhaligon loot (some with the orc chief, some with the cleric). The majority, though, had been picked up by someone else, the orcs could reveal. The stolen items were left at the castellan of the DRK to return to Penhaligon.
5. Homebrew Selenica
This was mainly just to do some more setup on what is going on, the Iron Ring acting as lackeys for the Hulean scheme, and hiring mercenaries (the ones met in B12 latter half) for Illyana, as well as to wrap up a loose thread from B9, one of the slaver mini-bosses who managed to escape in B9. However, the PCs noped out of there when the going got tough, so that opportunity was lost. Oh well, maybe they will do it on the way back home.
Also, an example of prep going to 'waste', as the PCs didn't do the night-time raid on the tavern the slavers were staying, nor followed them into the sewers. But maybe I will be able to recycle this when the PCs are heading back.
6. B7
As mentioned, my 'trick' of getting the PCs here was that Hassan was from Rifllian and the PCs had been hired by his father to escort him and the wedding gift to his bride, Rahasia. So obviously they had more of a buy-in when stuff started to happen. I had Rahasia being chased by the Siswa into the PCs' camp, which was a few hours away from the village at that point, which made for a more fun and energetic introduction.
I did have to rewrite some of the history of Elyas and his tower and his relationship with the elves, given that canonically the Elves had been in Alfheim & surroundings only for about 2000 years, or roughly two-three elven lifespans. Instead, the elves found Elyas and his tower already there, and they became his guests rather than vice versa. While I have not confirmed it, I am seriously thinking of making Elyas a mage from the dawn of Blackmoor, so if I ever run DA series, the PCs can run into him. And he just managed to sidestep the destruction of Blackmoor by time-travel / dimensional hopping or something.
One problem I almost instantly ran into was the players/PCs asking why the elves of the village wouldn't help in defeating the Siswa? My quick response was that the SIswa were their children and/or siblings, so the Siswa were simultaneously their opponents as well as hostages for their good behavior. However, given that the PCs were outsiders with no connection to the village (as far as the SIswa and the Rahib knew), they could fight the Siswa without worries; just don't kill them, please. Alki was from another clan (a militaristic one in Alfheim) so he was free to go in and try to rescue his betrothed. As I already had Hassan in the party, I put Alki in his place in the cells.
As for the random bandits and Baik Telor, I decided that they were from Ylaruam, basically a bandit chief and his bodyguards. I had their horses stabled in the courtyard (alas, Sasha's player made a mistake in assuming that the six horses belonged to the six hostile mercenaries they had met in Selenica, and this then poisoned some of his interaction with the bandits). In short, the Rahib had summoned Baik Telor to talk about an alliance, gathering his tribe of cutthroats and bringing them over when the time came. However, while Baik Telor is an outlaw, he is a faithful son of the Faith of Al-Kalim, so when the Rahib started espousing the faith of Hule, he declined. He was then attacked by the Rahib and the Siswa, and dragged to the cells, while his entourage was playing hide and seek in the temple with all the teleporters. In any case, once he was freed by the PCs, he did fill them in about this, which added another puzzle piece to the grand plot, as now there was talk of an actual invasion from the west, too. I did remove the bandits from the Tower itself, as it beggared belief how they could have gotten there. I also removed the captive mage as unnecessary and again, why lock him up there?
The Rahib himself was a Hulean priest, as was probably already clear, and having heard stories of the elves and the Temple, he came wanting to learn more. Having found access to the Tower, he managed to charm the Siswa with the help of the witches and some conjunction boosting their powers to do this kind of mass charm, even while the witches were still trapped. They have not had time to go through the Rahib's correspondence and notes, as they are in Hulean. They do have a Sindhian yogi with them, who might be able to read it...
Crypt: Given the description of the story of Elyas and his fight with the Witches, it seems... improbable that he would have had time to get a themed crypt built for the three witches between defeating them and the mountain falling on him. So instead I made it two sarcophagi: one for Elyas himself (empty, unsealed) and another sealed one for his lady love from millenia ago, buried with her treasure and an illusion keeping her looking like she did in life. The PCs opted not to unseal the sarcophagus, at least not now, which was probably smart, as I had upgraded her from a mere skeleton into a mummy warrior.
I did go a bit overboard with the talking quill, as I had not realized.remembered that it would only answer yes/no. Instead, it was a talkative medieval Clippy. Fortunately, the PCs ran out of answers soon enough, and since they are unlikely to have a pure-hearted elven maiden amongst them when they come back (the PCs themselves tend to be a bit more scuffed around the edges; Neutral and Chaotic types), they are unlikely to be able to get more answers from the Quill. Still, all in all, they got some usable intel out of the encounter, and it was fun enough, so all good. :)
As I mentioned in the previous post, I did up the power level of the Siswa a bit, mainly the Siswa Guards, whom I made into Siswa Teachers. I recast the Siswa from a purely philosophical one into more of a finishing school, where the young male elves would learn to fight (mainly spear and short bow, their hunting weapons) and cast spells. I also upped the threat by making the Siswa capable of casting spells despite being charmed. Now of course they might have already spent their spells and they had a very limited repertoire, but it still amped up the threat nicely.
I also made the Rahib and the Siswa a bit more proactive, making them react to the threats and such, raising alarms, etc. After they successfully Charmed one of the PCs and asked her some questions, they found out that Rahasia was back in the village (as well as everything about the PCs themselves). So they opted to fort up while sending most of the Siswa to go and grab Rahasia. This made it easier for the PCs to break through the remaining SIswa (having found the secret door that the Siswa didn't expect) and then roll up the Rahib himself with his panthers, although he made them sweat.
We are still in the middle of this adventure. The PCs got as far as the Crypts, having searched the western side of the tower, and found Miryala (one of the kidnapped elven maidens). Now the PCs are thinking of going back to take care of the rest of the Siswa, expecting that they may have captured both Rahasia and the girlfriend of Sasha, MIlena, who was also at the village waiting for their return. This would also let them bring Alki and Miryana out to safety as well as get some rest and healing. After that, the PCs could come back to deal with the rest of the baddies, this mysterious greater evil in underneath... I admit, I am SO tempted to make Milena the host of one of the witches... :P I think I shall!
So some future plans...
Obviously, finish B7.
Chances are that the PCs will head back to Selenica (run the homebrew for them there), and then continue to Karameikos (beefed up B2 & B5, and B12 latter half?). This probably spoils the whole Penhaligon plot for the Master, as well as exposes it. This likely will bring them running south, so they likely won't have time for B10, which is a bit too small potatoes for them at this stage, although I could maybe use Elwyn and the Bell to lure them to this storyline at some point: they are chasing after Elwyn, who is chasing after the Valley. It is a very nice adventure as I have said elsewhere, but I fear the PCs are starting to be too high a level to run the adventure as is, and as I said, it might be a bit too hard to fit to this storyline at this stage. I'll have to see how the players feel about it, if they get lured by the idea of Elwyn running around with the Bell looking for some artefacts, or if they choose to ignore her.
Originally, I was going to run X12 next. But now I am tempted to have Stefan send them on a quest to Hule to find out what is actually going on, so X4 and X5, with possibly a beefed up B4 as a side quest. And then run X12 when they return, and then have both the levels, the treasure, and the time to devote to building their domains, including Stefan's gratitude and willingness to grant those domains. Suitable locations abound, obviously, but Skarda's Manor would be a potential one, as would the abandoned Mistamere, or even the Lost Valley itself. If the players feel like continuing, great, time for X10 action, which is a mini-campaign all by itself. If they do not, then X12 and the rescue of their family members from Skarda will make for a nice campaign ender, too, with the war plans from Hule and the Master's death (since if we are ending the campaign, he can just stay dead or at least not come back a while) ending that threat.
Yep, I think that is the plan.
As for advancement:
I am bumping everyone up a level after Rahasia, so they will be on 5th level (the Cleric might be on the 6th).
The homebrew is rather short, one session thing, so I don't think I will be increasing levels there.
B2 will definitely push the rest to level 6th at the very least.
B5 + B12 will get them to 7th, I am thinking.
If they do B10, I can see them going to 8th.
In any case, at least 7th level across the board, I think they are ready for X4 and possibly go up a level during, or after X5 at the latest.
If they go to B4 and defeat Zargos, up another level.
And finally X12, and probably another level just to cap things off.
So they'd end up somewhere in the region of 10th to 12th level at the end of the campaign, if we stop there.
So, just to report how this thing is going...
We finished Rahasia, and then the PCs started on their way back to Karameikos. They had a scuffle with the traitorous wererats at Selenica, but didn't get involved more than that, instead getting hired as caravan guards to Kelvin. There was some dragon and hobgoblin trouble along the way, and at Duke's Road Keep they refused the call to adventure again (whether B2 or B5), claiming their need to stick with the caravan. Finally, with Penhaligon and Kelvin armies getting ready to counter the humanoid threat, the PCs decided that army life was not for them, and instead they took a mission from a mage to go and recover this tapestry from a lost city of Tuma (B8, heavily altered and tied to B10), in the mountains of western Karameikos.
If people are interested in the rewrite of B8, I can try to clean up my notes and maps and post them. I did already talk about that in another thread.
Anyway, once they got enough of the undead infested ruins, they headed back to Luln. There they met with some old friends with news that Yolanda of Luln had been kidnapped by the Iron Ring and taken to Fort Doom! Assassin attack later, they started planning for an infiltration and a rescue of Yolanda. This is a rewritten DDA3 Eye of Traldar, and again, I can share my notes and maps, if people are interested?
One thing is that the PCs are already on 6th level, so I need to beef up the Basic modules quite a bit.
As for the future, well, it depends whether the PCs will follow the breadcrumbs to the Lost Valley of Hutaaka, which I would alter significantly since they already dealt with one hidden valley full of undead. More like Tarzan and the Lost Empire, with two cities fighting one another. Although I might make it even more Homeric by having various Traldar sub-kings under a high king. In any case, forget about the stunted, degenerate Traldar from B10, these will be bronze-clad Homeric heroes with egos to match.
The other route would tie them more into the politics and the big plot thus far, as Lady Penhaligon has fallen in battle, her army saved from destruction by the fortuitous arrival of her bastard sister, Ilyana, at the head of a mercenary army. She has also slain the dragon attacking the caravans, so by acclamation, she is the new Lady Penhaligon. Of course, the PCs, having more personal experience with the said dragon, would notice that it is smaller than the one attacking them, and there are other things that don't quite mesh... Assuming they dig into it, this will definitely tie to B12, but potentially also B2 and B5, depending which way they start pulling the thread.
The third option is that they say F it, and take a ship out from Specularum, which would then see them arriving to X1, the Isle of Dread, followed by a rewrite of the Quagmire.
So, a bit more detailed, but keeping in mind that these were more like my own notes rather than anything I expected to publish.
Also, a big point to make here is that my players' characters were already on the 5th level when they came to this adventure, so I boosted the number or the efficacy of the opponents/monsters somewhat. If the characters are of lower level, I would recommend adjusting downwards again.
Background of Tuma
Tuma was a Hutaakan-ruled city tucked into a secluded mountain valley, inhabited mostly by the ancient Traldar. As they were located in the far western flank of the Hutaakan civilization, and also considered themselves to be relatively remote from any threat, the local Hutaakan priesthood opted not to risk fleeing all the way to the Lost Valley when the call came around 1000 BC. Instead, they stayed put.
Alas, the invading beastmen/gnolls did follow the roads all the way to Tuma, and stormed the unwalled city, slaughtering its inhabitants. However, the senior priest opted to turn to Thanatos for help, pledging himself to the Immortal's service in return for help against the gnolls. Help came in the guise of turning the senior priest into a mummy and the assistant priests into wraiths, before everyone in the valley who was already dead or would die during the rest of the day and night rose as an undead zombie. The undead killed the invading gnolls, thus adding them to the undead guardians of the city.
Background of Arkayz AKA Golthar and his involvement
Golthar is the Iron Ring baddie from B10, a mage of considerable level (for that adventure) and an obsession with finding more about the Hutaakan civilization/treasure. The background in B10 is a bit weak, but I don't feel like rewriting all of it. I believe that there is another thread here on B10 where we have talked about on how I would tweak it within that storyline. Of course, here it will be even more different.
In short, one way or another Golthar got wind of this Lost City of Tuma. There are some ruins, etc, and given the Black Eagle Barony's connection with Bugbears (that I have placed nearby) and to the Iron Ring, maybe it is something from there. In any case, he put together an expedition of about dozen or so Iron Ring flunkies and a priest just in case (alas lost along the way), and headed over to explore. They got all the way to the interior of the Temple, the sanctum sanctorum, where Golthar beheld the tapestry. However, before they could take it and leave, the higher level undead activated, the wraith priests swarming over the low level flunkies and draining them. Golthar, always more conscious of his own safety than fighting to the last used his flight spell to escape quickly.
So, Golthar knows where Tuma is and the tapestry, but he can't take another few months to his personal project, especially given the risk. So he is spending money to hire the adventurers (via his Darokinian go-between, Jenlar Temlin) to do it for him. In our campaign, he was paying 200 gp (in normal BECMI units, we use silver-based coinage in our campaign, doesn't matter here) per PC for expenses, and then a bonus depending on what they returned with: Tapestry was the main thing, 300 gp / person. Other items and artifacts as well as notes and maps, additional up to 200 gp / person, depending on the value of the items. Full clear of the city was another 100 gp / person. Any coin and bullion was fully for the PCs to keep, but items of any sort were to be his. Obviously, the PCs could try to negotiate a more agreeable split, like 50/50, although Golthar would insist on a) getting his expenses first, and b) getting the first pick, to ensure that he gets what he needs.
TRAVEL (assuming Light Enc, on foot.)
In our campaign, Golthar was in Kelvin when he gave the mission to the PCs. Obviously, this would need some altering in the case of a different location.
Kelvin to Rifflian: About 48 miles but along the road (2 days).
Rifflian to Forest: Go north along the trail (8mi or so), and then cut west across the plains (about 48 mi). About 3.5 days on foot.
Forest to Hills: About 96 miles, 8 days, until you reach higher, treeless hills in the west, with no more forest.
Hills to the River: Then move northwest, until you come to a river. If it is running in a gorge, follow it downriver to a waterfall. A bridge is after the waterfall. If it is running in a gentler valley, follow upriver to the bridge before the waterfall. Cross the bridge. About 48mi, 4 days on foot.
River to the Mountains: Head NNW, towards a wider valley in the mountains. About 64mi, 5.5 days on foot.
Mountains to the Ruins: Follow the pass. About 16 mi but counts as a trail, so less than a day.
Total: About 24 days.
Food: 8 iron rations (56 days) per person = 120 gp, 56 lbs.
Now, if the adventurers get some mules and get their travel encumbrance down to None, then the travel time is about 18 days, a couple of iron rations less per person.
1 mule and three saddlebags (40+15 gp) is needed for every 4 adventurers for their food.
In our game, the PCs got a mule and saddlebags each, 10 weeks of iron rations, and loaded up the mules so that every PC was on No Encumbrance as well. Which did involve taking off some of the heavier armor in some cases.
The trip from Kelvin to Rifflian to Forest was uneventful. While you could add random encounters, I would keep the fighting at a minimum.
FOREST (6 to 8 days; if 8 days, add a couple of nothing days, maybe both ends of the goblins, meeting them on the 3rd and the rain starting on the 4th.)
1st day: Nothing
2nd day, morning/day: Goblin Hunting Trap. (Western Trail Optional Encounters, p. 5.)
2nd day, afternoon: Old Camp. (Northern Trail Optional Encounters, p. 10.)
2nd/3rd day, during the night: S6. SINGING SKULLS goblins (p. 23)
Night theft/raid. If spotted, they retreat.
Make threats and demand payment.
If rebuffed, they will move away but follow the PCs, and try to attack the following night with surprise.
3rd and 4th day: Rain. (Northern Trail Optional Encounters, p. 10.)
5th day, day: Bog. (Northern Trail Optional Encounters, p. 10.)
This detour will take about an hour or circling to the higher ground, no biggie.
Which leads to...
5th day, afternoon: S3. THE TREE SPIDERS (p. 21, reskinned Sand Spiders)
These arboreal, camouflaging spiders are ambush predators, launching themselves from the branches at their victims, surprising on 1-4. Their previous victims are up in the higher boughs of the trees, wrapped in cocoons. Mostly goblins, but there could be something else in there too. (Any treasure would be still in the cocoons with the corpses, not in the belly of the spiders.)
6th day: Nothing
HILLS BEFORE THE BRIDGE (3-4 days; if 4 days, just add a day of nothing at the start)
Choice: Walk in the valleys (more hidden but also limited visibility) or on the ridgeline (you can see far, but also seen from far)?
An Ogre family has made this area their own hunting grounds. This is a rewrite from N1 and N2 encounters in B8, p. 11, but since it has a significantly different setup, I am including my notes in full.
Grandparents: Gargh and Gurgu
Older couple: Gargur and Marmar
- Kids: Gagar and Gugu, little Margu (girl)
Younger couple: Gurragh and Hargu
- Kids: Gurhar (boy)
Hunters: Gargh, Gargur, Gurragh, Hargu, Gagar, Gugu
Home: Gurgu, Marmar, Margu, Gurhar
1st day: N1. Ogre Ambush (p. 11)
If the PCs chose to travel in the valleys, there is an ogre ambush. Well, an attempt of one. A successful Survival or Perception roll would reveal the ambush, as the ambushers keep glancing up from their hiding places. If it is obvious that they have been spotted, the Ogre leader orders an all-out charge (or after a minute or so of pointing). However, as they are a bit scattered in their hiding places, the attack is not simultaneous, but comes in three waves (see below). However, if everyone fails, then the ambush is successful! The Ogres pounce as the caravan is in the middle, possibly achieving surprise. First round is moving, then the second all six hit simultaneously.
PCs - 70m or so - first pair - 140m - other four.
First pair is the couple, male and female (Gurragh and Hargu): AC 5, 21 hp, THAC0 15, DMG 1d8+5. They run for the first round, and arrive to combat on the second.
Second pair is the adolescent ogres, male (Gagar) and female (Gugu): AC 5, 16 hp, THAC0 16, DMG 1d8+3. They are slightly faster, so they run for two rounds and arrive on the third.
The third pair is two big males (Gargur and Gargh), one of them greying (Gargh): AC 5, 25 hp, THAC0 14, DMG 1d8+6. They run for three rounds, arrive on the fourth.
Morale: All Ogres roll Morale when they fall to half HP or half of them fall. While Gurgar is alive, they have Morale 10, but if Gurgar is dead, the Morale is just 8. Gargh hasn't lived this long being stupid, he has Morale 6 to start with and automatically fails Morale if Gurgar is dead.
If the PCs opted for the ridgelines, they can spot a small group (half a dozen) human-shapes following them in the late afternoon, maybe an hour or sunlight left. The PCs can stage an ambush and as long as the mules are moving, the Ogres would walk right into it. If they do not ambush the Ogres, the following night the Ogres try to sneak into the camp. However, lacking infravision, they are making a ruckus, allowing the PCs to hear them and prepare. There is about a minute, enough time to get the breastplates and helmets on (AC equal to chainmail, so two worse than normal for platemail). The attack of the Ogres in the night is again a bit staggered, Gargur, Gurragh and Hargu arriving the first round, and Gargh, Gagar and Gugu the second round.
Gargur has various bling items, pretty mangled to make them fit an ogre and crude as they are mainly ogre-made/modified:
Like tusks of wild boars in a string, a copper kettle that has been hammered flat with a rock and then hung with leather strips as a pectoral plate, that sort of stuff. However, he was also wearing eight silver 'rings' which on closer inspection look like gnomish bracelets. They are not terribly valuable, but it is something, about 25 sp and 0.1 lbs each. (Note: this is based on our campaign's silver-based economy and coin size. In standard BECMI, the weight would be 5 coins and they'd be in gold, so 25 gp each.)
1st or 2nd day? N2. Ogre Camp (p. 11)
Depending where the PCs fought the Ogres, the Ogre Camp can be near or far:
Valley Ambush by the Ogres: About an half an hour away. Easy to track, even if there are no bleeding enemies fleeing.
Ridgeline ambush by the PCs: About 2 hours. Any wounded ogres would make backtracking easy. Otherwise, a Survival+5 roll to get to the ambush site, then automatic.
Night attack: About 4 hours. Probably a huge pain to track timewise, although any wounded ogres would make it easy. Otherwise, a Survival roll to get to the ambush site, then automatic.
2nd day: About a day from the Bridge... Fugitive Bugbears. (Southern Trail Optional Encounters, p. 19.)
As in B8, with some tweaks and additional notes...
If valley, the bugbears just round the corner in a run and skid to a halt. Mutual surprise possible, Quick reactions from the PCs what do they do. If they don't attack straight away, the first bugbear looks hostile/angry/stubborn, but the other one sits down, looking defeated.
If ridgeline, the PCs would see two runners heading towards them, with some figures in pursuit, metal flashing. The two figures try to evade, but the PCs can intercept if they want. See above, but no surprise on either side.
Chances are that the PCs would be able to intimidate them enough to at least talk to them. They would agree to serve the PCs as guides if returned to their own people rather than the gnomes. They know that there are monsters in the river, but not how to get past them.
Within an hour...
Gnomes Patrol. (Southern Trail Optional Encounters, p. 19.)
These 1+9 gnomes are chasing a pair of bugbear prisoners who have been sentenced to hard labor in the mines. No, not slaves, just criminals... If the prisoners are handed over, the gnomes thank the PCs and warn them that across the river, there be more bugbears, so be careful. If the bugbears are not handed over, the gnomes might react poorly, up to the point of attacking the PCs, if they think they can win. Or at least, shoot their crossbows at the bugbears to kill them.
Leader: AC 5/4; HD 3; hp 13; MV 60’ (20’); THAC0 18; D 1d6/1d8; Save D3; ML 8; AL Neutral; XP 50
Others: AC 5; HD 1; hp 5 each; MV 60’ (20’); THAC0 19; D 1d6; Save D1; ML 8; AL Neutral; XP 10 each
The gnomes are armed with spears (leader with sword and shield) and light crossbows, wearing chainmail.
Each gnome would be wearing a similar silver (gold) bracelet as found on the ogre, worth 25sp (gp), except the leader's is particularly fancy for double the value.
At the end of the next day (3rd) the PCs would reach the Bridge.
W6. THE BRIDGE (p. 8-9)
The text in the arch is a very early form of Traldar writing. Even for Traladaran speakers, Religion [Church of Traladara] or Knowledge roll is needed to suss it out, and even then, the translation is somewhat garbled. "Sacrifice" or "Ritual", "Gift", "Water". If the PCs pour a libation (water, ale, wine, etc) into the water before crossing, the water weirds are suppressed for a turn (10 min). If the ritual is not made, two water weirds attack people trying to cross the bridge (not just male humans, anyone), starting from the ones in the front.
HILLS AFTER THE BRIDGE (3.5 - 4.5 days + 1-2 days to divert to the bugbear cavern)
If the PCs have the bugbear prisoners with them, the bugbears would argue going straight for the bugbear cavern (extra 1 day), bringing gifts (loot from the ogres or the gnomes, perhaps). In this case, the 'ambush' below is the guards of the camp. However, if the PCs resist this idea, they will get ambushed/attacked. If they take the ridgeway, they are seen from the distance, and the bugbears would parallel them during the day in hiding, and then attack at night, likely achieving surprise. If they take the valleys, they run into a patrol that ambushes them, as below.
1st day: Nothing
2nd day (or night): W4. THE BUGBEAR AMBUSH (p. 6-7, rewritten to be bugbears)
An ambush by 10 bugbears, 1+3 in the front, 3 on each flank.
If the bugbear fugitives are with the PCs, the ambush leader steps out to discuss and check what is going on, but is ready to trigger the ambush if need be. He would insist that the PCs will come to the bugbear cavern to see the King (taking an extra day back and forth = 2 days extra, unless they were headed for the cavern anyway), and if the PCs behave threateningly, he triggers the ambush.
Leader: AC 5; HD 4+1; hp 24; MV 90’ (30’); THAC0 15; D ld6+1 / 1d8+1; Save F3; ML 9; AL Chaotic; XP 125 [if weapon mastery rules are used, Skilled with Spear, modify THAC0 and damage accordingly]
Others: AC 5; HD 3+1; hp 18; MV 90’ (30’); THAC0 16; D ld6+1 / 1d8+1; Save F3; ML 9; AL Chaotic; XP 75
The bugbears are armed with javelins (2 each) and spears, starting with a barrage of javelins before closing to melee. Sewn inside their 'hide breastplates' is a layer of gnomish chain mail, often in rather poor condition as they have not been doing much maintenance on them, probably not even before putting it in. Anyway, basically unraveling a gnome chain mail shirt down the middle and spreading it out, using the (detached) sleeves to protect the flanks and another shirt for the back. There could be some value in those (probably around 10 sp and 40 lbs per each of the 20 shirts). They have also those gnomish gold bracelets, each carrying one, for 25 gp each (leader 50 gp).
If any bugbears manage to flee, they would head back to their tribe (see below), and alert them to the invaders. A double group of 20 bugbears would head after the PCs, but since it could take up to 3 days (if it was the night attack) to get the bugbears to the attack site, the PCs should be able to keep their lead.
2nd (direct) or 3rd day (after being ambushed): W5. THE CAVERN OF THE BUGBEARS (p. 7, rewritten to be bugbears)
A natural, large, limestone cavern complex in the hills, housing this bugbear tribe. The predation by the gnomes has welded the bugbears of this region into a more cohesive tribe, rather than scattered kin-groups.
There are about 200 bugbears altogether. Three patrols/hunting groups of 10 men each range out to find food and ambush travelers and scout for slave raids. Twenty men stay with the King Lemullar. There are additionally 50 female bugbears and 100 children, twenty of whom are adolescent. The bugbear king is not happy about the PCs being brought here, and he would demand to know what the PCs are doing in their lands. Obviously, the intent is not to overwhelm and kill the PCs here. At the same time, the PCs ought to realize that fighting a whole tribe of bugbears at once is not a winning strategy, either. Gifts of about 100 gp per PC would be appropriate; ff the PCs are unable or unwilling to pay, the bugbear king is obviously not pleased, but one of the captive bugbears would speak on the PCs behalf in their own language, convincing the King that it is better to let the PCs go, loot the haunted city and then come back with riches to pay for the toll. The King would extract a promise to do so from the PCs, in return for safe-passage.
In any case, the PCs should be allowed to leave unharmed, and one of the prisoners (the first, braver one), would volunteer as a guide as far as the mountains. Once it is time for him to leave the PCs, he would warn them NOT to return: the King would seek to murder them and steal any riches they might be bringing back. This also absolves the PCs for any promise they may have made, as the King is not going to hold up his end of the bargain. (Bugbears are Chaotic, after all...)
Night before reaching the mountains: Rattlesnake. (Northern Trail Optional Encounters, p. 10.)
MOUNTAIN VALLEY (1 - 1.5 days)
At entry of the valley (probably around noon): The Skull. (Southern Trail Optional Encounters, p. 19.)
They find a bugbear skull, mounted on a spear thrust point-first into the ground. A sign reading “BEWARE” in Traladaran is attached to the spear. (This grim item was placed by the dwarf miner, Dunnak Ironhammer, as a warning to the bugbear marauders that only death waits for them here.)
Same day: Avalanche. (Northern Trail Optional Encounters, p. 10.) [ONLY TRIGGERED IF THE PCS ARE TRAVELLING WITH BUGBEARS; a trap triggered by Dunnak to try and keep Bugbears from their valley.]
The following night: W7. THE STEALTHY CRAFTSMAN (p. 9) [ONLY IF THE PCS ARE TRAVELLING WITHOUT BUGBEARS]
Assuming the party is traveling without bugbears, when they camp for the night, a dwarven prospector named Dunnak Ironhammer has been keeping an eye on them. He tries to sneak closer during the darkness to get a better look at them. However, he is not particularly sneaky: Each PC who is awake can roll 1d6, +1 if a demihuman or a thief.
1-2: Dunnak gets close enough without being heard, although any elf or dwarf would see him hiding in the dark when Dunnak calls out in Dwarvish.
3-4: Something is moving in the dark, and it is close! Indeed, any elf or dwarf can see the lump of bodyheat about 50 feet away.
5-6: Metal clinks against metal some distance away, and then it repeats, a bit closer, maybe 100 feet away. Someone is ineptly trying to sneak up on you. What do you do? The PCs have a few rounds to wake up and get ready, although if they make a lot of noise, Dunnak hears them, too.
Dunnak Ironhammer (AC 5; Dw 5; hp 30; MV 60’ (20’); THAC0 15/14; D 1d8+1/1d8+4; Save Dw 5; ML 8; AL L; XP 175) is a prospector, armed with a heavy crossbow (masterwork) and a two-handed pickaxe (masterwork), wearing a chainmail. Dunnak speaks Dwarven, Thyatian and Traladaran.
Dunnak apologizes for trying to sneak up on the party, explaining that he had to be sure that they were good people rather than claim-jumping varmints. In any case, do you have any healers? Preferably very good ones? His partner, Young Mica, is dying, in desperate need for help. Sooner would be better than later. The cave is about an hour away from here... he would prefer not leading a huge mule train right to their doorstep, the bugbears, you see. Go to S7.
S7. THE CAVE OF SANCTUARY (p. 9) [ONLY IF THE PCS GO WITH DUNNAK]
The cave is up a windy mountain path that is relatively easy for a single dwarf or a gnome to defend. Hidden against a cliffside is a secret door, leading to a large cavern. Dunnak explains that it is a former gnomish guardpost, but with the gnomes slowly losing the fight against the bugbears, it has been long abandoned.
At the back of the cave, on a bedrolls and blankets, lies a pale, sweaty, unconscious gnome. Young Mica is a young gnome prospector, the apprentice of sorts of Dunnak (AC 5; HD 2; hp 11; MV 60’ (20’); THAC0 18; D 1d6; Save D2; ML 9; AL L; XP 10). Alas, he is currently badly hurt, due to an encounter with some bugbear raiders, and the wounds have turn gangrenous. He is currently at -12 hp*, and unlikely to survive more than a day or two. He needs a Cure Disease and enough healing to bring him to positive hit points. [* our house-rule has death at -CON, not at 0. In standard BECMI, he just needs the Cure Disease. In lower level variant, perhaps mere Cure Light Wounds would do.]
If the PCs save Young Mica, both of them are very grateful. They give the healer four gemstones, two worth 100 gp each and two worth 50 gp each.
If the PCs ask Dunnak about the lost city, he admits that he hasn't been there. He did see a group of people going past, maybe three months or so ago? But since he didn't much like the looks of them, nor had any need to reveal his presence, he kept hidden. None ever came back, and he would know. If the PCs describe the route they are taking, Dunnak says that he knows the pass, as he was exploring it a few years back, before... he cuts off suddenly and then shifts gears... before meeting Young Mica. He heard some harpies screeching, and saw them flying around, and that was enough to convince him to not continue any further on that pass.
Both Mica and Dunnak know that the local gnomes are using bugbears for slave labor; neither approves, although Mica is ashamed that gnomes would do this. Dunnak says that it is pure foolishness, bringing enemies into the mines and giving them weapons. Not only that, it is not even efficient, once you take into account the number of guards and how crap bugbears are as miners. Sure, they are strong, but they are also big and need bigger tunnels... No, the whole idea is shite, and it will come to bite the gnomes in the arse, mark me words.
MOUNTAIN TRAIL (1 day)
Morning: Mountain Lion. (Southern Trail Optional Encounters, p. 19.)
Midday: Rock Baboons. (Southern Trail Optional Encounters, p. 19.)
[I staged this to happen where there was a mountain spring and a bit of a pool, the rock baboons wishing to drink in peace. The Cleric used Speak to Animals to communicate with the dominant male, and diffused the situation, allowing the rock baboons to drink and wander off.]
Late afternoon: W1. HARPY LEDGE (p. 5-6, rewritten from a forest encounter to a mountain one, and four Harpies to upscale the challenge; the ledge is about 150' above the trail)
The harpies try to pick the uncharmed characters first, starting from the weakest-looking characters. They only double up if there are not enough targets left. If they manage to hit with both claws, they will latch on and try to haul the captured off the path to plunge them into the ravine, in the harpy's next turn. Save vs. Paralysis to resist, if the Harpy is still alive.
Any Harpy dropped to below half HP will roll Morale. When any Harpy is killed, the other Harpies will roll Morale, too. If the morale breaks, the Harpies try to fly back up to their ledge in front of their lair.
W2. LAIR OF THE HARPIES (p. 6, rewritten to a mountain lair; there are plenty of handholds, so I would let a thief to succeed automatically, maybe Athletics rolls for the others).
Relatively fresh bones of a man lie in the back of the cave. His backpack contains rope and usual stuff (food has been eaten), but also a scroll with three cure light wounds spells. The cave contains 200 gp, 200 sp, and two 100 gp gems. The cleric was wearing a chainmail which is still in OK condition, a mace, a shield, and a holy symbol of Hel. [Obviously, to tie this more to the Hulean plot, the cleric could be Hulean, but I had established earlier that the Iron Ring was engaging the services of clerics of Hel to make undead, so I went with that.]
As the sun is starting to set, the trail rounds a mountain, and the hidden valley with the ruined city in the middle opens up below them, the trail continuing down the mountain side. A pair of colossal dog-headed statues marking the end of trail lie broken on the road. Clearly the vandalism has happened ages ago. But more of all of that later.
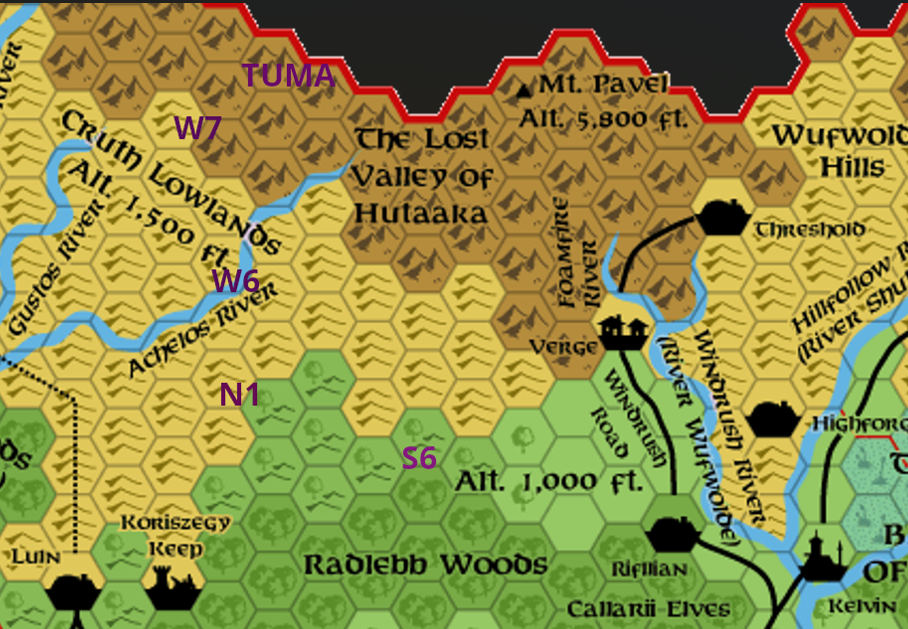
Here is a very quick mock-up of the route with some 'waypoints' in violet, based on Thorfinn's map that I downloaded from: here