
Escape from Hule
by David Keyser from Threshold Magazine issue 22Part 1: Introduction
“Escape from Hule” is intended for use with the 1981 D&D Basic and Expert rules (commonly referred to as the B/X ruleset) authored by gaming legends Tom Moldvay and David Cook. It is also compatible with the 1983 D&D Mentzer rule set and the 1991 Rules Cyclopedia. In a pinch, a DM may convert this adventure to one of the many other editions of D&D as needed. Note that when referring to specific B/X rules, the Basic rulebook used B for its page numbers (such as page B24) and the Expert rulebook used X for its page numbers (such as page X63).
If you intend to play in this module, stop reading now. The following information is for the Dungeon Master only, who will use this information to guide the players through the adventure. Knowing what will happen will ruin the excitement and surprise for the players as they face new and unknown situations.
This module is designed for a party of 7th to 11th level characters, there should be six to eight players in the group. Each character should have from three to four magical items, including weapons, armor and miscellaneous items. It is strongly recommended that there be at least one 8th to 11th level cleric, magic-user and fighter. All the characters should be prepared for a wilderness adventure.
This module is the third in what was originally a two-part series. The first and second parts, X4: “Master of the Desert Nomads” and X5: “Temple of Death”, written by the legend David “Zeb” Cook, describe the encounters players overcome as they navigate their way across Sind, the Plain of Fire, the Black Mountains and the nation of Hule on a mission for the army of the Republic of Darokin. The adventures conclude with the PCs infiltrating the Master’s temple in Hule’s capital deep within the Dark Wood.
The second adventure provides players two different methods to teleport the entire adventuring party back to Darokin. The first is a small closet in location C6 of the temple.1 The second is the House of Zebulon, a magical cube in the possession of the Master.2 Additionally, a magic-user or elf in the party may also be capable of casting the teleport spell if they are 9th level or higher, although they can only transport one PC at a time with each casting.
For players not fortunate enough to possess or uncover a magical method of teleportation, this adventure provides three possible methods for the PCs to make their way home. Two methods are detailed in this issue, while the third, Escape by Sea, will appear in the next issue of Threshold Magazine.
Part 2: The Fate of Narellus
The PCs may have rescued the Darokinian spy Narellus.3 While Narellus is loyal to Darokin, the Master had two geas spells placed on him. These geas spells were cast by Alrethus, who is an 11th level magic-user.4 The first is to never leave the nation of Hule and the second is to never speak of anything the Master and his subordinates said or did to him, which conveniently prevents Narellus from warning the PCs. The PCs may notice this behavior in conversation. Unless the PCs cast remove geas, Narellus will, if forced to leave Hule, be affected by losses to his intelligence and wisdom scores by one point each day after leaving. Once again, the PCs have a chance to notice that Narellus seems to be having mental difficulties. After d3+3 days, Narellus will no longer be able to withstand the geas, and he will turn on his allies and attempt to sabotage the PCs so that he can return to Hule. The methods by which he does this depend on the avenue of escape chosen by the PCs, which are detailed in each section below. If the PCs remove the geas, or if he returns to Hule, Narellus will begin healing his mental ability scores at the same rate he lost them.
Narellus, fighter (AC variable; F7; hp 45; #AT 1; D by weapon; MV 40’; Save F7; ML 8; AL L; S 12; I 10; W 11; D 13; C 15; Ch 12)
Part 3: Escape by Air
The Master may have his magical flying airboat docked above the roof of his personal chambers.5 If the avatar of the Master is slain and the PCs possess at least one potion of undead control6, they may board the ship and take control. No one, including Hosadus in his original body, will be able to take back control of the airboat remotely once the PCs have control of it.
Gaining permanent control of the airboat
The PCs only have 1-2 hours before the potion effect wears off. The PCs realize after the first turn that the skeletons do not interact with the PCs other than to respond to commands. The PCs must make an imprint on the skeletons to force them to permanently accept the PCs as the new authorized captains of the ship. This airboat is identical to the other airboats in the Master’s army which always have an authorized captain to command.
The PCs, but not accompanying henchmen or NPCs, pool their efforts to force their imprint on the airboat and skeleton crew. Each PC rolls a d6 and adds (or subtracts) their ability score adjustment for the ability score they use, which depends on their character class. Magic-users and elves use their Intelligence score, clerics use their Wisdom score, and all other classes use their Charisma score. Total up the result scored by all the PCs. If the duration for the potion of undead control lasted at least 9 turns, add +1 to the total. If the duration for the potion of control undead lasted the maximum 12 turns, add another +1 to the total. The final Target Number which the PCs must equal or exceed is determined by the following equation7:
# of PCs in the party multiplied by 4.5, round fractions down
If the PCs fail to achieve this, the skeleton crew begin dropping the ship’s altitude in preparation for landing it on the ground. The PCs may make one more attempt as before, but this time add half the number of PCs (rounding down) to further increase the final Target Number, and the potion modifiers can no longer be used. If they succeed on either check, the PCs gain control of the airboat for the rest of the adventure. If they fail, the skeletons land the airboat safely in a clearing in the Dark Wood seven miles east of Greatrealm and remain inactive. Only if the PCs have a second potion of undead control can they try to get the ship airborne again and start this process all over. If they do not, the PCs will need to escape some other way.
Airboat Statistics Profile
The Master’s airboat resembles a sea-going longship.8 It has the following statistics:
Miles/Day: 72; Speed: 360’ (120’); Crew: up to 60 (10 skeleton minimum); Hull Points: 60; AC: 8; Cargo(cn): 25,000
The skeleton crew primarily work as rowers and never tire. The skeleton crew aboard the airboat currently number twenty, they have the following statistics:
20 skeletons (AC7; HD 1; hp 4; #AT 1; D 1-6; MV 60’ (20’); Save F1; ML 12; AL C)
If the number of skeleton crew drops below ten, the airboat begins to descend rapidly and will crash. Skeletons that are “killed” in battles may be restored with an animate dead spell, unless the body was annihilated, such as, for example, an enemy cleric of 4th level or higher getting a Dispel result using the Turn Undead ability.
Any PC still on the airboat when it crashes takes 2d10 hp of damage and the ship takes 2d6 hull points of damage for every ten feet fallen.
For attacks against the airboat itself, use the ship combat rules found in the Expert set.9 If the airboat’s hull points reach zero, the ship will begin to descend rapidly but will also break apart in 1-10 rounds. If the airboat breaks apart while still in the air, PCs take normal falling damage.
The Journey
The PCs presumably take a direct route east across Hule and over the Black Mountains and Plain of Fire until they reach Sind and begin navigating by landmarks. This will take them on a slightly southeastern course skirting the southwestern edge of the Kurish Massif mountains until they arrive at Akesoli. This route is about eighty-one 24 mile hexes or 1944 miles, and the airboat can complete the trip in just under a month assuming no delays and minimal damage to the airboat. The airboat follows normal rules10 for ship damage and repairs, except that the PCs can land on any dry, level ground to repair all hull damage. The airboat contains enough lumber onboard to repair 40 hull points.
[Map: From Hule to Darokin]
http://pandius.com/Graakhalia_in_the_Great_Waste_Map.png
Caption: Replica
map of the Great Waste by Thorfinn Tait with position of Graakhalia
by Omnibius
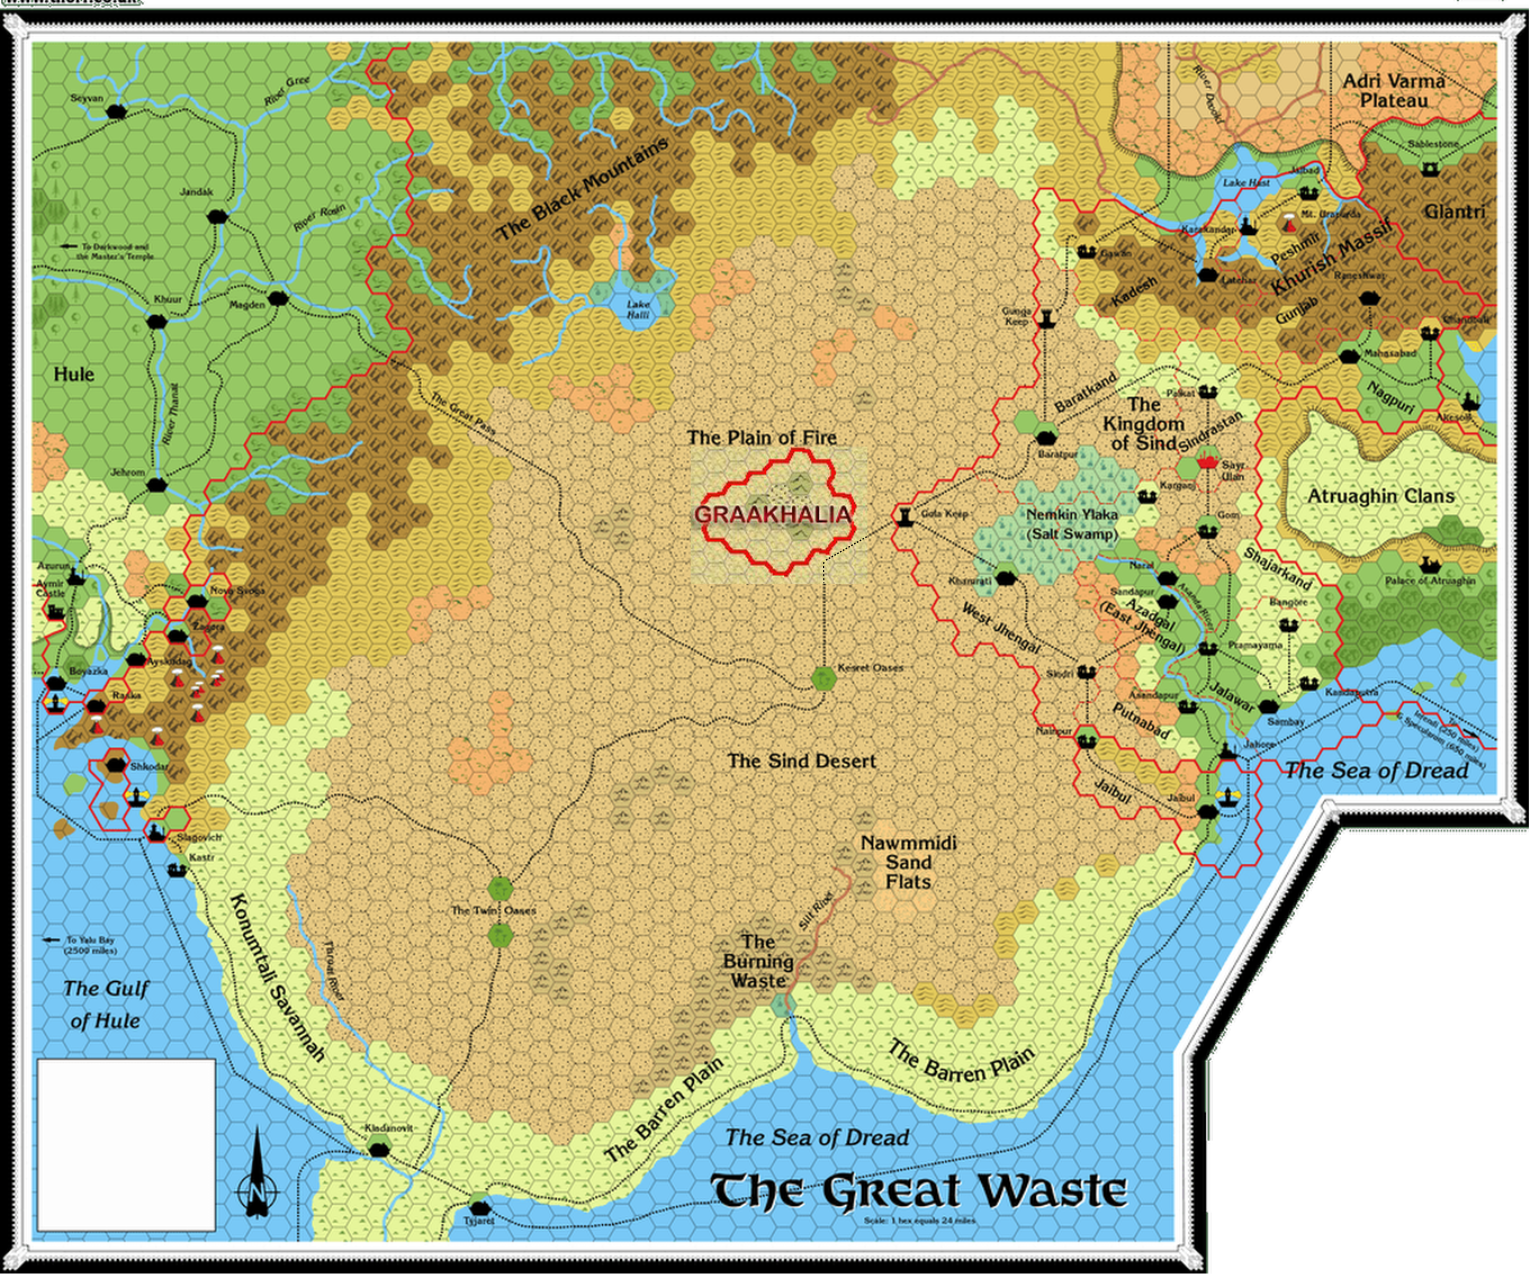
Dragon Attack above Hule
Hule counts among its allies a few dragons which live within its borders and occasionally agree to perform mercenary work. The Master or his subordinates have offered them a substantial reward for bringing down the PCs, dead or alive.
Two dragons, the green dragon, Viridescere, and the red dragon, Carminic, have agreed to work together and are patrolling the skies above settled lands in eastern Hule. They spot the airboat as it approaches their heading and they prepare to attack from opposite directions as they fly close to it. Neither dragon is a spellcaster.
If the PCs have set a lookout, they cry out and point to starboard…a dragon is approaching!
Viridescere, female green dragon (AC 1; HD 8**; hp 58; #AT 2 claws, 1 bite; D1-6/1-6/3d8; MV 240’(80’); Save F8; ML 9; AL C)
Carminic, male red dragon (AC -1; HD 10**; hp 73; #AT 2 claws, 1 bite; D1-8/1-8/4d8; MV 240’(80’); Save F10; ML 10; AL C)
As the airboat moves forty yards faster per round, the dragons align their flight path so that they are traveling full speed in the same direction and closing to intersect as the PCs attempt to speed past them. Carminic will make an underside approach to target the hull with his breath weapon, while Viridescere is at an angle above the air boat to target her breath weapon on the deck. The skeleton crew are unaffected by the chlorine gas.
[Diagram: Dragon Attack]
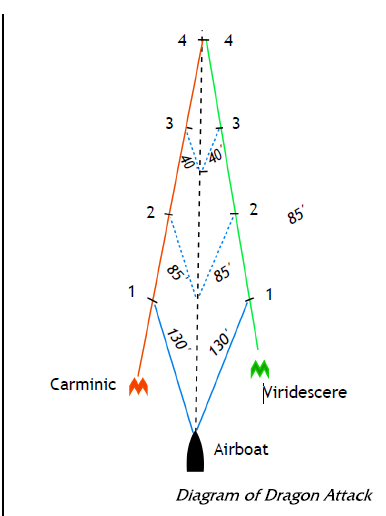
The diagram outlines the respective locations of the airboat and the two dragons in the four combat rounds leading up to where the dragons intersect with the airboat. On round two, Carminic will breath fire to maximize the cone and setting three 10’x10’ hull sections of the airboat on fire. On round three, Viridescere will use her breath weapon to position her gas cloud slightly in front of the airboat so that the airboat passes through the cloud and emerges from it just before both dragons attempt to grapple the ship on round four.
If the PCs alter course, they will likely steer away from Viridiscere but bring themselves closer to Carminic. Use the diagram as a guide for tracking if and where the dragons can intersect with the airboat.
Each dragon will attempt to grapple the ship as it passes them, which requires he or she to hit the airboat with both claw attacks. If both claws hit, the dragon holds on as the airboat plows forward, and it may use its bite attack or breath weapon each round on any individuals in range on the deck. A dragon grappling the ship will let go if it loses more than half of its hit points. A dragon that has lost more than three quarters of its hit points will break off any attack and flee.
Cloud Giant Attack over the Black Mountains
The PCs will need to be at a high altitude to go over the Black Mountains. Unknown to the PCs, they venture too close to a cloud giant fortress that resides permanently on a mass of clouds in this region of the mountain range. The cloud giants have attacked the Master’s airboats before, so his air forces normally give this area a wide berth. A band of cloud giants returning to the fortress from a successful raid elsewhere in the Black Mountains spot the airboat and elect to pursue in their fast-moving cloud ship with the goal of looting the airboat and killing its occupants. The cloud giants each have a giant hawk companion.
You are admiring the view on this fine crisp, cold day, gazing over the Black Mountains below. Something catches the corner of your eye, and you look up. You realize one of the clouds is moving toward you at high speed, much faster than the wind could possibly carry it.
3 cloud giant raiders (AC 4; HD 12+3; hp 80, 75, 72; #AT 1 weapon or 1 thrown rock; D 6d6 or 3d6; MV 120’(40’); Save F12; ML 10; AL N)
Each cloud giant raider carries a potion of levitation.
4 giant hawks (AC 6; HD 3+3; hp 24, 23, 21, 19; #AT 1; D 1-6; MV 450’(150’); Save F2; ML 8; AL N)
1 cloud giant pilot (AC 4; HD 12+3; hp 64; #AT 1 weapon or 1 thrown rock; D 6d6 or 3d6; MV 120’(40’); Save F12; ML 10; AL N)
The cloud giant pilot has a ring of spell storing that contains the following spells: mirror image, hold person, lightning bolt (D 6d6), polymorph others, and feeblemind. He also carries a potion of levitation.
The cloud giant ship closes with the airboat from behind and uses the sun or cloud cover so that it cannot be spotted until it is within close range. At a range of 80 feet, the cloud giant pilot fires two harpoons at the airboat which drag a silver mesh material behind them that forms a bridge or boarding platform. Make one attack roll and if the harpoons hit they inflict 2d6 hull damage. It takes a full combat round to reload the harpoons and fire again, the cloud giants can keep firing until they score a hit.
On the next round after the harpoons successfully anchor the two vessels together, the cloud giants begin proceeding across the eighty-foot bridge one at a time, with the giant having the highest hit point total going first. Movement during this encounter is measured in feet. The giant hawks follow the cloud giants in and make supporting attacks. The bridge is only wide enough for one cloud giant to fight, but up to three PCs can fight on the bridge side by side. If the PCs intercept the giants on the bridge, any cloud giant not in melee will remain on the cloud giant ship and throw rocks at the airboat until there is an opening to proceed across the bridge and engage foes. On any round a cloud giant boards the airboat, they suffer a -2 to attack rolls and a +2 penalty to AC.11
Any PC on the bridge that is struck by a cloud giant must roll a d20, if the roll is higher than their Dexterity score, they must save vs Dragon Breath or fall off the bridge. A cloud giant on the bridge is only in danger of falling if a PC scores a natural 20 on a hit roll, at which point the giant must test against their Dexterity of 13 and make a saving throw if they fail the ability score check.
Whether fighting on the bridge or on the airboat, a cloud giant may optionally forfeit its normal attack and instead make a hit roll to grab a PC. If the attack hits, the PC is grabbed and held in the giant’s hand until the next round. On the next round, the giant throws the PC out into the air to fall to the ground far below, there is no saving throw. If a PC while grasped can act in initiative before the giant’s next action, the PC may attempt an attack, cast a spell, or grab the giant’s potion bottle, which rests prominently tied to his belt and bears a cloud symbol as well as the word levitate written in the Giant language. A thief PC must make a successful Pick Pockets roll, while all other characters must roll a 1 on a d6, to successfully grab the potion bottle. These potions are geometrically designed to allow an individual to drink them while in free fall.
The cloud giant pilot sends his giant hawk companion into the fight but remains on the cloud giant ship, using his spells to support his fellow giants. If successfully targeted at range, he will cast mirror image on the following round. If all three cloud giants raiders are slain or sent falling to the earth, or if they retreat back to their own ship, the cloud giant pilot will cut the bridge on his end, causing anyone currently on the bridge to make a saving throw vs Paralysis to grab hold of the bridge and hold on as it is left dangling from the edge of the airboat. The pilot will then break off and depart, bringing an end to the encounter.
In addition to the possessions noted above, each cloud giant carries a large belt pouch the size of a massive sack. For the contents of each sack, roll for Treasure Type E12 and add a few thousand gold pieces.
Narellus Driven Mad
Should Narellus be on the airboat when he is driven mad by his geas (see Part 2), he will suddenly begin attacking the skeletons and destroying them as quickly as he can. He will turn on the PCs if they block him from attacking the undead, but if he has an opportunity to attack either a PC or a skeleton, he will attack the skeleton.
Airboat Attack over the Plain of Fire
The Master’s air force is limited and his airboats were not deployed in the initial battles with Darokinian forces. But once the PCs escape Hule, some of the Master’s elite agents are assembled in Sind and granted use of an airboat to intercept the PCs. The commander of the military squadron onboard is an agent of the Master who has crossed paths with the PCs before, his name is Ahmed Khel.13
The Master’s forces on the ship include:
20 skeletons (AC7; HD 1; hp 4; #AT 1; D 1-6; MV 60’ (20’); Save F1; ML 12; AL C)
40 human archers, fighters (AC 6; HD 2; hp 12; #AT 1 ranged bow attack at +1 to hit; D 1-6; MV 120’ (40’); Save F2; ML 8; AL C)
Captain of the Airboat, magic-user (AC 7; M6; hp 22; #AT 1; D 1-4; MV 120’ (40’); Save M6; ML 10; AL C)
The captain wields a dagger and possesses a ring of protection +1. He has the following spells memorized:
First Level: magic missile, shield
Second Level: mirror image, web
Third Level: dispel magic, fireball
Diviner, cleric (AC 1; C9; hp 57; #AT 1; D 1d6+2; MV 60’ (20’); Save C9; ML 10; AL C)
The Diviner wields a mace +1, wears plate mail armor, and carries a shield +1. He has the following spells memorized:
First Level: cure light wounds(x2), cause fear
Second Level: bless, hold person, silence 15’ radius
Third Level: cause disease, locate object (already cast), striking
Fourth Level: create water, protection from good 10’ radius
Fifth Level: insect plague, finger of death (raise dead reversed)
Assassin, thief (AC 3; T8; hp 38; #AT 1; D 1d6+3; MV 120’ (40’); Save T8; ML 9; AL C)
The assassin wields a short sword +1, wears leather armor +1, carries a short bow, and possesses two potions, both fly and invisibility.
Ahmed Khel, fighter (AC 0; F9; hp 75; #AT 1; D 1d8+2; MV 90’ (30’); Save F9; ML 9; AL C)
Ahmed wields a sword +2, extra damage (x4 for 1-10 rounds), AL N, Will 17, wears +2 chain mail armor, an amulet of finding14, and carries a shield +2.
In the unlikely event Ahmed Khel was slain previously by the PCs, he has was brought back to life with a raise dead spell and carries a grudge against the PC who slew him.
The PCs encounter the enemy airboat for the first time over the Plain of Fire. Use the rules under the Encounters at Sea15 section should the PCs attempt to evade. Any successful evasion buys the PCs a respite of d3 days before they encounter the airboat again. If the PCs can successfully evade the enemy airboat four times, Ahmed and his forces will have exhausted their magical resources in tracking them and be unable to continue pursuit. Optionally, the DM may have Ahmed, the assassin and the Diviner make their way to Akesoli from Sind to set up an ambush in the city as a way to redeem themselves for their failure.
Should the enemy airboat successfully close to engage, Ahmed’s initial tactics are to have the archers cover the PC’s airboat with volley fire and close until the Diviner is in range to begin using Turn Undead to disintegrate the skeleton crew of the PCs ship. The Diviner will use bless and protection from good 10’ radius to benefit allies. If the PCs are forced to crash, Ahmed will have the airboat hover above and direct his men to unleash spells and missile fire without mercy.
If these initial tactics fail, Ahmed directs his forces to target the PCs. The captain will emerge from full cover after casting mirror image and shield, starting his offensive spellcasting with fireball. The assassin will be disguised in uniform as one of the archers and will be content to use his bow unless Ahmed is forced to order the retreat. If this happens, the assassin will attempt to sneak aboard the PC’s ship using magic if possible to make a backstab attempt on a lightly armored PC, preferably a magic-user.
If the PCs attempt to board the enemy ship, Ahmed will lead the defense engaging in melee with the most heavily armored PC or, optionally, a PC which he carries a grudge against from the time they spent traveling together with the caravan. The assassin will use his abilities as described above. The Diviner will cast striking on his mace and target PCs from range until an enemy engages in melee with him, at which point he will cast cause serious wounds and then fight with his mace +1. Should the PCs capture the enemy airboat, they can use it provided they have a few living prisoners to give orders to the skeleton crew. Otherwise they must attune this new skeleton crew to their commands as they did with the previous skeleton crew, provided they have the required magic to do so.
Rescue the Darokinian Army Remnant
This encounter takes place close to the Sunken City and Gunga Keep, in the desert and close to the Sind border. The PCs are flying a bit lower in elevation to navigate by landmarks when they spot what appears to be a military engagement on the ground. As they fly closer, they identify a Darokin Republic Army standard on a hill amongst a small force with several enemy army standards amidst a larger force surrounding the hill.
[Map: Rescue the Darokinian]
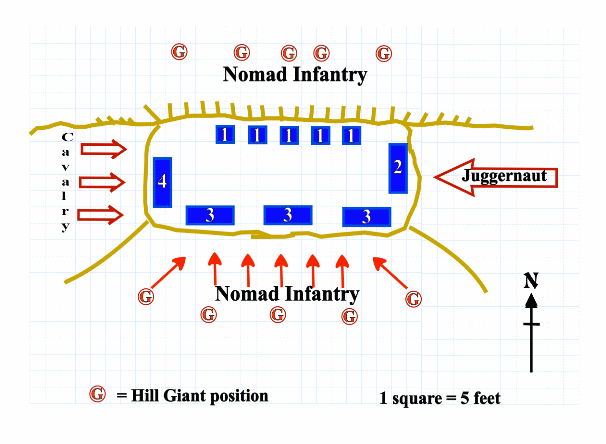
The Darokinian force on the hill was a scouting patrol attached to the main Darokin Republic army that was wiped out by the Desert Nomads in the desert outside of Sind. The current commander of the force is Colonel Leonidas.16
Colonel Leonidas, fighter (AC 2; F8; hp 61; #AT 1; D 1d8+1; MV 60’(20’); Save F8; ML 9; AL L)
1 human sergeant, fighter (AC 5; F3; hp 20; #AT 1; D 1-8; MV 90’(30’); Save F2; ML 8; AL L)
15 human infantry, fighter (AC 5; F2; hp 13; #AT 1; D 1-8; MV 90’(30’); Save F2; ML 8; AL L)
15 human archers, fighter (AC 6; F2; hp 12; #AT by weapon; D 1-6 or 1-4; MV 90’ (30’); Save F2; ML 8; AL L)
Note that all the infantry and archers wear a modified leather armor with breastplate which grants AC 6, the infantry also carry a small buckler shield.
Elements of an elite Desert Nomad army have taken up positions to engage the Darokinian soldiers and capture or kill them.
10 hill giants (AC 4; HD 8; hp 48; #AT 1 club or 1 thrown spear; D 2d8 or 2d6; MV 120’(40’); Save F8; ML 8; AL C)
80 human infantry, fighter (AC 6; HD 2; hp 12; #AT 1 bow or sword; D 1-6 or 1-8; MV 90’(30’); Save F2; ML 8; AL C)
30 elite human cavalry, fighter (AC 4; HD 3; hp 21; #AT 1 bow or sword; D 1-6 or 1d8+1; MV 120’(40’); Save F3; ML 9; AL C)
30 warhorses (AC 7; HD 3; hp 1; #AT 0(while ridden) or 2 hooves; D 0 or 1-6/1-6; MV 120’(40’); Save F2; ML 9; AL N)
1 stone juggernaut17 (AC 0; HD 30**; hp 180; #AT 1 crush; D 10d10; MV 90’ (30’); Save special; ML 12; AL N)
1 human captain F6 (AC 2; HD 6; hp 42; #AT 1 sword; D 1d8+2; MV 60’(20’); Save F6; ML 10; AL C)
The top of the hill is eighty feet wide on the north and south facings and thirty feet wide on the east and west facings. The hill has a steep, rocky northern face that is difficult to climb and impassible for the cavalry and juggernaut. The other three compass facings, however, are more gentle slopes of packed sand. All land-based movement is measured in feet for this encounter due to the difficulty of the terrain.
If the PCs choose to assist, they can either pilot the airboat in close so that they can evacuate the Darokin force as the airboat glides slowly over the hilltop, or they can attack the Desert Nomad army directly. If they make a direct attack on one of the sides of the hill, Colonel Leonidas will order his forces to move toward the airboat and reinforce the attack if he can, but he will not send his men down the steep north face nor will he send his men toward the juggernaut.
The troops on both sides are dispersed as follows:
On the north side, five hill giants and twenty-five human infantry are in position and directing missile fire at any target they see at the top of the hill. Five Darokinian archers are scattered about attempting to return fire but are mostly pinned down in cover.
On the east side, the stone juggernaut is building up momentum to ascend the hill. Five Darokinian infantry are guarding this side near the hill crest but they will break and flee as the juggernaut closes.
On the south side, five hill giants and fifty-five human infantry are spread out and slowly advancing up the hill, firing at the top of the hill as they advance. They expect to be the anvil in this engagement and the captain of the Nomad army is here commanding them directly. At the top of the hill, the Darokinian force is spread thin with just five infantry and ten archers attempting to cover the approach and return fire.
On the west side, thirty elite cavalry are grouped and preparing to charge in ranks of 6 wide. The last five Darokinian infantry are waiting at the hillcrest along with Colonel Leonidas.
If the PCs approach the hilltop, they can drop ten ropes on each side and slow the airboat down to as little as 10’ per round to give the Darokinian force an opportunity to climb aboard. The PCs have time to set up their approach from any direction they choose, as the Desert Nomads temporarily halt their assault when they see the airboat approaching. The Desert Nomads will first assume that the airboat has come to drive the Darokinian soldiers off the hilltop, but once they realize their error, the cavalry and juggernaut will charge the hilltop. If the PCs don’t give away what they are doing, this will be on the first round when the airboat reaches the edge of the hilltop and begins slowly passing over.
The elite cavalry will reach the crest of the hill on round 3 and, if no one is there to engage them, charge any target in range on the hilltop in round 4. The juggernaut will reach the crest of the hill on round 4 and continue straight across the hilltop before plunging down the west side of the hill on round 7. The cavalry will sweep down the south side of the hill on round 5 to avoid the juggernaut and run down any Darokinian soldiers on the slope before pulling their horses to a stop as they meet their own infantry advancing up the south slope.
Any Darokinian soldier will grab an available rope within five feet and begin pulling themselves up. It will take them five combat rounds to safely climb into the airboat, and they need at least two rounds of climbing before someone underneath can grab the same rope and also try to pull themselves up. Unaided, a Darokinian soldier has a 75% chance of climbing up on their own, although this drops to a 70% chance if two soldiers attempt to climb the same rope. A PC in the airboat who wishes to assist can pull on the rope, for each attempt to assist the player makes an ability score check against their Strength by rolling a d20. If they roll their strength score or less, they reduce the time it takes the soldier to climb the rope by two rounds, and they increase the percentage of success by double their Strength score up to a maximum of 99%. If the PC fails the roll, they only reduce the climbing time by one round and increase the percentage of success by their Strength score. As an example, a PC, with a Strength of 12, attempts to help two soldiers climbing the same rope. A successful ability score roll increases both soldiers chance of success from 70% to 94%, and the second soldier completes the climb in three combat rounds.
Note that if the airboat crosses paths with the juggernaut it must have more than fifty feet of altitude to safely avoid a collision.
The PCs gain the XP value for all the Darokinian forces they rescue.
Once this encounter is over and the airboat departs safely, Leonidas recommends they make full speed for Akesoli. See Part 5 for the conclusion.
Part 4: Escape by Land
This route makes certain assumptions about the House of Zebulon. The rules for this magic item are clarified below, but this escape route will open to the PCs if they use the House of Zebulon to return to the Evil Abbey of the bhuts.
House of Zebulon rule clarifications
The House of Zebulon does not lead to an extra-dimensional space, instead the apartment of six rooms occupies space in the Evil Abbey, specifically the Abbot’s House.18 Anyone entering the Abbot’s House from the Evil Abbey will exit back into the abbey when they leave. But if the owner of the House of Zebulon uses it to open a doorway to the abbey, they teleport to location N1, leaving the House of Zebulon behind. As a result, walking out of the door at N1 will bring the users of the House of Zebulon back to where the magic item is located, they will not walk into the courtyard of the abbey. To bypass this magic and escape Hule by returning to the abbey, the PCs must go upstairs to the terrace found at location N7. There they can see the other buildings of the abbey and jump down or lower themselves into the courtyard. Once they do so, they have left Hule and the House of Zebulon behind and their adventure returns to the Evil Abbey.
In addition to transporting the PCs to the Evil Abbey, the House of Zebulon can open the doorway once a week to any location the owner is familiar with. This functionality is equivalent to a teleport spell. As with traveling to the abbey, using this ability requires the owner to leave the House of Zebulon behind, so the owner will need to return to the location of the magic item by other means.
Lastly, disregard all references in X4: “Master of the Desert Nomads” to locations N1-N6 being within the Master’s temple. The rooms exist within the Evil Abbey and the Abbot’s House is part of the magical item which is the House of Zebulon. The viewpoints from the windows of locations N3, N5 and N6 as described in X4 are due to the Master situating the House of Zebulon in his personal chamber19 so that two windows can be viewed from within the cube.
The Evil Abbey Revisited
If the PCs somehow avoided the Evil Abbey the first time and did not engage with the bhuts before reaching the Black Pass, then you can run this encounter as described in X4: “Master of the Desert Nomads”.
But if the PCs are returning to the abbey, they will find that every bhut they have slain now walks the abbey again as one of the walking dead. The Master laid a curse on the bhuts and the abbey for failing to stop the PCs. The first part of the curse transformed any bhut slain into an undead bhut (see Part 6 for details). The second part of the curse imprisons both the living and undead, or that enter the abbey, within the walls of the abbey, which now includes the PCs. No means of escape, not even magical means, is possible for as long as the curse holds. Spells like dimension door and fly do not function in the abbey, and even attempting to lower a rope from the top of the wall or a window just causes the rope and any grappling hook or other anchor to fall away before anyone can use it.
To break the curse, the PCs must slay eight of the undead bhuts, destroying not only their bodies but also their incorporeal forms. Bhuts will generally be found where they were located at night in the adventure X4. Note that if the chamber of the Abbot’s Shrine20 plunged over the cliff in the original adventure, any bhut’s corpses in that room were lost and are not present among the undead bhuts. Furthermore, the threshold to break the curse drops to seven undead bhuts.
As explained in the New Monster section (Part 6), each bhut when first encountered is occupying their own corpse. Once the corpse is slain, the undead bhut manifests as an incorporeal spirit and continues the battle. Use the statistics provided in X4 for the bhuts in their corporeal form, and the following statistics for bhuts in their incorporeal form. The incorporeal form will generally have 8 hp more than its corporeal form.
Undead bhut (AC 1; HD 8+4**; hp 40-68; #AT 1 bite; D 1-10 + special; MV 150’(50’); Save F14; ML 10; AL C)
Due to the curse on the Evil Abbey, all the undead bhuts are turned as if they were undead two columns to the right in the Turn Undead table.21 This means that when animating a body, undead bhuts are turned as if they are vampires. The undead bhut in its incorporeal form is turned as if one column greater than a vampire, which is shown below.
Cleric Level Incorporeal bhut in Evil Abbey
7 11
8 9
9 7
10 T
11+ T
The PCs gain XP for each physical body possessed by the undead bhuts that they destroy, in addition to destroying the incorporeal undead bhuts.
Note that the buildings in the Evil Abbey are made of stone, and incorporeal undead bhuts forced to flee from a cleric’s Turn Undead ability may be forced to flee through stone walls exposing them to their unique vulnerability (see Part 6).
Narellus, if present, will fight bravely alongside the PCs as they attempt to clear and escape the Evil Abbey. Each battle, however, the PCs may notice Narellus becoming more morose and despondent, particularly if he suffers Wisdom damage in combat against the undead bhuts.
Once the PCs break the curse and escape the Evil Abbey, they can retrace their original path using now familiar landmarks to navigate through the Desert Hills as they make their way to the Plain of Fire.
Narellus Driven to Despair
If Narellus is with the party, he will turn on the PCs earlier, while they are still in the Desert Hills. The sights he sees at the Evil Abbey fill him with despair and shortens the incubation time for his betrayal to just 1d3 days. The shorter duration results in less of a drop in his ability scores, which means he comes up with a better plan.
Narellus will wait until he takes a night watch while the other PCs sleep and then slips away. If this is not possible, he will volunteer to scout for food while the party is resting. Once the PCs realize he is gone, they must decide if they wish to follow his tracks and recapture him. If they do not or if they fail to find him, then in twenty-four hours Narellus returns accompanied by one of the enemy patrols22 which serve the Master and wander the Desert Hills. Select one of the enemy patrols that the PCs did not encounter while playing X4 or, if they have already encountered all three patrols previously, have Narellus return accompanied by five hill giants. Narellus and his new companions will attempt to ambush and slay the PCs before they can reach the Plain of Fire.
5 hill giants (AC 4; HD 8; hp 48; #AT 1 club or 1 thrown spear; D 2d8 or 2d6; MV 120’(40’); Save F8; ML 8; AL C)
If the PCs capture Narellus at any time, they will need to both break the geas and engage in persuasion to fully extract him from the grasp of the Master. The PCs can use their Charisma ability score adjustment while persuading and use the Reaction table23 to see if they succeed.
The Unknown Benefactor24 Returns
As the PCs reach the end of the Desert Hills, they spot a shiny golden flash in a gully before a steep hill that rests on the border with the Plain of Fire. If they approach to investigate, they see another golden flash, and a crack in the earth begins to crumble away until a tunnel is revealed.
The PCs here a voice quietly say, “Enter. This aid will be my last. When you stand before enemies who have become friends, there you may seek a friend and guide.”
This tunnel takes the PCs under the Plain of Fire for many miles before reaching the land of Graakhalia.25 They will travel along smooth tunnels bored of packed earth by a purple worm or some other great creature for about 288 miles (twelve 24 mile hexes) before reaching the western edge of Graakhalia. They occasionally see cracks high above that let some sunlight penetrate from the surface, and clean water in crevices which they can drink. While occasional side tunnels are found, they quickly dead end and the PCs have no chance of getting lost.
Deserted Elven Outpost
The PCs arrive at the western edge of Graakhalia where a powerful Sheyallia elf wizard once established a private outpost where he could perform magical research and store magical lore. He chose this site based on its remote location and proximity to yellow mold colonies which discouraged intrusion. Only one safe avenue of approach to the outpost from the east was established, existing to this day.
The elven wizard passed away within the outpost before designating a successor, leaving the Sheyallia elves and Gruugrakh gnolls unable to pass beyond the guard chamber wherein lies the “Guardian of Nihility”. A presence is maintained by Graakhalians at the entrance foyer of the outpost, but so far no one has been able to get past the guardian.
All the doors of the elven outpost are made of a strange metallic alloy which does not rust, the doors are stuck but not locked unless otherwise noted and require the standard roll to open.26
[Map: Elven Outpost]
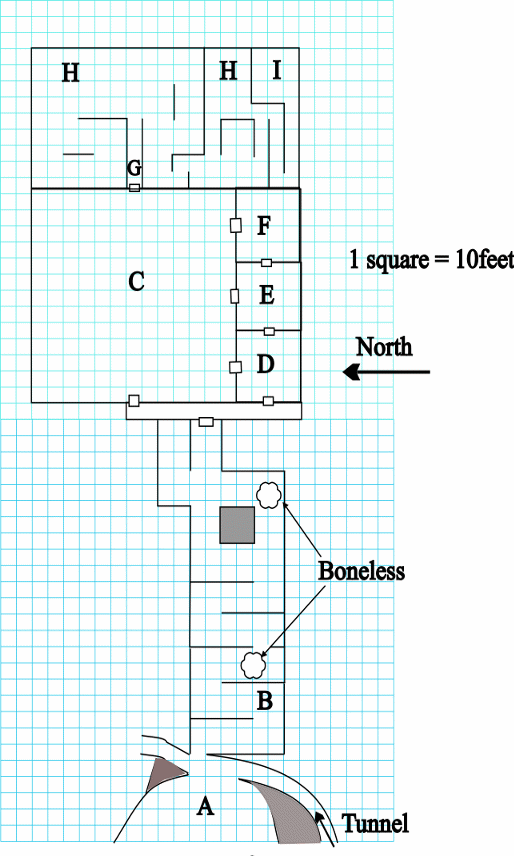
Here the tunnel passes through a natural cavern where yellow mold lines the floor, walls and ceiling. The PCs notice forty feet ahead the side of the tunnel has collapsed leaving a large aperture where no yellow mold grows.
The PCs must pass through forty feet of yellow mold, either by not touching the mold, or by carefully making their way through causing as little disturbance as possible, or by running as fast as possible to try and stay ahead of the cloud of spores. Attempting to destroy the yellow mold with fire is also possible, though it will require several hours for the resulting spores to clear.
Yellow Mold (AC nil; HD 16 (minimum to clear a 2’ path to the aperture) or more; hp 80 (5hp per HD); #AT Spores; D 1-6 + special; MV 0; Save F2; ML 12; AL N)
These are unfinished passages which were originally planned to be developed into a maze and tomb for the elven wizard. This area, as well as the rest of the outpost, is magically warded against yellow mold spores, which is why the yellow mold colonies have not migrated into these passages.
What does occupy these passages are two Boneless (see Part 6 for details) as shown on the map. They lie in wait and attack the PCs as soon as they can draw a line of sight, or more specifically a line of thermal sensing, to a target. They first attack by spitting a thick glob of acid and then closing to melee.
These two Boneless are descended from one Boneless which was captured and studied by the elven wizard long ago. The second Boneless will not come to the aid of the first.
2 Boneless (AC 0; HD 10*; hp 70, 65; #AT 1 bite + special; D 1-10/4d6 or 6d6; MV 60’(20’); Save F10; ML 10; AL C)
The Pleasant Garden
You are momentarily dazzled by sunlight shining in half of this immense chamber. You are surprised to find what appears to be a surface outdoor garden in half of the chamber and adjacent to what is unmistakably a second garden shrouded in darkness growing a variety of underground plants and fungi. A pleasant waterfall pours out from the ceiling in one corner and you see irrigation channels distribute the water evenly throughout.
This immense chamber was the wizard’s garden where he grew both underground and above ground plants for both food and magical spell components. The northern half of the garden receives light through a crevice in the ceiling and contains many beautiful trees, flowers and shrubs that normally grow on the surface. If the PCs attempt to investigate the crevice they find it does not directly lead to the surface but follows a zigzag course with installed mirrors reflecting the light to this chamber. The southern half of the garden grows various benign fungi and strange plants which thrive underground.
Hidden in the garden in shallow burrows are five caecilia, which move to attack soon after the PCs begin exploring this chamber. If the PCs enter the garden from the door on the west wall or the central door on the south wall, they will be attacked from three directions. But if they enter from either of the other two doors on the south wall they will be in a more defensible position and will only be attacked from two directions.
5 Caecilia27 (AC 6; HD 6*; hp 42,41,38,37,36; #AT 1 bite; D 1-8; MV 60’(20’); Save F3; ML 9; AL N)
Experimentation Chamber
A large table holding glass vials and beakers occupies one corner of this chamber, with the center dominated by what appears to be a summoning circle engraved on the stone floor. A wall hanging across the room has a dagger sticking out of it. There are numerous scorch marks and wear on the far wall. Four large and masterfully carved stone statues stand at the four corners of the room. Two of the statues depict elven warriors, while the other two depict larger gnoll warriors with groomed close-cropped mohawks instead of the wild manes you normally see on their heads and necks. You pause as you realize both elves and gnolls are dressed in similar armor and carry similar weapons.
This chamber was used for magical experimentation and spell research. The table is covered with glass vials and beakers but all substances have dried up except for a potion of control plant which rests in a sealed unmarked vial.
The south wall bears numerous scorch marks and wear. On the west wall hangs a dart board that is annotated with elven script and has a dagger +1 lodged in the bullseye.
The statues standing at the corners of the room are four living rock statues. They will remain motionless until the PCs move well into the room or until they are attacked. Once they activate they will attack until destroyed or they fail a morale check. If the statues do fail a morale check, they will attempt to play dead rather than flee.
4 Living Rock Statues28 (AC 4; HD 5**; hp 35, 33, 32, 31; #AT 2; D 2-12/2-12; MV 60’(20’); Save F5; ML 11; AL C)
Personal Quarters
This is the bedroom, with a large elaborate bed covered in fine sheets and a large desk nearby. A curtain against the far wall doesn’t extend to the floor and appears to cover what could be a window. A large chest rests on the floor close to the bed.
This is the wizard’s personal bedroom and study. The bed is covered in rich silks, most of which can be salvaged and are worth 325 gp. The PCs find the elven wizard’s mummified corpse under the covers. There are no signs of violence on the body.
The southern wall has curtains which are closed, opening the curtains reveals a mirror of life trapping. The desk contains various parchments and notes in elven on various topics of magical research and alchemy. Also found in a drawer is the wizard’s spell book. The spells in the spell book are to be selected by the DM, and include up through the 5th level of Magic-user and Elf spells.
The chest is trapped and has both a complex mechanical lock as well as a wizard lock spell. A thief who attempts to unlock the mechanical lock faces a -5% penalty to their Open Locks roll. The trap is set off if the mechanical lock is broken or if the chest is opened without first finding and disarming the trap. The key was lost long before and the wizard used a knock spell as needed to unlock it. The wizard lock is cast by a 9th level caster.
If the trap is triggered a magical sonic blast inflicts 2d6 points of damage on everyone within the chamber unless blocked by a silence spell. This sonic blast will shatter any potion bottles the PCs are carrying along with the mirror of life trapping. Destroying the mirror releases ten aranea that have been trapped for centuries. They have been driven insane by their imprisonment and this is reflected in their Morale score, they fight to the death.
10 aranea29 (AC 7; HD 3**; hp 20 each; #AT 1; D 1-6 + poison; MV 60’ (20’), In web: 120’ (40’); Save M3; ML 12; AL C)
On the first round of combat, the first three aranea cast mirror image, while the next two aranea cast web and attempt to ensnare as many opponents as possible. Two aranea cast charm person while the last three cast magic missile. On the second round of combat, the first three aranea attack in melee, the next two cast magic missile, the next two cast shield spells, and the last three cast light spells at individual opponents who are still up and fighting. On the third round of combat, the first three aranea remain in melee, the next two cast magic missile, the next two enter melee, and of the remaining three, two cast mirror image and the last casts web. All remaining aranea engage in melee by the fourth round of combat.
The contents of the chest include 1153 gp, five pieces of jewelry individually boxed in small boxes of finely crafted teak wood for a combined worth of 6500 gp, a wand of negation, a potion of control giant, and a potion of growth. If the sonic blast is triggered, the potions are destroyed.
Library
This chamber has several bookshelves stacked with books and scrolls. One bookshelf is only half full and another is completely empty, indicating possible plans for future expansion.
Most of the books and scrolls are written in Elvish. If the PCs spend a few hours reading they learn the basic history of the Sheyallia elves and the nation of Graakhalia.30 The historical perspective of these books portray a chauvinistic narrative, emphasizing how the Sheyallia elves discovered habitable caverns beneath the Plain of Fire and settled while reluctantly allying with the Gruugrakh gnolls for protection and slowly elevating the gnolls’ culture until a true nation could be formed.
For every two hours the PCs, as a group, spend reading material in the library, there is a cumulative 1 in 10 chance of discovering a collection of forgotten notes wedged into a tome. The title for the notes reads “The Nihility Effect” and detail experiments for depriving a subject of all five senses. There is mention that “the effect is only temporary so long as the subject perseveres”.
Security Door
This was what the elven wizard considered to be the front door to his home. The door has a wizard lock spell on the eastern side of the door, but on the side the PCs first approach there is only a latch which the PCs can easily open. The wizard lock is cast by a 9th level caster.
Guardian of Nihility
This cavern is filled with magical plants specially cultivated by the elven wizard that together generate a powerful magical field which completely negates the senses of both living and undead creatures. For humans and demi-humans, this means the standard five senses as well as the ability to sense pressure, temperature, and pain along with any demi-human’s innate sensing abilities, infravision and magical detection abilities.
While the PCs are still approaching the cavern, just before they can start to view the inside of the cavern, the magical field takes effect.
You are making your way down the passage when suddenly your light source vanishes and you are in utter darkness…as well as in complete silence…your body is numb and without feeling…you can’t even taste the inside of your mouth.
At this point inform the players they cannot communicate with each other but must pass written notes to you detailing what actions they take. No communication between the PCs is possible until they overcome the magical field or retreat. If they retreat, their senses return in a few minutes, but they are subject to the effects of the magical field each time they enter it.
While within the effects of the magical field, the PCs actions can help them overcome the field and regain their senses. Each of the five senses are tied to a different ability score of the character, actions should be adjudicated as to which ability score is relied upon for the action taken. A fighter attempting a melee attack relies on Strength. A magic-user casting a spell relies on Intelligence. A cleric casting a spell or Turning Undead relies on Wisdom. A thief using thief skills or firing a missile weapon relies on Dexterity. Certain saving throws, such as a save against Poison, rely on Constitution.
For each action taken, the PC must make an ability score check, rolling at or under their ability score. One and two successes do not have any discernible effect, but a third success for the same ability score is rewarded with a brief sensation for the corresponding sense. A brief flash of light, the momentary sound of a voice, or the feeling of clothing and armor against the skin, are examples of what the PC briefly experiences. Upon achieving a fourth success for that ability score, the corresponding sense is restored to the character.
Strength checks can restore the sense of touch. Intelligence checks can restore the sense of smell. Wisdom checks can restore the sense of hearing. Dexterity checks can restore the sense of sight. Constitution checks can restore the sense of taste. Charisma checks can be used to restore any special senses available to a PC. As PCs begin to regain their senses, they can begin to communicate with each other as well as begin to perceive their location in the cavern.
Certain magic items and spells can provide a faster means of overcoming the magical effect. A potion of control plant allows the imbiber of the potion to restore all senses at the rate of one sense per round, but only for the potion user. The spell speak with plants immediately restores the sense of hearing to the caster, and the caster can converse with the plants to learn the nature of the magical effect and that the plants generate this effect. Anti-magic shell blocks the magical effect of the plants making the caster immune to the plants. Commune and contact higher plane function normally as the character interacts with the entity in question through telepathic means.
Once at least some of the PCs regain their sight, or regain both their hearing and sense of touch, they can navigate their way through the chamber. Each PC must regain at least the sense of touch to receive communication from the other PCs and be guided through the room. The plant network which forms the guardian of nihility are a mix of large ferns and thicket bushes which impede and slow movement. Sunlight filters down from thin crevices in the ceiling.
Award the PCs 4000 XP each for successfully navigating past the Guardian of Nihility.
Entrance Foyer
Any PC senses still nullified are regained after a few minutes in the entrance foyer. Returning to the Guardian of Nihility starts the process all over again.
You emerge into a bare chamber across from a band of armed gnolls and elves who are staring at you in astonishment.
For those who can hear but cannot see:
A collective gasp of what sounds like astonishment greets your ears. The silent pause afterward makes it seem as if those who see you are now waiting for your next move.
The PCs encounter a band of five Sheyallia elves and nine Gruugrakh gnolls, all Graakhalian natives. The band can see the PCs are outsiders from the surface, but they are in awe that the characters have emerged from the wizard outpost. They wait to see what the PCs do, and tentatively open a discussion in Elvish if possible. The PCs get a +2 bonus on their reaction roll31 at the beginning of the encounter, and if they offer the secret of passing beyond the Guardian of Nihility, they get a further +2 bonus later in the negotiation.
Sheyallia elves (AC 5; HD 1+1; hp 6; #AT 1; D 1-8; MV 120’ (40’); Save E1; ML 8; AL N)
Gruugrakh gnolls (AC 6; HD 2; hp 10; #AT 1; D 1d8+1; MV 90’ (30’); Save F2; ML 8; AL N)
What the PCs need first and foremost is a guide. Provided the Graakhalians have a favorable reaction to the PCs they are willing to offer a guide that will lead them through Graakhalia safely and into Sind. The PCs in exchange must offer details on everything they have learned about both the elven outpost and the armies of the Desert Nomads and swear an oath of secrecy to never speak of Graakhalia.
The Graakhalians select one of their number to escort the PCs. If there is at least one elf among the PC party, a Sheyallia elf named Eruantion will volunteer to guide them. If not, a Gruugrakh gnoll named Aagnih Moletalon volunteers.
Eruantion (AC 5; HD 3; hp 15; #AT 1 sword or 1 longbow; D 1-8 or 1-6; MV 120’ (40’); Save E3; ML 8; AL N)
Eruantion can cast the following spells per day: mirror image, shield(x2)
Aagnih Moletalon (AC 6; HD 3; hp 16; #AT 1 sword or 1 longbow; D 1d8+1 or 1-6; MV 90’ (30’); Save F3; ML 8; AL N)
Aagnih gains a +1 bonus to hit when firing his longbow due to his Dexterity bonus.
The PCs journey through Graakhalia is largely uneventful as they are not allowed to travel through communities. Their guide keeps them in the outer passages that form the borders of Graakhalia, and they only occasionally encounter other Graakhalians who keep interactions brief. The PCs do see that Graakhalians use giant lizards as beasts of burden and blue-furred giant weasels as animal companions.
Ambush by the Master’s Elite
By journeying under the Plain of Fire, the PCs avoid the armies of the Master. But a team of the Master’s elite agents are assembled in Sind and joined by a soul eater32 summoned by the Master. The commander of the team is an agent of the Master who has crossed paths with the PCs before, his name is Ahmed Khel.33
In the unlikely event Ahmed Khel was slain previously by the PCs, he has was brought back to life with a raise dead spell and carries a grudge against the PC who slew him.
Ahmed Khel, fighter (AC 0; F9; hp 75; #AT 1; D 1d8+2; MV 90’ (30’); Save F9; ML 9; AL C)
Ahmed wields a sword +2, extra damage (x4 for 1-10 rounds), AL N, Will 17, wears +2 chain mail armor, an amulet of finding34, and carries a shield +2.
Assassin, thief (AC 3; T8; hp 38; #AT 1; D 1d6+3; MV 120’(40’); Save T8; ML 9; AL C)
The assassin wields a short sword +1, wears leather armor +1, carries a short bow, and possesses two potions, both fly and invisibility.
Diviner, cleric (AC 1; C9; hp 57; #AT 1; D 1d6+2; MV 60’(20’); Save C9; ML 10; AL C)
The Diviner wields a mace +1, wears plate mail armor and carries a shield +1. He has the following spells memorized:
First Level: cure light wounds(x2), cause fear
Second Level: bless, hold person, silence 15’ radius
Third Level: cause disease, growth of animals, striking
Fourth Level: cause serious wounds, protection from good 10’ radius
Fifth Level: finger of death(x2) (raise dead reversed)
Giant Bats (AC 6 HD 2; hp 11; #AT 1; D 1-4; MV 30’ (10’), Fly: 180’ (60’); Save F1; ML 8; AL N)
Soul Eater (AC 0; HD 10*; hp 60; #AT 2; D 1-10/1-10; MV 180’ (60’); Save C10; ML 12; AL C)
Vampire (AC 2; HD 9**; hp 60; #AT 1 touch + special; D 1-10 + energy drain; MV 120’ (40’) Fly: 180’(60’); Save F9; ML 11; AL C)
The team will ambush the party in a Y-shaped cavern with three exits as the PCs approach the center of the three prongs. This cavern lies east of Graakhalia but west of Sind, and the PCs Graakhalian guide will still be with them.
[Map: Ambush by the Master’s Elite]
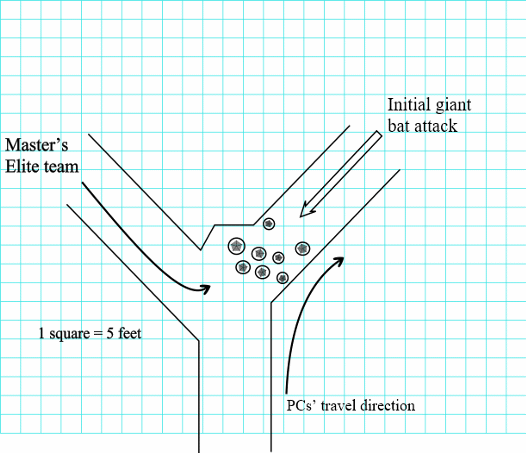
The vampire will summon 3-18 giant bats from a nearby cavern. Two-thirds of the giant bats will attack from one direction, as the PCs come upon a row of stalagmites which limit forward movement on foot in the direction from which the giant bats approach. A round or two after battle is joined with the giant bats, the team will attack from the other direction with the remaining giant bats, where no stalagmites impede movement.
Before the battle, the Diviner will cast bless and protection from good 10’ radius to benefit allies, also casting growth of animals on one giant bat and striking on his mace. The assassin will start the battle invisible using his potion.
When the team charges in, the remaining giant bats will lead with Ahmed Khel and the rest right behind them. Khel will engage in melee with the most heavily armored PC or, optionally, a PC which he carries a grudge against from the time they spent traveling together with the caravan. The soul eater has as its target whichever PC struck the killing blow or cast the spell that brought down the Master. It will attack only that PC and any others who attempt to prevent it from reaching that PC. If the soul eater succeeds in slaying that PC it will immediately depart the battle.
The assassin will use stealth to try and backstab a vulnerable spellcaster. The Diviner will begin by casting spells at range, starting with finger of death. He will use silence on any troublesome spellcaster and cause serious wounds on anyone that closes to melee with him before switching to his mace. The vampire will attempt to target enemy clerics first.
The Graakhalian guide with the PCs will fight alongside them as long as his morale holds.
Rescue the Darokin Army Remnant
Review the matching title section in Part 3 where the PCs rescue a Darokinian force from a larger force of Desert Nomads using an airboat. Here the PCs have arrived too late to intervene in that battle, and most of the Darokinian soldiers were killed with the rest captured. But here the PCs have an opportunity to rescue the prisoners who have been brought south.
Their guide leads them to an exit on the surface near the Sindhi town of Baratpur. It is nightfall when they emerge. The guide recommends they seek out a trusted local contact who can provide news and a map in exchange for a few coins. If the PCs follow the guide’s direction, they come to a small hovel on the outskirts of Baratpur wherein lives a middle-aged Sindhi man named Mohan.
Mohan agrees to sketch out a map of Sind for 5gp, but also offers to volunteer information on some Darokinian army prisoners for an additional 20gp. Assuming the PCs pay, Mohan will guide them to the army camp which lies on the other side of Baratpur.
This is the same army found in Part 3, losses from the battle have already been replaced. Of the Darokinian remnant only Colonel Leonidas, two infantrymen, and three archers remain. When the PCs arrive, Leonidas is being interrogated in a tent with his men bound and gagged just outside it.
You watch the camp carefully from a nearby copse. As the soldiers drop off to sleep and the camp grows still, you note that there is one area of activity near a lone tent where a torch burns outside. A few more minutes of watching and you hear faint cries of pain from the tent. The prisoners Mohan spoke of must be there.
[Map: Desert nomads camp]
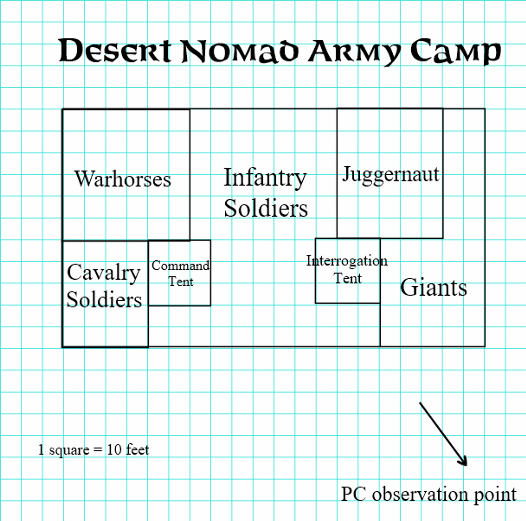
The PCs will need to deal with two human infantry posted as sentries at the perimeter of the camp. If they succeed in doing so quietly, they can make their way to the tent unimpeded where they must deal with ten more human infantry as well as the interrogator. Eight of the infantrymen are outside the tent watching the prisoners, while the other two are inside the tent watching Leonidas be interrogated.
Interrogator, magic-user (AC 6; HD 5; hp 18; AT 1 dagger; D 1d4+1; MV 120’ (40’); Save M5; ML 7; AL C)
The interrogator wears a ring of protection +1 and carries a dagger. He has the following spells memorized:
First Level: magic missile(x2)
Second Level: ESP(x2) (one ESP spell is currently active)
Third Level: hold person
12 human infantry, fighter (AC 6; HD 2; hp 12; #AT 1 bow or sword; D 1-6 or 1-8; MV 90’(30’); Save F2; ML 8; AL C)
Provided the PCs are able to take out the interrogator and infantry guards quietly, they can rescue the Darokinian soldiers and escape back the way they came. If not, the entire army encampment will be alerted by the alarm and the PCs will likely have to flee. Should a pitched battle ensue, once the soldiers realize the PCs are too dangerous, they attempt to withdraw and encircle the PCs so that the giants and stone juggernaut finish the fight.
Colonel Leonidas had been wounded and tortured, he is currently at 31 hp. His men have all suffered some wounds or rough treatment, each has taken 2-12 hp of damage. Leonidas will first suggest stealing some horses from the army camp. If the PCs agree, they will need to deal with five of the elite cavalry soldiers who are guarding the perimeter where the horses are resting.
5 elite human cavalry, fighter (AC 4; HD 3; hp 21; #AT 1 bow or sword; D 1-6 or 1d8+1; MV 90’(30’); Save F3; ML 9; AL C)
Once safely away from the camp, Colonel Leonidas will quickly trade stories with the PCs and conclude they all must return to Darokin with the treasure trove of information that has been collected. Leonidas and his men will accompany the PCs as best they can and fight alongside them.
At this point, allow the PCs to use the map of Sind and Darokin to plan whatever route they choose across land. Leonidas recommends avoiding settled areas and to eventually make their way to Akesoli, as much of Sind is now controlled by the armies of the Desert Nomads and the sea ports are likely to be heavily watched. Leonidas also warns the PCs against traveling through Atruaghin lands as the plateau is not passable on the west side and crossing the lowlands means passing through the lands of the Children of the Tiger.35
Whether the PCs were successful in their rescue or not, the enemy captain commanding the army camp begins tracking and pursuing the PCs in the morning. Magical assistance from the Master and the logical conclusion that they must head for Akesoli helps in his pursuit. Spies among the Sindhi and scouts from other Desert Nomad army units will also help him track the PCs. If necessary, he will split his forces so that the faster contingents of his troops can try to get ahead and cut off escape. He won’t have any of his forces enter the Salt Swamp but will instead have his men circle past it and wait for the PCs to emerge. At the DM’s option, at major settlements such as Sayr Ulan, the captain can replace lost troops and possibly pick up supplemental forces including additional soldiers, trolls, stone giants, or NPC clerics or magic-users.36
The PCs will need to move quickly and take advantage of terrain to try and stay ahead of the army. They may also try and bait the enemy into splitting their forces so that they can ambush and defeat a fraction of the captain’s forces. The captain will be mounted and riding with his elite cavalry during the pursuit, accompanied by either the hill giants or the stone juggernaut (or both).
As long as the captain is alive he will continue pursuit, but if he is slain a reserve officer soon takes his place and resumes pursuit. Once this happens however, the reserve officer (use the human captain’s statistics) must make a morale check each time one of the following conditions occur…
The force of hill giants is wiped out.
The stone juggernaut is destroyed.
The overall force has taken 50% casualties.
Should a morale check be failed, pursuit is abandoned and the PCs are able to slip past the Master’s remaining forces in Sind and reach the Darokin border.
The PCs gain the XP value for all the Darokinian soldiers they rescue.
[Map of
Sind]
https://mystara.thorfmaps.com/sind-8/
Part 5: Back in Darokin
Once the PCs have reached Darokin, this adventure is over. The PCs will be questioned and debriefed over the course of several days by both General Balcares37, as well as the commanders of Fort Anselbury and Fort Lakeside.38
The PCs will receive a substantial monetary reward for their efforts (to be decided by the DM) and the offer of high-ranking commissions in the Darokinian military. If the PCs brought one of the Master’s airboats, they receive an offer from the Darokinian military if they are willing to sell it.
If you wish to begin the adventure X10: “Red Arrow, Black Shield” immediately, then after the debriefing the PCs are given a week to relax and unwind in Akesoli… and their new adventure begins a few days later.
If not, the Master realizes that Darokin now has a very accurate understanding of his forces and nation and what his strategy would be in attacking western Darokin. The Master elects to withdraw his forces near the Darokin border and focus on consolidating his hold on Sind. The PCs have spared Darokin from war for at least a year or two while the Master plots new strategies and carries a grudge against those who bested him.
Part 6: New Monsters
The Boneless39
Armor Class: 0 No. Appearing: 1
Hit Dice: 10** Save As: Fighter: 10
Move: 60’(20’) Morale: 10
Attacks: 1 bite + special Treasure Type: Nil
Damage: 1d10/4d6 or 6d6 Alignment: Chaotic
The Boneless is a horrific monster, far more dangerous than its appearance might suggest from a distance. The Boneless looks like nothing more than a sickly, yellow-cream maggot of vast size, up to fifteen feet long. Its movement is a peristaltic writhing in the acidic slime it so freely secretes. At the front end is a small mouth ringed with wickedly sharp teeth and, while the creature has no visual sense, it has two dark patches where eyes should be, which it uses for thermal sensing.
It has a bite attack, and as a second attack can also spew out a thick glob of very corrosive acid slime once per turn. This glob has a 10-foot radius and a range of 60 feet, with all in the area of effect taking 4d6 damage. A saving throw vs Dragon Breath halves this damage. Also, any creature or character in melee with the Boneless may be affected by acid. Any successful melee hit by a character requires a saving throw vs Wands or the character is splattered by acid from the Boneless, suffering 1d8 points of damage.
Boneless are immune to all magical cold-based attacks. Hits from edged weapons only inflict half damage on the Boneless due to its thick and slippery skin. Boneless also radiate magical fear. Anyone within twenty feet of the Boneless must make a saving throw vs Spells or be forced to flee for 1d6 rounds. Such an affected character can return to try again, making a new saving throw. However, once a successful saving throw has been made, the character will not need to make another against that particular Boneless.
Lastly, the Boneless has a final attack upon its death. When slain by any attack other than a disintegrate spell or something similar, the horror’s head arches back, the monster writhes frantically and utters a screaming gurgle, then its body literally explodes. Its disgusting internal organs and acidic slime explode in a 20-foot radius, inflicting 6-36 points of acid damage on all in the area of effect. A saving throw vs Dragon Breath will halve this damage.
At the DM’s option, magical items carried by PCs can be vulnerable to this acid. Saving throws vs Dragon Breath can be made for such items, use the PCs saving throw with a +1 bonus per +1 of enchantment. A failed saving throw destroys the item.
Undead Bhut40
Armor Class: 1 No. Appearing: 2-8 (2-8)
Hit Dice: 8+4*** Save As: Fighter: 14
Move: Fly 150’ (50’) Morale: 10
Attacks: 1 bite Treasure Type: A
Damage: 1d10 + special Alignment: Chaotic
If a bhut rises as one of the undead, it manifests as an incorporeal spirit similar to a spectre. In this form it is a terrifying sight that consists of a distorted humanoid head with red, feral eyes, a mouth full of dagger-like teeth and a roiling, half-formed body of sickening black smoke and dank red mist. It harbors a festering hatred of the living, especially the ones who slew it in life.
An undead bhut can occupy a dead humanoid body of any size in one round. The body animates immediately and is under the bhut’s full control. An undead bhut animating its own body looks and moves like a zombie bhut, it regains its original statistics except that it loses its vulnerability to blessed weapons and its aura which obscures detect evil and know alignment. It always loses initiative as a zombie, except against opponents which have succumbed to its numbing bite, and is turned as a mummy.
Animating its own corpse, the undead bhut retains its original statistics, including 7+2 HD. It has two claw attacks and one bite attack, doing 1-4/1-4/1-6 damage. The bite is freezing to the touch and anyone bitten must save vs Paralysis or be numbed. Numbed creatures always lose initiative (roll for initiative as normal against undead bhuts in a corporeal body) and are -2 on all to hit rolls. The numbness lasts for 1-4 rounds.
When the animated corpse is destroyed by reducing it to 0 hit points or a Dispel result from Turn Undead, the undead bhut exits the body and continues to attack in its incorporeal form. It can even attack in the same combat round its physical body is destroyed provided it has not yet attacked this round. If an undead bhut inhabits a human or demi-human corpse, it looks like a zombie, has 4 HD and loses its numbing special ability from its bite attack which now only does 1-4 damage. In this 4 HD form, they are turned as if they are a ghoul.
In its incorporeal form, an undead bhut has several special abilities and weaknesses. Anyone within 30’ must make a save vs. Paralysis or lose 1d3 points of Strength, due to its dreadful appearance. Each victim must only save once for each undead bhut, but the effects are cumulative for multiple undead. Anyone whose Strength is reduced to 0 or less collapses and cannot move or attack until the effect wears off, which takes two hours. An undead bhut rolling a natural 20 on a bite attack does 2d10 hit points of damage. Anyone bitten by the undead bhut must make a save vs. Poison or lose 1d3 points of Wisdom. Anyone whose Wisdom is reduced to 0 or less lapses into a coma and dies in 1d4 hours unless the poison is neutralized. A humanoid creature slain in this manner rises as a ghoul with the next sunset. A bhut slain in this manner rises as an undead bhut. Wisdom loss is regained at the rate of 1 point per day.
Like spectres, undead bhuts in incorporeal form can only be hit by magic weapons (with one exception, see below), and are immune to sleep, charm, and hold spells. An undead bhut is turned as a spectre.
Undead bhuts in incorporeal form cannot abide contact with earth or stone and take 3d6 points of damage per round passing through such matter. Any magical weapons made of stone or earth that strike the incorporeal undead bhut deal an additional 1d6 points of damage, non-magical earth or stone weapons do 1d6 points of damage.
An undead bhut speaks all languages it knew in life.
1See X5: “Temple of Death”, p24
2Ibid, p25
3See X5: “Temple of Death”, p24
4Ibid, p24
5Ibid, p16,26
6See page X48
7The target number is an equation because a flat number makes it too easy for a large party and too hard for a small party.
8See X10: “Red Arrow, Black Shield!, p4
9See pages X63-64
10See page X64
11See page X64
12See page X43
13See X4: “Master of the Desert Nomads”, p10
14Se X5: “Temple of Death”, p3
15See page X64
16See inside cover of X10: “Red Arrow, Black Shield”, Allied Expeditionary Force
17See X4: “Master of the Desert Nomads”, p30
18See X4: “Master of the Desert Nomads”, p27-28
19See X5: “Temple of Death”, p25-26
20See X4: “Master of the Desert Nomads”, p26
21See pages X5 and X7.
22See X4: “Master of the Desert Nomads”, p15
23See page B24.
24See X4: “Master of the Desert Nomads”, p3
25See “Champions of Mystara” box set, Explorer’s Guide p25-32
26See page B21
27See page X28
28See page B37
29See X1: “The Isle of Dread”, p28
30See “Champions of Mystara” box set, Explorer’s Guide p25-32
31See page B24.
32See X4: “Master of the Desert Nomads”, p31
33Ibid, p10
34Se X5: “Temple of Death”, p3
35See GAZ14: “The Atruaghin Clans”, Player’s Guide, p49-55
36See inside cover of X10: “Red Arrow, Black Shield”, Army of the Desert Nomads
37See inside cover of X10: “Red Arrow, Black Shield”, Allied Expeditionary Force
38See GAZ11: “The Republic of Darokin”, Dungeon Master’s Guide, p38-41
39See GAZ13: “The Shadow Elves”, Dungeon Master’s Guide p40
40The undead bhut draws upon both the original bhut from X4 as well as the bhut found on pages 20-21 of the 3.0 D&D edition of the “Fiend Folio”.