
Campaign Log: Sasserine/Sea of Dread
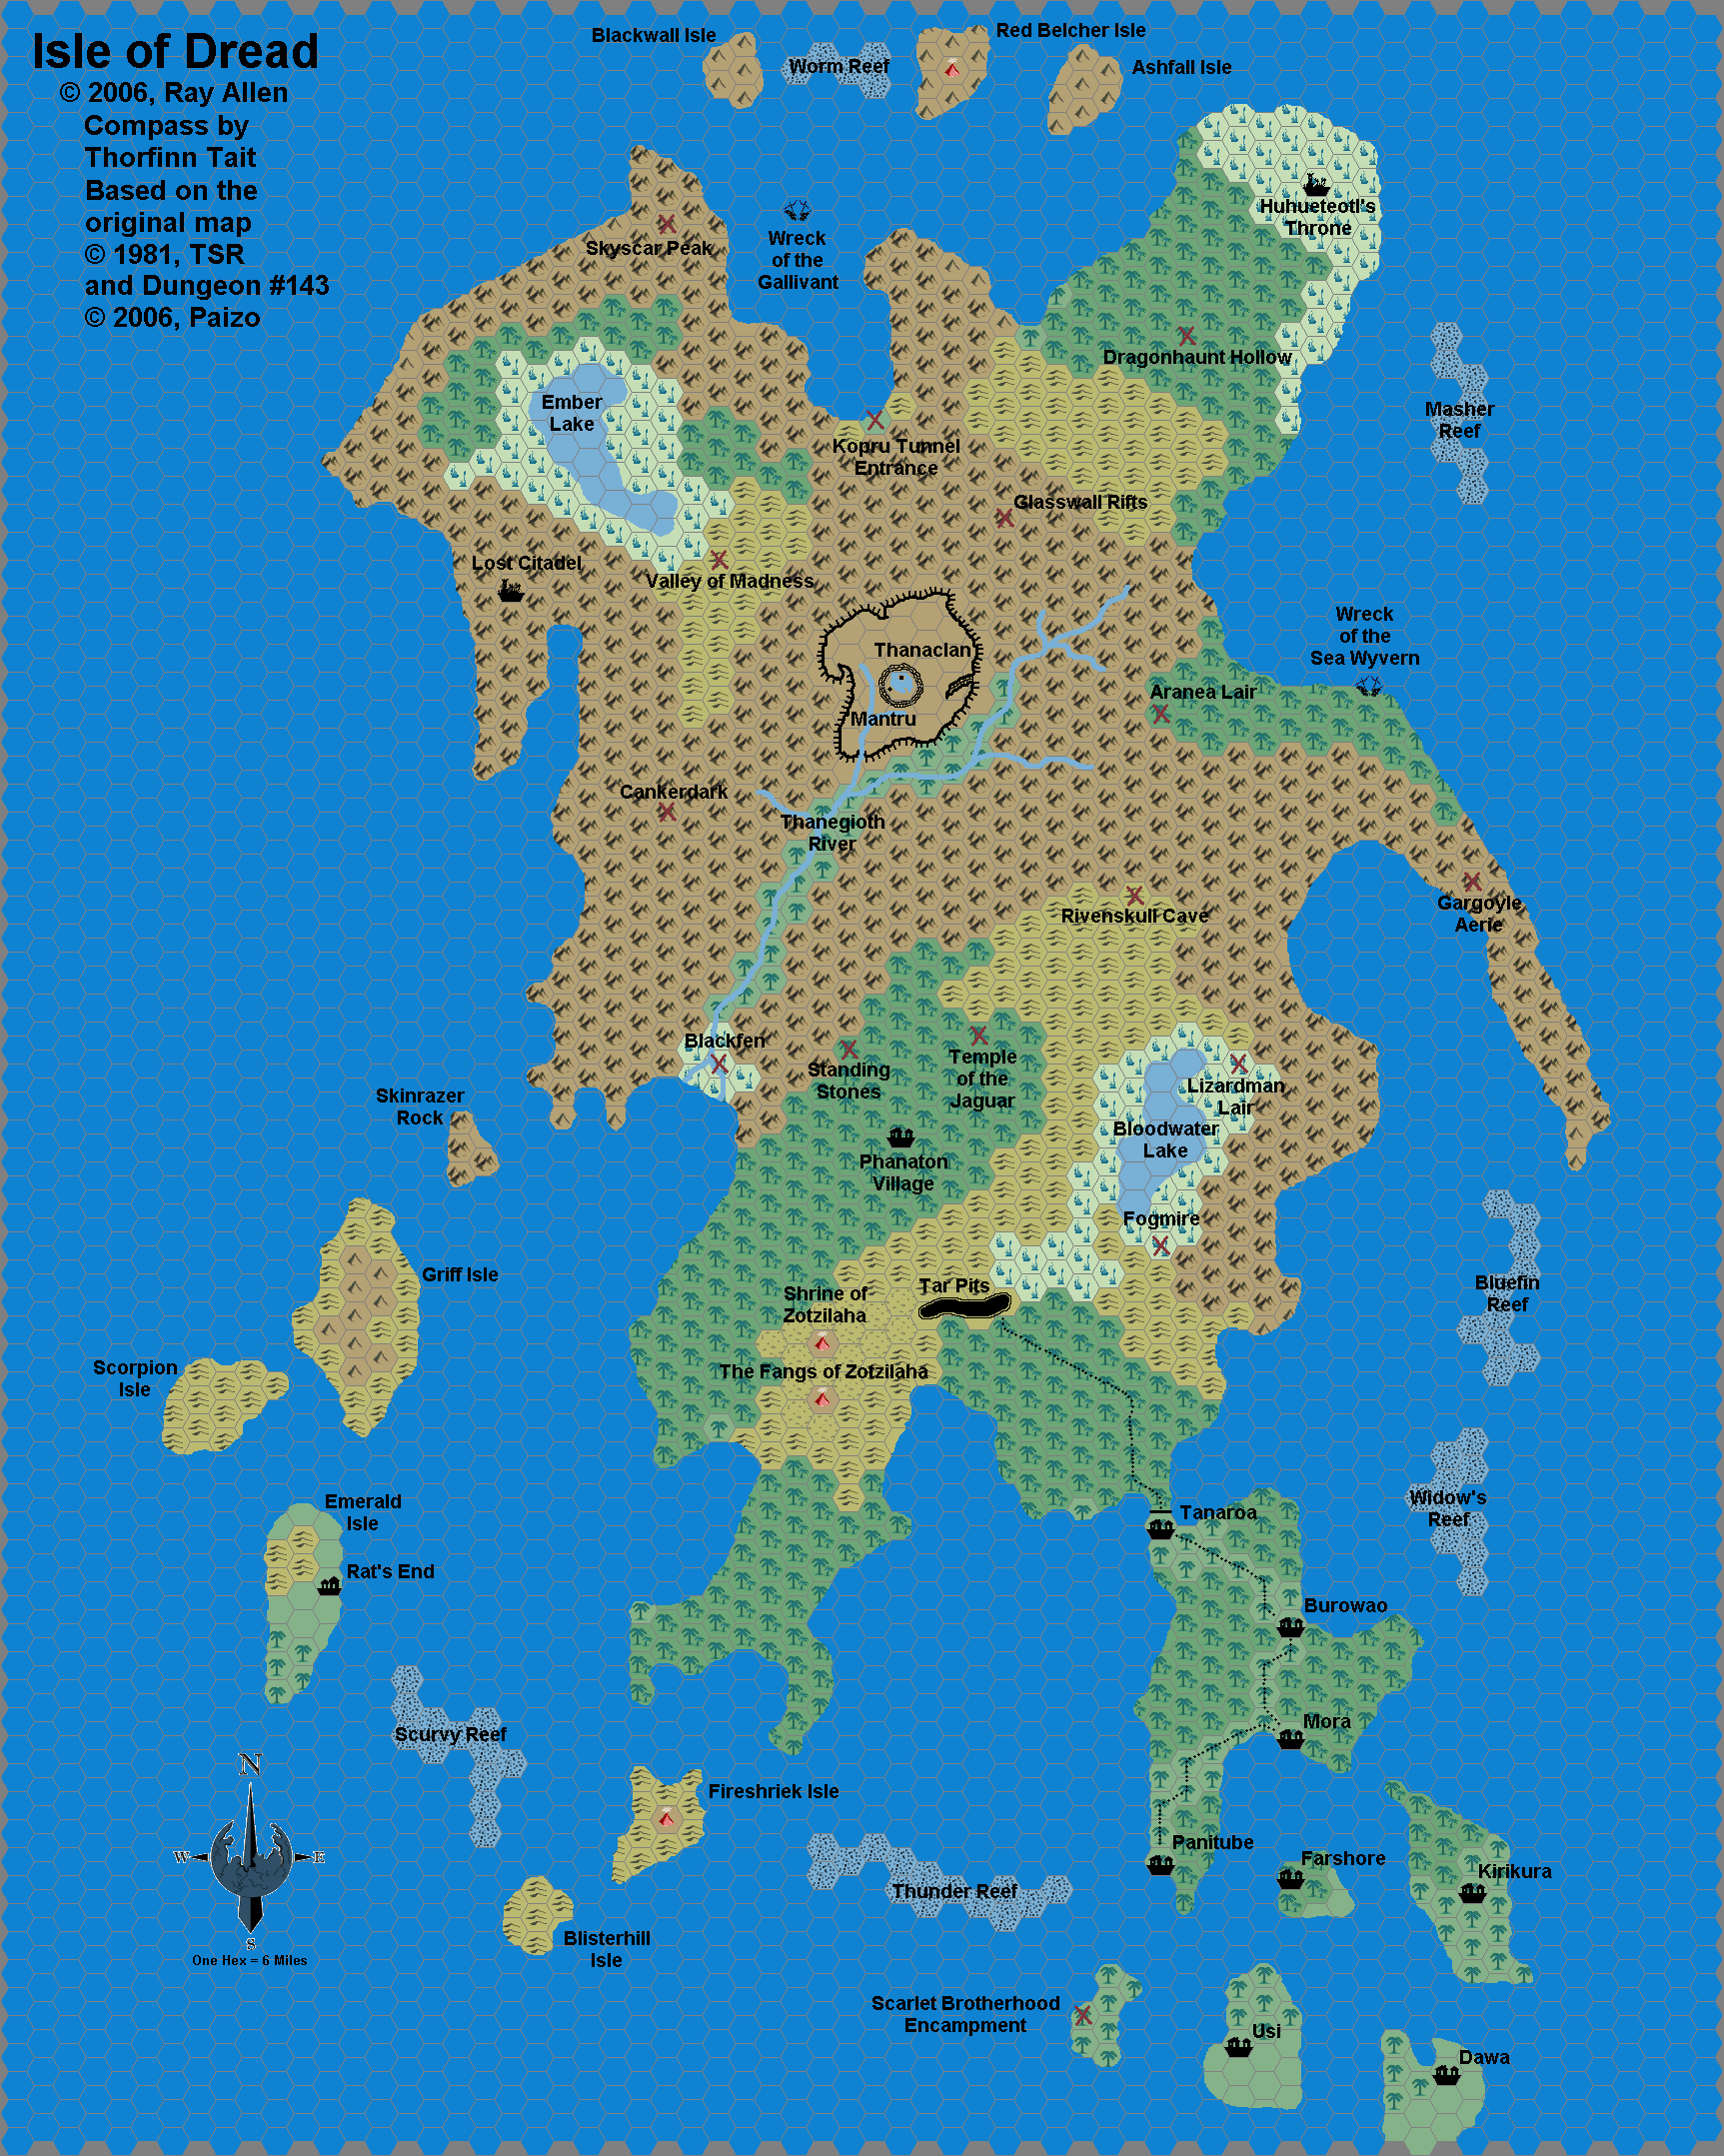
by Ray AllenI'm currently running a modified version of the Savage Tide AP for our gaming group. We're using this map, for the Isle of Dread. All things considered, without the Demogorgon/"Black Pearl is going to kill everyone", the Savage Tide IoD modules fit into Mystara rather nicely for a standard piraty campaign. I have replaced Lavania Vanderboren with Aubreck as the party's patron.
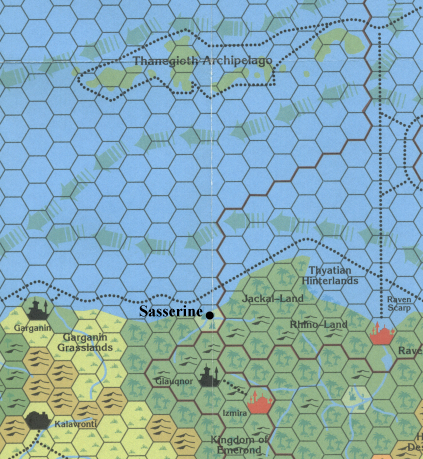
Sasserine Placement
Sasserine is placed on the northern coast of Davania in the single swamp hex where the two rivers meet the Sea of Dread. This would place it west of Raven Scarp, east of Garganin and almost directly north of the Kingdom of Emerond (two 72 mile hexes north of Glauqnor in Emerond).
We are using Basic Fantasy Role-Playing Game as our rules with one regional feat from the Sasserine player's guide and the v3.5 skills. Thieves use the BFRPG thieves skills in place of v3.5 equivalents. All of the PCs were strongly suggested to take Profession (Sailor).
The Party
Jack : Human Swashbuckler
Monique : Elven Rogue
Tylden : Human Cleric of Poseidon
Vivias : Human Sea Merchant
Amella : Human Fighter
Mira : Elven Wizard
Jokar : Phanaton Fighter
Sasserine Campaign Modules So Far
1. Salvage Operation, Dungeon #123.
2. Dragon Hunters, Dungeon #104
3. Tammeraut's Fate, Dungeon #106.
4. Isle of Dread, X1 + parts of Savage Tide, (ōThe Sea Wyvern's Wakeö, Dungeon #141, ōHere There Be Monstersö, Dungeon #142, and ōTides of Dreadö, Dungeon #143).
The campaign began when Aubreck employed the party to salvage the Emperor of the Waves. He had just enough gold to rent the Sea Wyvern for the trip. Upon the return to prosperity and calling in a few favours, Aubreck became one of the most powerful men in the city and the patron of the party. Aubreck isn't a nice guy but rather an extreme capitalist with few morals. Lavania Vanderboren came on hard times and sold her holdings in Sasserine to Aubreck who sent her to Farshore in his employ to run his newly acquired colony.
In the meantime, the party's cleric, Tylden, who has dealings in the Sasserine underworld, was contacted to bring a ōshipmentö of Zzonga fruit into the city. I decided that Zzonga fruit grows in the jungle just to the east. Unfortunately, the player forgot to negotiate a price for the work <snicker>. Once they landed at Fort Akor, they learned of a ōdragonö that had been attacking the fort. The party travelled inland to the Grand Temple and fought the ōdragonö. This would turn out to be the first of many encounters with the terrible Tyrannosaurus Rex in this campaign. Fortunately for them, this was a smaller T-Rex. They searched the temple, nearly died from the Burnt Othur Vapour trap, gathered their Zzongas and returned to Sasserine.
After some downtime in the city, the party was contacted by Aubreck and travelled to the nearby village of Uskarn and Firewatch Island to recover a dwarf named Morley. Morley owed Aubreck several thousand gold after releasing slaves from a ship that Aubreck owned. He either wanted Morley to repay his debt or he would to sell him to the Thyatians for the games. They found Morley and turned him over to Aubreck without Morley suspecting a thing until he saw Aubreck. Poor guy. It was the coliseum for him. They did not venture into Dagon's Maw. This may become a problem later now that the ghost of Syrgaul, the captain of the Tammeraut, has reawakened.
Aubreck contacted the party again and asked them to travel to Farshore. Lavania's ship, the Blue Nixie, should have returned to Sasserine with a cargo or rare woods from the Isle of Dread. The party set out on the Sea Wyvern again. Along the way they encountered the Sargasso Sea. Locked in the sargasso is a gnomish side-paddle steamship that is lying on its side. They investigated the wreck and fought many assassin vines and vine horrors. They also investigated a small single-masted sailing ship named Bountiful. She was still seaworthy (but lost most of her rigging and 50% of the mainmast) but was just as locked in the sargasso as the Sea Wyvern. After two nights of fighting off the vine horrors, the party trekked to the wreck of the Thunder and encountered and defeated the dreadful Mother of All.
When the Sargasso started to break up after the death of the Mother, the party was able to run to the Bountiful before they ran out of solid seaweed to walk on. Amella, Aubreck's captain of the Sea Wyvern, soon found the party. A rather easy task as the Wyvern and Bountiful were the only two ships still afloat that had been trapped in the sargasso.
The party took the Bountiful in tow as a prize and Monique the rogue stayed on board to man the rudder and rig a temporary mast and sails. Unfortunately, a heavy storm (hurricane actually) blew in. Monique and one seaman from the Wyvern, Vivias, were on board the Bountiful and the rest of the party and crew were on the Wyvern. Monique lashed herself to the wheel and Vivias ran below. The tow line from the Sea Wyvern broke, but Poseidon was merciful! Three natural 20's later on Profession (Sailor) checks (no her dice aren't loaded!), the Bountiful smoothly sailed proudly into Farshore. The Sea Wyvern wasn't so lucky. She ended up on Masher reef on the northeastern side of the isle. The party fought their second T-Rex and successfully repaired the Wyvern with the tools and supplies they had thought to put in the Wyvern before they left. (I was surprised that they had thought of repairs too!) It took several weeks of repair work and one monthly high tide later to put the Wyvern back on the high seas.
The party was reunited at Farshore when the Sea Wyvern arrived. One day later Slipknot Peet, the captain of the Hellfish of the Crimson Fleet, attacked Farshore. The pirates burned about 1/3 of the town but were defeated by the party and townsmen. A captured pirate by the name of Lefty warned the party that the Crimson Fleet didn't like the idea of Farshore in its backyard and would attack within two months.
Preparations were made for the defence of Farshore by the party and inhabitants. They dug trenches around the palisade wall, upgraded many buildings and built several trebuchets. The town guards have given minimum training to all able bodied people. After the first week, the local cleric, Vesserin Catherly, and Tylden started using Stone Shape to make pillars across two-thirds of the harbour entrance with glyphs of warding (fire) on the tips. The final third will be crossed with anchor chains.
The outlying farms had been attacked by a group of troglodytes and Jack, Amella, Monique, Mira, Tylden and Vivias travelled to the far side of Temute (the island on which Farshore is located) to deal with the menace. In the lair they found a small golden idol to the bat god, Zotzilaha.
They soon realised that the town would not have enough time to train the townsmen to properly defend it, so they travelled to the native village of Tanaroa. There they fought fire bats and learned that a nearby active volcano was going to erupt if a certain bat-shaped idol was not returned to the shrine located inside the volcano. The party tactfully returned the idol to Zotzilaha and secured the aid of the natives for the defence of Farshore.
Afterward, the party decided to travel to the tar pits and collect tar for ammunition for the new trebuchets they were building. They encountered another T-Rex on the way and were nearly killed by it. A lucky roll on a summon monster chart brought a gargoyle to the fight. The gargoyle could not hit the T-Rex and the T-Rex could not hit the magical creature. The party took the opportunity to run as fast as they could. Two days later they encountered the same T-Rex and killed it, but the T-Rex encounters were not over! The largest T-Rex on the island, Temauhti-tecuani, hunts near the tar pits. While the party was gathering tar, a group of wounded and frightened phanaton ran into their midst. Temauhti-tecuani was right behind them. The hungry T-Rex was unconcerned about what he ate and happily attacked the party as the phanaton cheered in the background.
After the big dinosaur finally fell, the phanaton asked the party to travel with them to their village. The phanaton elder agreed to send 100 phanaton warriors to Farshore within two weeks to help in the town's defence.
While in the phanaton village the party learned of a lost cache of rakasta weapons in an old temple to the north. The party was guided to the site by a phanaton named Jokar. There they met the guardian of the rakasta temple, a couatl named Tonatiuh, and honestly described their need for the weapons to defend Farshore. Tonatiuh, who still grieved over the loss of the rakasta, allowed them to take the weapons cache and then departed to his home plane.
The party trekked back across the island to Farshore. They are making their final preparations for the Crimson Fleet attack.
Where to From Here, Side Treks and Adventure Ideas
The Sunken Ziggurat (DCC#23, Levels 5-7)
Drums on Fire Mountain (Classic, Levels 5-8)
The Secret of Smuggler's Cove (DCC#7, Levels 5-7)
Bloody Jack's Gold (DCC#4, Levels 10-12)
The Kopru Ruins (Web Enhancement, Level 12).
Assault on Stormbringer Castle (DCC#21, Levels 12-14)
The Stormbringer Juggernaut (DCC#22, Levels 13-15)
Strike on the Rabid Dawn (Dungeon #111, Level 13-15). Crimson Fleet Pirate ship that is blockading Sasserine.
Assault on Scuttle Cove (d20/BFRPG, Original)/Serpents of Scuttlecove (Dungeon #146, Level 15).
Maps of mystery, Dungeon #106.
Living Shipwreck, CR18.
Also...
DCC#46, Book Of Treasure Maps has a couple of pirate maps that I may put in some treasure hordes.
Next post... The Battle of Farshore!
The party still had two weeks to prepare for the arrival of the Crimson Fleet. During that time they placed stone spikes in the harbour entrance with glyphs of warding on every other spike, and placed a heavy chain across the middle section because they didn't have enough time to spike the entire channel. They also trained the people of Farshore with the weapons from the Rakasta weapons cache and dug trenches around the palisade wall. They had built seven trebuchets over the two months of preparation time since being forewarned of the attack by Lefty. Last of all, the Bountiful was sailed to the native village of Mora just a couple of hours to the north to get her out of harm's way. While in Mora, they were asked by Karta, a village elder, to help quell the Walking Ancestors and find the Zombie Master before the undead kill them all! The party agreed to return to Mora after the battle, whereupon they returned to Farshore in their folding boat.
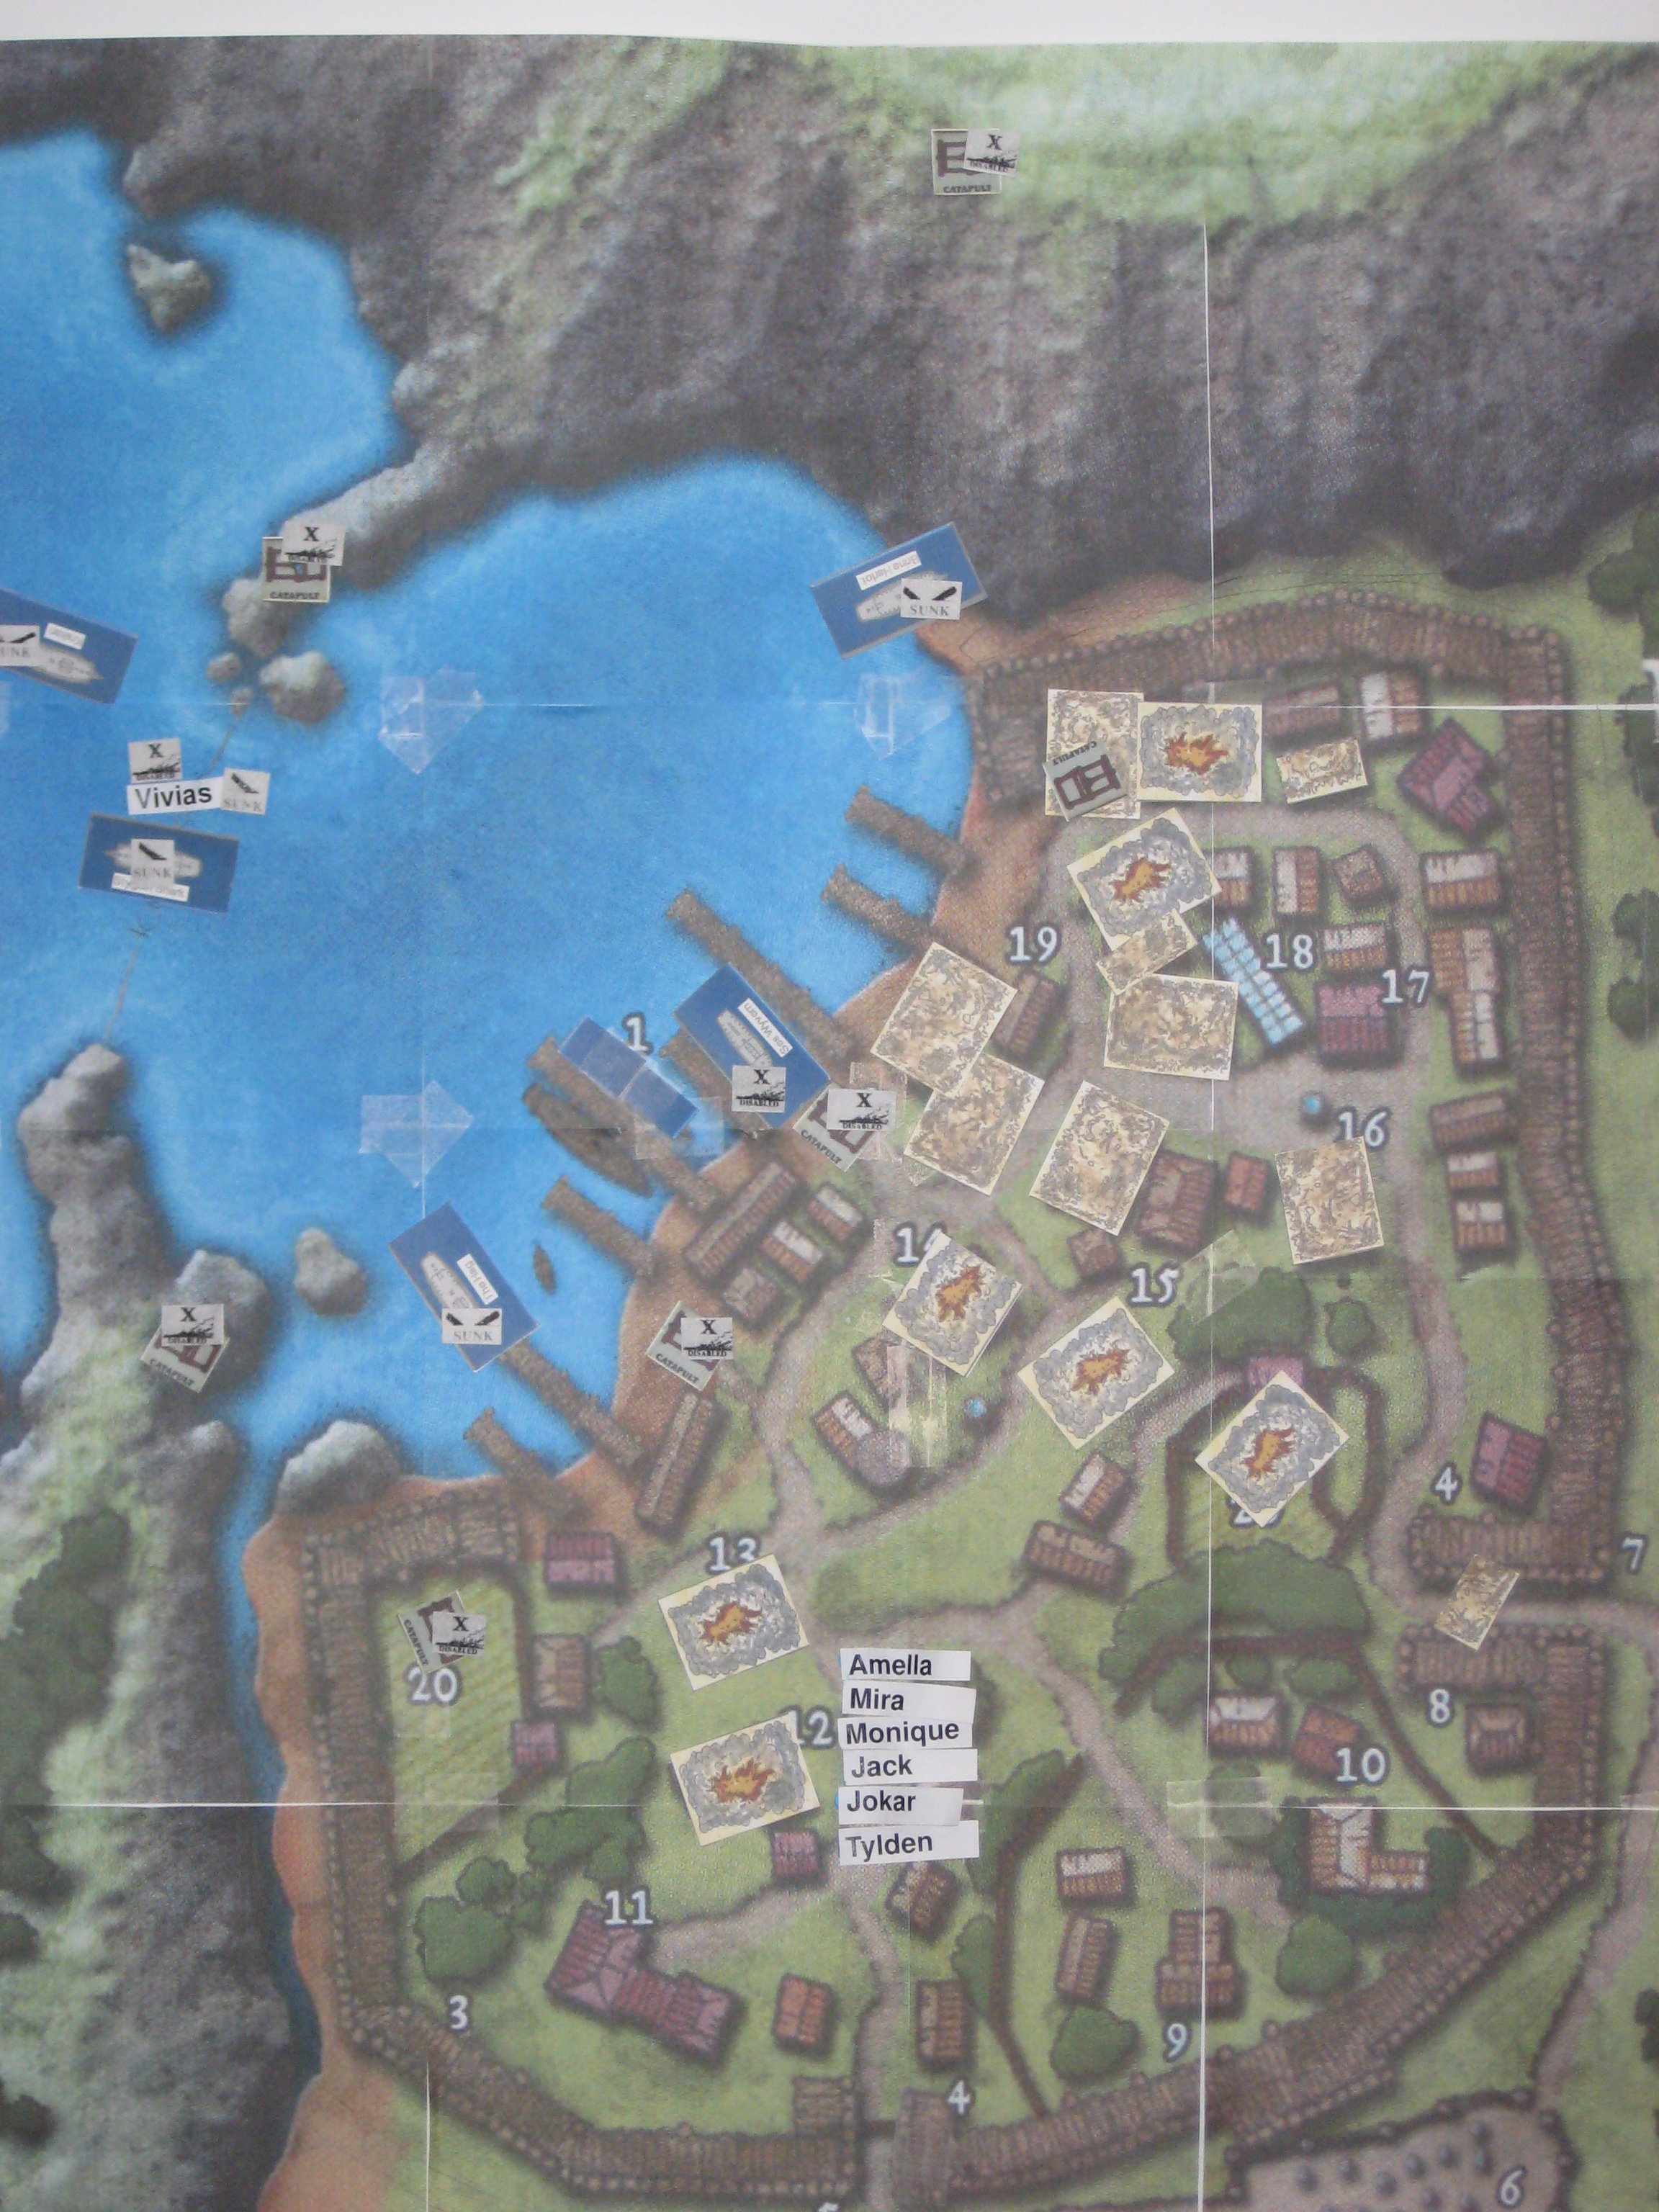
Battle of Farshore
14 Yarthmont 1000 AC, 7:12 am
The six ships of the Crimson Fleet were spotted 2 hours south of Farshore. The party made their final preparations. Tylden and Vivias had the best water-based spells and skills and positioned themselves on the northern breakwater barrier. The rest of the party situated themselves on the waterfront. Vivias cast Clear Sight and identified the Sea Wyvern, Aubreck's ship. It had been captured after leaving Farshore and was now part of the pirate fleet.
Soon the Crimson Fleet was within trebuchet range. The two trebuchets on the hills above the breakwaters were fired. Two fireballs from the wand of the Crimson Fleet's wizard, Vesslin, put both out of action inside two rounds. This was largely how the trebuchets were handled by the pirates. As soon as one fired, a fireball would land on it.
The party waited for the fleet to enter the harbour. The flag of the squadron, the Brine Harlot, entered first and snapped the chain in the centre of the channel. The Kraken and The Sea Witch's Curse both struck the spikes, taking heavy damage. In the end, this saved the Witch from being sunk by the party. Both ships launched their longboats filled with bloodthirsty pirates to attack the town from this point. The Sea Witch's Curse was stuck on the spikes for several rounds but dislodged herself and turned out to sea. The Brine Harlot also launched her longboats, but Tylden was ready with a Summon Monster spell. A mako shark was summoned and tipped over several of the longboats.
Tylden summoned a 12 headed hydra (damned lucky die roll!) and placed it at the stern of the Harlot. It quickly tore the stern off the ship, which was already burning from several trebuchet hits (burning oil-filled coconuts). Her momentum took her aground near the north palisade wall. Unfortunately, the hydra did not survive being rammed by the next ship to enter the harbour.
The Sea Wyvern and The Hag both entered the harbour. The pirates didn't care what happened to the Wyvern so they ran it aground on the waterfront and poured out of the ship to attack the town. The Hag wasn't so lucky. She took several fireballs and a lightning bolt and was a burning wreck when she struck the end of one of the docks.
The Stygian Shark was the last ship to enter the harbour and to cast off longboats. Four flesh golems jumped in the water and simply walked to shore to attack the town. The ship then turned to head out to sea and out of range of the trebuchets.
Vivias decided to enter the water by wearing a Helm of Water Breathing and a Ring of Freedom of Movement. He had two Warp Wood spells ready. He cast one on the heavily damaged Kraken, which sank the next round. Unfortunately, this event attracted the attention of Vesslin, who sent his three lizardman bodyguards to take care of the problem. They swam a little too close to a spike and set off one of the glyphs. This forewarned Vivias, who cast a web spell on the lizardmen. Two of them missed their saving throws and were caught in the webs, but the third escaped. The lizardman and Vivias fought until Vivias was reduced to a single hit point, and the lizardman forced Vivias to surrender. They walked toward the Stygian Shark with the lizardman holding a cutlass to Vivias's back. When the Shark sailed into sight, Vivias decided to risk it all and cast his final Warp Wood on the ship. The lizardman sank the cutlass into Vivias, killing him (-6 hit points). Several rounds later Vivias stopped bleeding after rolling a stabilisation check. He was found unconscious, lying on the bottom of the channel near the wreck of the Stygian Shark after the battle.
The Stygian Shark was ripped open from bow to stern and sank immediately. Unfortunately, she sank in the middle of the channel, which effectively closed the port of Farshore.
By this time there were nearly 200 pirates engaged on shore against the defenders of the town. The party fought many pirates and destroyed three of the four flesh golems which were destroying buildings in the town with ease. The fourth golem destroyed all the buildings in its path until it came to the eastern town gate. It battered it down and wandered out into the jungle.
The pirates soon lost their taste for combat and re-entered their longboats and pulled for The Sea Witch's Curse, ending the Battle of Farshore. Jack and Jokar tracked the last flesh golem for about an hour before returning to Farshore. The rest of the party helped put out the fires that were raging in town throughout the rest of the day.
On the following day, the party searched the wrecks of the pirate ships and found a sea chest containing three different pirate treasure maps.
The end result was that about 50% of the town was damaged or destroyed, but the Crimson Fleet lost five of its six ships and over 50% of its crews in the conflict.
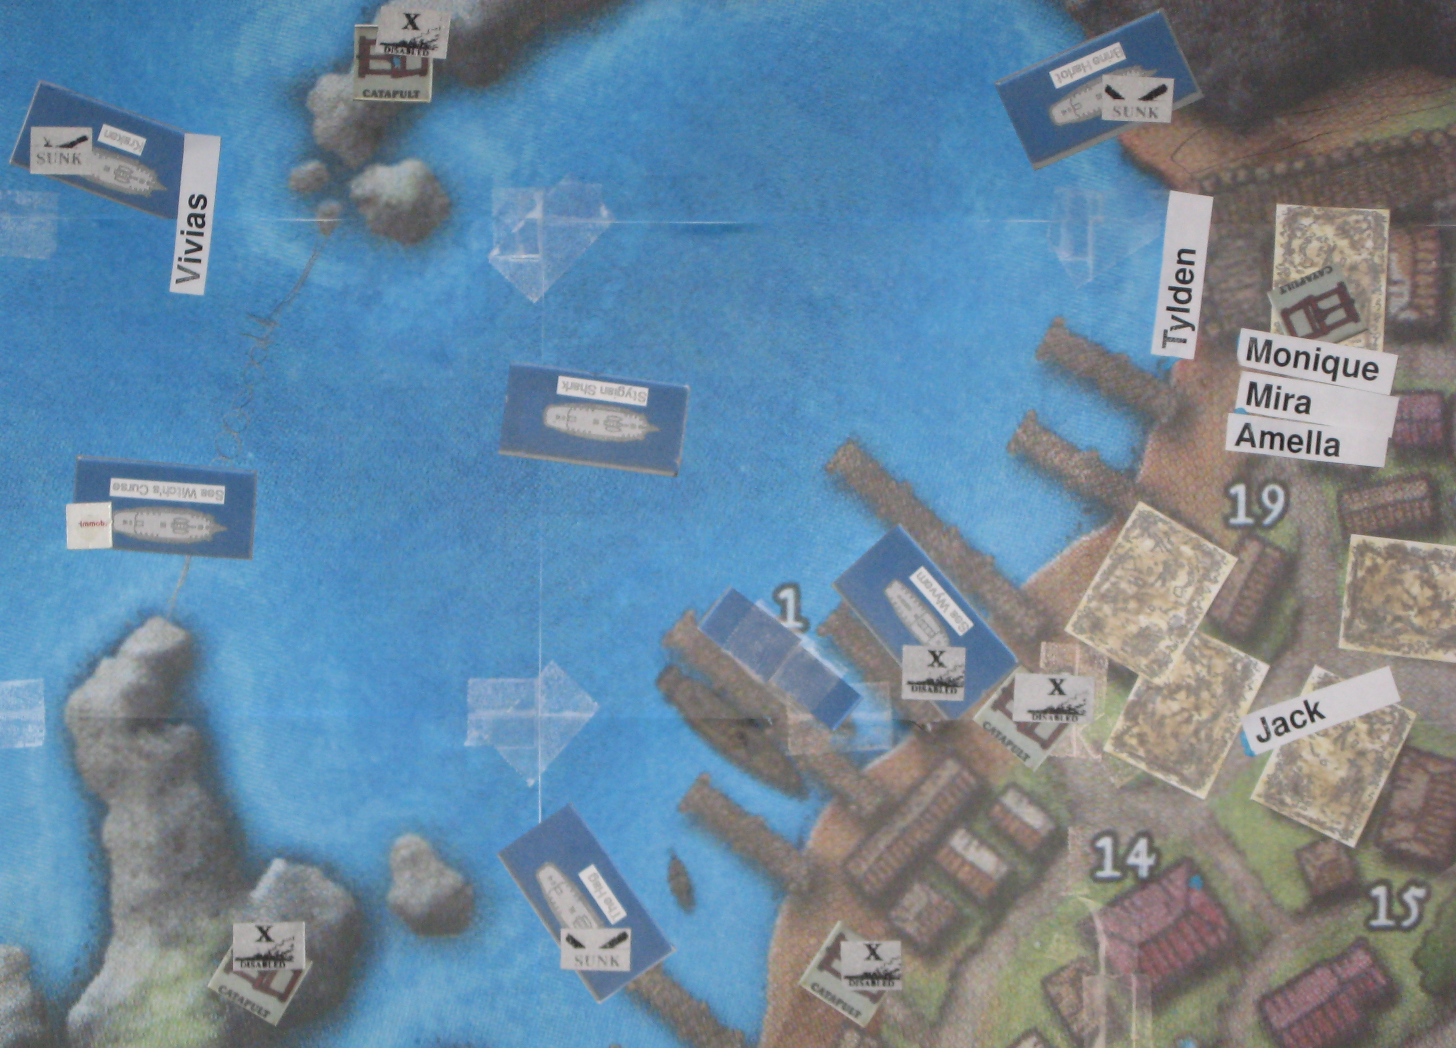
Battle of Farshore at the end of first game session
Figure 1 (2.5mb)
Figure 2 (1.7mb)
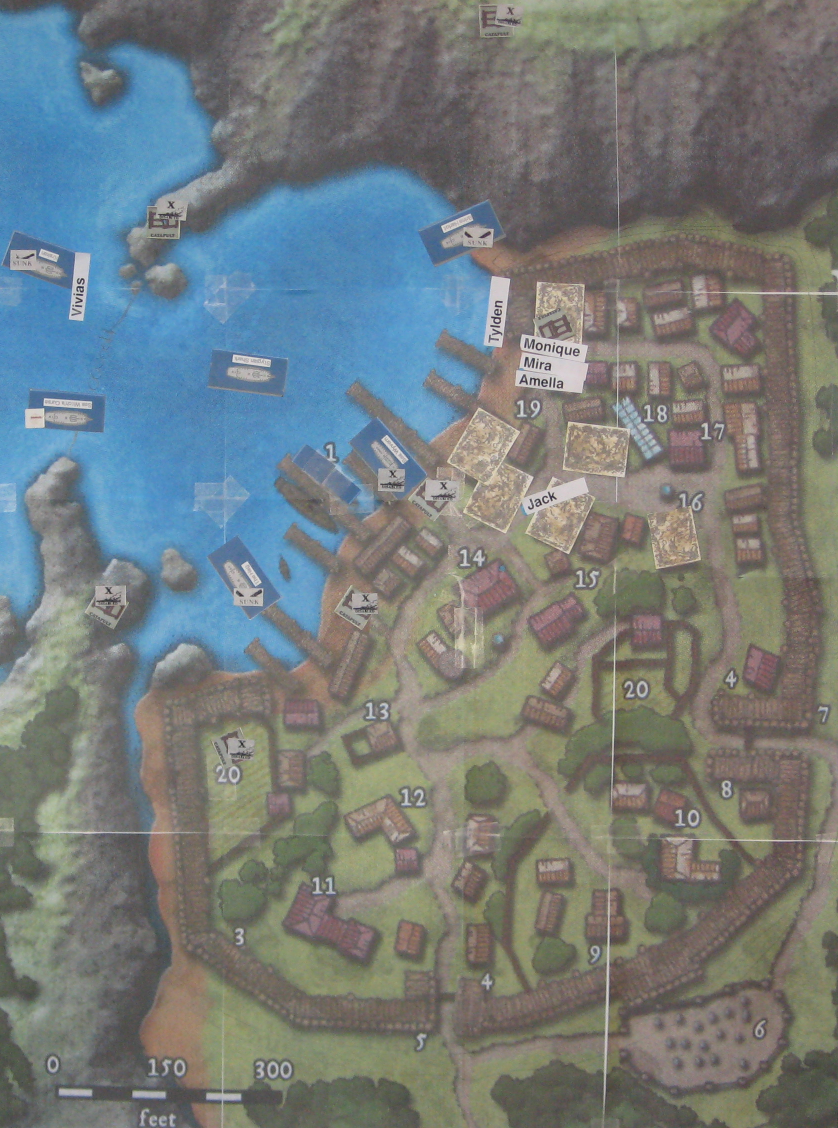
Battle of Farshore at the end of second game session
Figure 1 (1mb)
Figure 2 (287kb)