
The Tomb of Thob Shanwood
by Giampaolo Agosta from Threshold Magazine issue 16[Image: Ship in a storm]
This article presents a short BECMI D&D adventure designed for a party of 3-5 characters of levels 1-3, but easily adapted to slightly higher levels.
The Player Characters have recovered a treasure map from a dying hin. Once deciphered, the map leads the party to Fletcher Reef, a group of atolls in the sea between the Five Shires and Ierendi. There lies the heavily protected tomb of “Peg-leg” Thob Shanwood, a famous pirate of the VIIIth century AC.
Plot Summary
Some time before the start of the adventure, the Player Characters recover a treasure map from a dying hin, a member of the Flintfoot clan. Where this event happens is immaterial to the adventure itself – the hin might be found in the dungeons of Fort Doom1, on a trail in the wildernesses of Karameikos, or the victim of a Veiled Society mugging in Specularum.
The map itself is incomplete, and the PCs must track down the hin’s brother, Moran Flintfoot, to obtain its missing part. Once full the map is deciphered, it shows the location of the tomb of “Peg-leg” Thob Shanwood, a famous hin pirate of the VIIIth century AC, on Archer Atoll, one of the Fletcher Reef atolls.
[Image: Skull & Bones]
The tomb was built to house not only Thob’s body, but also those of several of his crew. Several measures were taken to ensure that no one could enter the tomb and disturb the pirate’s final rest. The PCs must overcome the tomb’s defences if they are to escape with their lives and the treasure.
Background
This section provides background information for the Dungeon Master about Thob Shanwood, his life, death, and treasure map.
The Life of Thob Shanwood
Thob Shanwood was one of the pirate stars at the end of the VIIIth century AC. Taking advantage of the chaos brought in Thyatis by the Year of Four Emperors, he managed to plunder many Thyatian merchant ships on his small sailing ship, the Rundegos Lightning.
Among his friends and crewmates were Brogan, a Brownie, the ship cook and Igor Ivanovic, a Traladaran magic-user and ship mage of the Rundegos Lightning. Ewan Flintfoot, an ancestor of Moran and his brother, was the ship’s quartermaster.
In 803 AC, the new Emperor, Giovanni I Porpora, ordered a campaign against the hin pirates. The Thyatian battleship Gabrionus II, strengthened with several battlemages, engaged the Rundegos Lightning. Many pirates died, and Thob was mortally wounded in the battle. The ship was also damaged, but Ewan Flintfoot managed to escape in the high sea, thanks to a strong wind. Unable to control the ship, the few survivors shipwrecked on Archer Atoll. Thob and six crewmen died shortly after being transported on the island.
Ivanovic, who was a competent wizard, used his elemental magic to dig a corridor down to a natural cave under the atoll. With the help of Ewan and the twelve surviving pirates, he built a tomb for Thob Shanwood and stored most of the heavier treasures, which they could not carry away on a lifeboat, in a secret room. While exploring the lowest cave, he was surprised and killed by a marine decapus.
Ewan and the other sailors covered the tomb with sand, took the lifeboat and sailed for the Five Shires. However, they left Brogan behind. The brownie had gone with Igor, and did not return – he was wounded and unconscious, but Igor had used a dimension door spell to send him to the upper level – so the other pirates assumed he had died as well.
The lifeboat was caught in a storm while approaching the coast, and only Ewan survived. He gave up piracy and retired in Rundegos, and left a map to his heirs, though none of them has ever tried to decipher it.
The Treasure Map
The treasure map is divided in two parts. The first, shown in Figure 1, is an encrypted text in a somewhat uncertain old Thyatian. The encryption method is a simple reversal of rows and columns of the plain text. The decrypted text reads:
cum ad sagittarii insula ex septentrione adveneris, xvii passuum ab submersa nave remotum, tobiae scianuti piratae sepulcrum invenieris
or, "as you come at Archer Atoll from the north, at 17’ from the submerged ship, you’ll find the tomb of pirate Thob Shanwood”.
[Image: Treasure map]
This first part of the map is recovered by the PCs from a dying hin – they may find him on one of the Karameikan roads, left behind after a goblinoid raid, or as a prisoner in a cell in Fort Doom or in a goblinoid lair. There’s no way they can save the hin – if the PCs do not have healing spells, he is simply beyond the means of a mundane healer; otherwise, he has been poisoned, so cure light wounds will not help him.
Figure 1: The Treasure Map
s m a a m n a v a p i s
i u t i u a m x e e i d
r r a c t s u s n s i a
e c r s o r u i o x r m
i l i e m e s r i e a u
n u p a e m s e r a t c
e p i i r b a n t l t
v e t b e u p e n u i
n s u o v s i v e s g
i e n t a b i d t n a
The second part has been destroyed. Only Moran Flintfoot, one of the nephews of Jenkins Flintfoot, the hin ambassador to Duke Stefan Karameikos, knows the information originally reported in the second part, that is the location of Archer Atoll.
Moran Flintfoot, however, is not easily found – he has been captured by the Iron Ring. Moran’s brother, the dying hin in possession of the first part of the map, will tell the PCs where his brother is, and will give them his part of the map (or tell them where he hid it) in exchange for a promise to recover his brother. The DM may use this hook to send the PCs on a mission to Fort Doom, to some slave market outside Karameikos (Jaibul, for example), or simply to stage an assault on a goblin lair2.
When the PCs manage to find Moran, he will, after mourning the loss of his brother, agree to recover the treasure and share it with them. Moran is able to decypher the map, and knows the exact position of the Archer Atoll – the westernmost of the Fletcher Reef atolls.
Voyage to Fletcher Reef
Dangers of the Sea of Dread
The Sea of Dread stands up to its name. Even near the coasts, dangers abound for the unwary sailor.
[Image: Ship]
The following random encounters can be used (roll 1d8):
1. The Shark! A Great White Shark hammers against the ship, trying to sink it (each successful attack causes 2d10/5 Hull Points to the ship). The PCs must drive it away – they may use a Knowledge skill and Herbalism to prepare a repellent, or fight the shark. Surviving the encounter awards 300 XP.
2. Fog banks! The PC’s vessel is caught in a bank of fog. It will crash onto a coral reef unless the PCs can either pass a Navigation roll at half skill, or use long pole to check the depth and proceed with caution, or use magic to dispel the fog. Surviving this fog bank awards the PCs a bonus of 125 XP.
3. The Pirates! A small ship loaded with pirates (2d6, plus one per NPC sailor) draws close. It may be manned by Iron Ring, Ierendians or hin pirates. Escaping or defeating the pirates bestows 200 XP.
4. Sea Serpents! A pair of Sea Snakes attack the ship. The first serpent draws the attention of the defenders with a frontal attack, while the second attacks from the opposite side. This encounter confers 250 XP if the PCs survive.
5. Storm ahead! The ship is caught in a major storm. The PCs will need to come up with good ideas or successful skill uses to save their ship (award 200 XP if they survive the storm).
6. Merchant Ship! These are merchants from any of the coastal nations of the Known World. They may have professional help (carpenters, healers) food, water, or goods to sell (at triple cost).
7. The Roc! A small Roc is scouting the sea in search of prey. It swoops on the ship, targeting one sailor (an NPC, if possible). The PCs have one round before the Roc captures its target. If they manage to wound the bird, it will retreat on a failed morale check. In this case, the PCs get 100 XP for saving the sailor.
8. Navy Patrol! A ship from the Karameikan, Ierendi or Five Shires navy approaches the party’s ship, searching for illegal goods or proof of involvement in piracy.
Archer Atoll
Archer Atoll is a strip of sand that emerges from Fletcher Reef. A few palm trees and some low shrubs grow on this otherwise barren atoll. Seagulls and other sea birds often stop here, but do not lair on the island, due to a nest of aggressive Large Crabs (see Appendix A).
The only other notable feature of the atoll is what remains of Shanwood’s sunken ship, only a few yards north of the atoll’s beach.
The Sunken Ship
This ship sunk on Fletcher Reef two centuries ago. Only a very small part of the ship survives, the emerging section covered in seagull guano, and the underwater section completely encased in seaweeds, and small mollusks.
A pair of Bull Sharks (2* HD, 8/12 HP, 50 XP) lairs within the broken hull, and will attack any small sized or larger creature that approaches the ship.
The Crab lair
A pair of Large Crabs lairs on Archer Atoll. One of the crabs (2 HD, 11 HP, 20 XP) will be scouting for food when the PCs land. As hungry as these animals always are, the crab will attack the party.
Crablings can also be found in large numbers. Random encounters with 1d3 crablings are possible at any time.
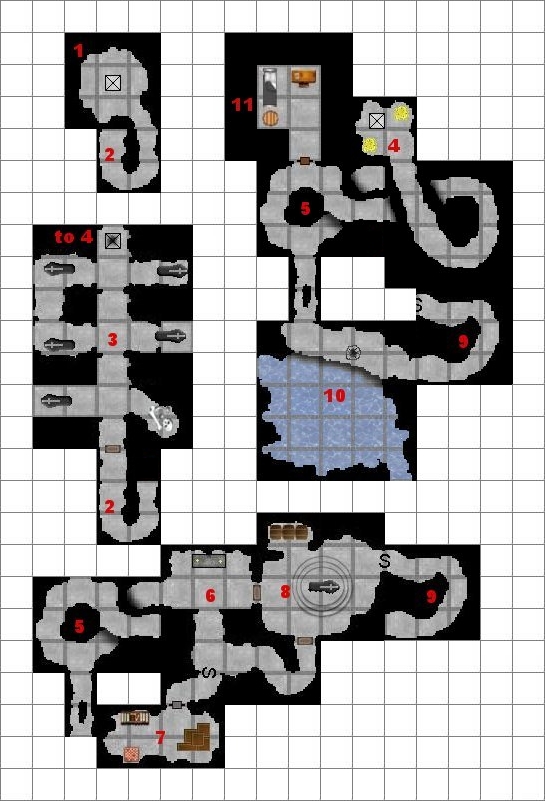
The Tomb
The tomb of Thob Shanwood was in the rock below Archer Atoll. The PCs need to dig about 7’ below the surface to find the trapdoor, covered by a stone slab. A large metal ring set in the stone slab can be used to heave it open.
Below ground, the tomb is composed of a set of roughly hewn rooms. The work was clearly done in a hurry, and in some cases the trace of earth magic use can be found. This latter item requires a successful roll on an appropriate skill, while the rest is obvious to anyone with mining skills.
The two lower levels, on the other hand, are natural caves. The upper one has been adapted to serve as the tomb of Thob Shanwood.
Note that the tomb was built to be deadly, so every room and most corridors are manned by guardians or protected by deadly traps. However, most monsters are bound to the room they guard, and will not pursue the PCs.
Room Description
Room 1: The Guardian
The first room under the tomb entrance is roughly circular. It has a single exit beyond the opening in the ceiling, and is empty, save for a wooden ship figurehead planted on the wall opposite the exit.
The figurehead is actually a living statue, a construct that once rested on the prow of Thob Shanwood’s ship. At his death, his friend and crewmate Igor Ivanovic, a magic-user and creator of the statue, placed the figurehead in Thob’s tomb, commanding it to "kill any tomb raider".
The figurehead is not a mindless construct, but rather an intelligent, if not exceedingly bright, creature, and is quite bored after two centuries spent in this room. It can be parlayed with, though once it decides the PCs are tomb raiders, it will most likely fight until destroyed. It has a female personality, and is talkative, vain, air-headed, and generally annoying. If the PCs persuade it that they are not enemies, it will try to strike a deal with them, letting them pass in exchange for being set on the prow of their ship.
Opponent: Figurehead Living Statue (4+4 HD, 24 HP, 125 XP).
Room 2: Corridor
This corridor leads down from the room of the guardian to the tombs of Thob Shanwood’s crewmates. The last part of the corridor is protected by a dangerous trap, a pendulum with a large axe blade attached. The trap is triggered by a pressure plate and can be detected by Dwarves using their detection abilities, or by Thieves using the Find Traps skills. The latter have +20% bonus to the Find Trap roll, since the activation mechanism is rather large. On the other hand, the trap cannot be easily removed.
Average-sized or thin PCs may simply stick to the wall while the blade passes, but large PCs will have to trigger the trap with a pole and cross right after the pendulum swings. This requires a successful Dexterity roll.
Any PC hit by the blade suffers 1d8 HP of damage. Note that a successful Saving Throw vs. Paralysis will allow a PC to escape damage if he accidentally triggers the trap, but not if he is trying to bypass it using the above described method. Also, in this case the PC will not be able to bypass the trap, just to step back in time to avoid damage.
Room 3: Crew’s Tomb
Several deep alcoves and passages open on both sides of this corridor. Each passage houses a single coffin, standing upright against the farthest wall. The six coffins are about halfling-sized. In each coffin rests one of Thob Shanwood’s comrades. They have been animated as Zombies, and will animate to attack any intruder.
Opponents: 6 Zombies (2 HD, 8 HP each, 120 XP).
At the end of the corridor is a trapdoor, blocked by a heavy stone slab. Only two characters of medium size can cooperate to move the slab, which requires a combined Strength of 30. Otherwise, PCs equipped with a pick can break down the slab in a few hours. The broken slab will fall down the shaft that leads to Room 4. The shaft is about 10’ deep.
Room 4: Entrance to the lower tomb
This roughly square room is connected to a single corridor. A trapdoor in the ceiling allows the character to enter from Room 3.
Most of the walls and floor is covered by patches of Yellow Mold, so extreme care is required to avoid touching the mold. If the PCs break the stone slab covering the trapdoor, the broken stone fragments will cause the Yellow Mold to release a deadly cloud of spores, filling the entire room.
Opponents: 2 Yellow Molds (2* HD, 9/12 HP, 50 XP).
Room 5: Winding passages
This corridor has a series of turns that make it similar in shape to an 8. In the lower section of the 8 open two passages, one blocked by a door, and the other brusquely sliding down to the lower caves. The section of ceiling above the second branch is trapped: a set of seven spears will thrust down to impale passing characters. Just like the trap in Room 2, these spears are activated by a pressure plate. A Thief or Dwarf can detect the trap. Thieves have a 25% bonus.
If a PC triggers the trap, he must pass a ST vs. Paralysis or suffer 1d6 points of damage. If the ST is passed, the PC succeeds in rolling away from the spears and past the trap. If a PC dives into the passage to the left, he falls down to Room 10, taking 2d6 damage for the fall (or 1d6 on a successful ST vs. Paralysis).
Room 6: Altar of the High Heroes
This room contain a massive, but low, standing stone altar. A ruined panel depicting an halfling in front of a dark, ominous castle is placed behind the altar. A ghostly figure stands in front of the altar.
The ghostly figure is a Lesser Banshee, mourning the unfortunate end of the Shanwood clan. Thob was the last of his clan, his closest relatives having died at sea. His demise at the end of the Thyatian marines attracted the attention of the Banshee, which now stands as a guard against the characters.
Opponents: Lesser Banshee (5* HD, 24 HP, 300 XP).
[Image: Scroll case]
In a secret compartment on the right side of the altar is a scroll case containing a copy of The Ballad of Nob Nar. The scroll is worth 50 gp, and is also imbued with magical power, allowing a cleric reading it to cast the Protection from Evil and Remove Curse spells.
Room 7: Trophy Room
This long, narrow cavern is packed with all sorts of furniture and curios. Four wooden crates are stacked against the leftmost wall; the floor is covered in mouldy pre-Al Kalim Ylari carpets; a low, square table made of rare Ierendian and Davanian woods composing a set of scenes from the life of Vanya is set on the right, opposite to a scaffolding loaded with old books, bottles, antique pottery, a collection of daggers in several styles, and a set of two odd dolls, similar to tiny mummified humanoids.
These last two items are actually Topis, a type of mummy reduced with techniques known to the Thanegioth islanders and animated by the magic of the Zombie Masters. The Topi will wait for an opponent to enter their range of attack, and jump on him by surprise.
Opponents: 2 Topi (3* HD, 13/15 HP, 100 XP).
After defeating the Topi, the PCs can collect much of the treasure of Thob Shanwood. While most weapons are rusty, and clothing is mouldy, the pottery and silverware is salvageable (100 gp of worth, but 100 cn encumbrance). Only two of the books are still in good shape, thanks to thick protective covers, and can fetch 50 gp each. A quiver with 20 arrows +1 hangs from the top of the scaffolding. On the opposite side hangs a small round shield showing the coat of arms of the Five Shires (Orange, bearing a row of five wheat ears).
The engraved table is also worth 140 gp. It is too large to be comfortably carried by a single character, though. A chest with 2000 Thyatian Denarii can be found under the table. On the table, there is an ivory map case (10 gp), containing a scroll of protection from lycanthropes and a map of the Sea of Dread.
[Image: Chest]
Hidden in one of the crates, under layers of decayed cloth, is a small chest with 200 Thyatian Lucins and 400 Asterii. Another crate contains a set of ancient halfling-sized bronze chain mail, dating back to the times of Faerdinel. It has a value of 200 gp for collectors of hin antiques.
Room 8: Tomb of Thob Shanwood
This large, almost circular cave holds the stone coffin of Thob Shanwood, placed upon a raised dais in the center of the room. The coffin is large for an halfling, and contains a second, wooden coffin. The wooden coffin is protected by a clever poison trap. If the lid is opened, it will break a large ampoule filled with poisonous gas. The trap can be detected and deactivated by Thieves with a 15% bonus to both rolls, since it is easy to spot the ampoule by drilling an hole in the coffin and to bypass it. In case the PCs trigger the trap, they must pass a ST vs Poison or suffer 1d4 HP – the poisonous gas has grown weaker with the passage of time, and it is now almost harmless.
[Image: Coffin]
The wooden coffin contains Thob’s skeleton, dressed in colorful rags, his cutlass (a finely worked blade preserved in oiled leather, warranting a non-magical +1 bonus on to-hit rolls) and small silver and gold jewels – a silver necklace (worth 20 gp), a large round earring (5 gp), and two rings (50 and 30 gp value, respectively).
Room 9: Dangerous passage
This passage plunges deep into the earth, making it difficult to traverse. Heavily armored or encumbered PCs (anyone with 1/2 their maximum movement or less, or wearing chain mail or heavier armor) needs to pass a ST vs Paralysis or fall down the slope, taking 1d6 HP of temporary damage.
Room 10: Lurker in the depths
This large cave is mostly submerged, and only a narrow ledge connecting the two entrances raises above the water. A dangerous predator, the Marine Decapus, lairs here. It generally hunts in the sea near the island, but will try to catch an unaware PC to snack upon.
Opponents: Marine Decapus (4 HD, 19 HP, 75 XP).
Note that the room is well below the level of the sea, and should be completely submerged. However, ancient lizardman magic keeps the water level from rising– this cave was originally a place where lizardmen shamans retired to receive visions, and was only accidentally discovered by the hin pirates as they worked to the tomb. There is little trace of the lizardman presence, except for some old bones on the floor of the cave. A small gold bracelet of ancient Malpheggi design can also be found among the bones. It is worth 20 gp, or 50 to a sage specializing in lizard-kin lore. There is also a silver dagger, but clearly more modern in design – it belonged to Igor Ivanovich, the wizard who built the tomb and was killed by the decapus.
The passage to Room 5 is too steep except for a Thief or a character with the Climbing skill. If one such character attempts the climb, he gets a 10% bonus unless he is encumbered (reduced to 1/2 movement or less), as the passage is not completely vertical and has many footholds.
Room 11: Lair of the Redcap
This room is much more refined than the rest of the tomb. The walls were accurately excavated and painfully levigated during the last century, so that now they appear completely flat.
Brogan, Shanwood’s Brownie friend, took residence here after being marooned on the island.
He still lives here, but despair for the loss of his friend and desire of revenge for having been left behind have changed him into a Redcap. Brogan can be reasoned with – barely. He is insane, and hates the hin with a passion. If Moran, or any other hin, is with the party, the Redcap will try to kill him first.
Opponents: Brogan, Redcap 1 (3 HD, 17 HP, 50 XP).
Brogan has little of value – a silver dagger, some old Thyatian coins, and a silver necklace, for a total value of 50 gp.
Random Encounters
A small tomb does not warrant many random encounters. Rolling is only recommended if the PCs rest within the tomb.
The following monsters can be met in that case:
Skeletons, 1-2 (10 XP each): these Skeletons were animated to guard the tomb. Only use this encounter once.
Centipede, Giant, 2-3 (5 XP each): Centipedes may try to surprise the PCs in their sleep and poison them.
Crabling, 1 (15 XP): these large crabs enter the tomb after the PCs dig it, and are just looking for food.
Brogan (see Room 11): Brogan will be invisible at this time, and will avoid discovery at all cost, but may try to steal valuable items from the PCs.
Conclusion
The adventure should give the party 850 to 1000 XPs for monsters, plus a similar amount for treasure. Goal based awards include 400 XP for surviving the tomb, 400 XP for recovering Thob’s treasure, and 50 XP for befriending the figurehead living statue.
Appendix A: New Monsters
Living Statue, Figurehead
[Table: Living Statue, Figurehead]
Monster Type: Construct, Lesser (Very Rare).
The figurehead living statue is a wooden statue representing the upper part of a woman’s body. The figurehead is usually installed on a ship, though it can be fixed to other supports.
This type of statue is designed for ranged combat, since it has no ability to move on its own. Thus, its creator made it able to eject a fiery blast from its mouth. Otherwise, it can attack nearby targets with its fists.
Like a wood golem, the figurehead statue is immune to cold, as well as to all missile attacks. However, it is not especially vulnerable to fire, thanks to its thick layer of protective paint, and to the fire magics that shape it. On the other hand, being unable to move around make it an easy target in combat.
Terrain: ships (usually).
Crab
[Table: Crab]
Monster Type: Giant Animal (Uncommon).
Large crabs are a medium sized version of Giant crabs that evolved in small islands where food is less plentiful.
Crablings are the young of the large crab.
Like their larger relatives, these are non-intelligent animals, always looking for food.
Terrain: Islands.
Appendix B Adapting the Adventure
While the adventure is designed for characters of level 1-3, it is easy to adapt for early Expert levels (3-5).
For the island exploration part, double the number of sharks and replace large crabs with giant crabs and, in turn, crablings with large crabs.
Add immunity to normal weapons to the living statue, and raise its damage to 1d6/1d6 (fists) and 1d8 (fire bolt). Replace one of the Zombies with a Wight. Brogan should also be moved up to a level 3 or level 4 Redcap, and the number of Topi in the trophy room should be doubled.
No bonuses need to be given to Thieves trying to find or remove traps, and damage for the poison trap can be doubled.
Treasure should be upgraded as well, by increasing the value of the precious objects and coins. Replace Denarii with Asterii, and Asterii with Almarand electrum pieces. Double the value of all miscellaneous objects.
Magical treasure should also be increased. The Ballad of Nob Nar now contains the Dispel Evil, Cure Disease and Remove Curse spells. Thob’s cutlass becomes a +1 weapon with the light power. One of the ruined books in the trophy room is now partially readable. It is the spellbook of a Minrothaddan mage, and contains two sea-related spells of level 2 and 3.
Tables
[Table: Living Statue, Figurehead]
|
Armor Class |
7 |
|
Hit Dice |
4+4 (M) |
|
Move |
Nil |
|
Attacks |
2 fists or 1 fire bolt |
|
Damage |
1d4/1d4 (fists) or 1d6 (fire bolt) |
|
No. Appearing |
1 |
|
Save As |
F4 |
|
Morale |
11 |
|
Treasure Type |
Nil |
|
Intelligence |
7 |
|
Alignment |
Lawful |
|
XP Value |
125 |
[Table: Crab]
|
|
Large |
Crabling |
|
Armor Class |
4 |
5 |
|
Hit Dice |
2 (M) |
1+1 (S) |
|
Move |
60’ (20’) |
60’ (20’) |
|
Attacks |
2 pincers |
2 pincers |
|
Damage |
1d8/1d8 |
1d6/1d6 |
|
No. Appearing |
1d2 (1d6) |
1d6 (2d4) |
|
Save As |
F1 |
F1 |
|
Morale |
7 |
6 |
|
Treasure Type |
Nil |
Nil |
|
Intelligence |
2 |
2 |
|
Alignment |
Neutral |
Neutral |
|
XP Value |
20 |
15 |
Images
|
|
[Image: Map of the Tomb of Thob Shanwood] G. Agosta, used by permission of the author. |
https://drive.google.com/open?id=0B63TLs3TewqyZXhkUEFlWHdoVGc |
|
|
[Image: Coffin]Stone coffin by William McAusland. Used by permission. |
SA-4-28 |
|
|
[Image: Chest]Ornate white box with lock by William McAusland. Used by permission. |
SA-1-23 |
|
|
[Image: Skull & Bones]Stone coffin by William McAusland. Used by permission. |
FCI-SPorts-2-skull-with-crossbones |
|
|
[Image: Treasure map]Scroll by William McAusland. Used by permission. |
FCI-magic-items-2-14 |
|
|
[Image: Scroll case]Ornate scroll case by William McAusland. Used by permission. |
SA-4-19 |
|
|
[Image: Ship]Tiny armored ship by William McAusland. Used by permission. |
SA-4-30 |
|
|
[Image: Ship in a storm]An English Ship in a Gale Trying to Claw off a Lee Shore by Willem van de Velde the Younger, 1672. Public domain via Wikimedia Commons. |
1In my original run of the adventure, the dying hin was indeed found during the Fort Doom section of module DDA3: “Eye of Traldar”.
2In my original run of the adventure, I used a set of short adventures from the Al Qadim sourcebook “A Dozen and One Adventures”