
Voices In The Dark:
An adventure for characters level 2-4
by Kevin Turner
Hidden in a collapsed and forgotten warren is one of the least-documented and most arcane artifacts the world has yet seen: the Sphere of Three. Placed within by angered Immortals, the cursed residents of the Sphere wait for someone to find them and either put them to use, or put them out of their misery.
The characters have a few ways to be injected into this scenario:
-
1. Luck
- The characters are just wandering about in the woods and come across the team led by Retro. Retro wants no witnesses, and so orders his men to kill the characters.
- 2. Wizard's Quest
- The characters are hired by a wizard to track down the artifact for his collection.
- 3. Hired by the Unseen Hand
- The characters are hired by a representative of the Unseen Hand, or another thieves'/assassins' guild with a taste for artifact recovery [as demonstrated in the caption on page 81 of G:KoM -Ed.]. They are not told that they are in direct competition with another team, nor that they are working for the most insidious organization in the world.
Other ways may, of course, be used should they fit your campaign better.
Part I: The Scenario
A team sent by the infamous Unseen Hand organization is excavating a site buried in a hill to the northeast of the town of Mansheim. There they hope to unearth the buried artifact, the Sphere of Three. None of the team knows why they have been sent to get the artifact, other than they were instructed to do so by the head of the Hand, the shadowy figure known only as "The Watcher" [Actually Antonio di Tarento -Ed.].
The team is led by Retro, a third-level priest. Retro is an underground priest of Asterius turned bad, and is now an acolyte of the Watcher. Serving the darker side of greed, he now is able to draw on many more spheres of power than before, and for that, he follows orders blindly and fanatically...and to the letter. This has gotten him into trouble in the past, but the Watcher finds it amusing to outwit his subordinate, while using Retro to convert even more followers.
Retro has a few teammates (described in Part III: NPCs, Monsters, and Items) who will follow his commands, and are sworn men of the Hand. They're the poor slobs doing the excavating.
The tomb itself is a giant booby trap. The Immortals wanted to make sure only the wisest and strongest, if anyone, would recover the Sphere. Several conditions permeate the tomb. The whispers of the Three drift throughout the tomb, unintelligible to all, but annoyingly audible. Characters with an Intelligence of less than 10 must make a Constitution check every hour they are in the tomb. Characters with Intelligence 10 or greater must check every two hours. If they fail, they go screamingly mad, joining the other maddened treasure hunters, driven to kill whatever they see moving.
Characters with a bit of wit will notice that they do not find themselves getting hungry while in the tomb. This aura works only within the tomb, and has nothing to do with the Sphere: it is a device of the tomb's creators to keep tem from having to feed its guardians.
Also, any living being who is slain in the tomb becomes a 1HD zombie one hour after dying, regardless of previous experience level. Needless to say, since there were undead here to begin with, their numbers have grown. The exact number should be left to the DM's discretion, depending on the abilities of the party entering, but should not be less than eight per level of the tomb (2 levels).
This adventure is designed to be a race. The prize will not help any who reach it first (as a matter of fact, it will be a hindrance), so the trip out should be even worse than the trip in, trying to find the trapdoor into the upper levels, fighting old dead, madmen, the Eye, and any traps that the players have or will trigger. It is important to keep track of where Retro and his men will be at any one time, since the players will have a deal of a time finding their way around in the warren.
Part II: Layout
The items below correspond to the numbered items on the map at the end of the adventure.
- Approach:
- The hill outside the warren of the Sphere is as nondescript as the rest of the hills of the area: grass- and heather-covered, spare trees of young growth, little underbrush, occasional bramble patches. The overall area is damp, noting its closeness to the hills of Klantyre and a tributary of the Vesubia River. Soil is red clay and topsoil, ripe for certain kinds of farming, but there are no steadings within a hundred kilometers in any direction.
In fact, the only thing which will distinguish this hill from the hundreds that surround it is the presence of four men digging furiously to the whims of a fifth man, who exhorts them with threats and occasional references to a "boss."
The man is dressed all in black, but spattered with red mud, and his general bearing is unkempt. He sounds fanatical in his emphasis, though it's very difficult for the characters to get a good idea of what he says: his speech is slurred and heavily accented in the manner of the folk of Caurenze.
His companions say little, preferring to work than risk the wrath of their overseer. They dig with gusto, apparently nearing their goal, since a crawlspace disappears down into the hill.
Retro will spot the characters if they approach within 40 meters of him and his group. His reaction will be the same, no matter the situation which brought the characters. Read the following text to the players.
The unmistakable noise of digging comes from ahead of you, as well as the loud cursings of someone whose accent you can't quite make out.
When you do spot the noisemakers, you find a group of armored men digging and clearing rubble from a crawlway leading into the side of a hill. The leader (as identified by the amount of work he is doing, in inverse proportion to the amount of noise he is making) breaks off his cursing at his men as he spots you coming up. His tangled mop of black hair is spattered with red mud, as are his black raiments. It is quite obvious he is from some philosophical or scholarly order, though you have no idea which order would employ an obvious madman: his eyes shine from under the mop of hair, revealing a staring madness.
He points at you and screams in a heavily accented voice, "Intruders! Kill them! They must not escape to tell what they have seen!" |
The workmen drop their stones and pickaxes and draw weapons, charging at the characters full-tilt. Unless your party is at full-strength of five characters of fourth level, I suggest letting the characters lose the pursuit, and not letting them enter combat at this early stage. They're going to need their hit points for later.
It should be made interesting enough for the characters to try and find out what all the fuss is about. If they decide to wander away, then the pursuit should find them and guide them back.
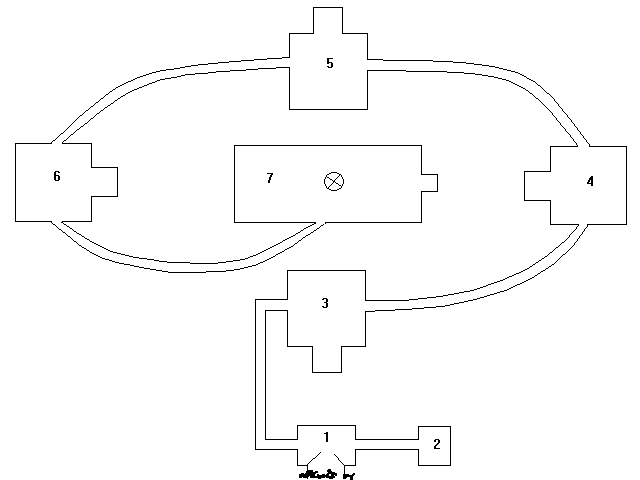
- 1. Entrance Room
-
- Double doors of stout oak open into this room. Two exits are visible. In the center, along the far wall, is a stone bench. Behind the bench, carved into the wall, is an inscription:
Thus were Three entombed within
For foolishness and sin
A world they Crushed and sorrow beset
Now here they dwell, 'till all forget
Release is granted by those with wit
For those without, in death they sit
Eight times for each who know the way
Eight times until the Three see light of day
- 2. Antechamber
- This room is filled with construction equipment: pickaxes, shoring timbers, trowels, plumb bobs, etc. Broken weapons are strewn liberally here, also. It is plain that slaughter has taken place here sometime in the distant past. This is, in fact, the room where the construction crew were killed by the guardians of the tomb, transforming them into undead. They now roam the lower echelons of the warren, unable to find a way back out.
- 3. Earth Chamber
- This room is a very regular room, with perfectly squared corners and arches. In fact, the room itself is square, and has a single, square alcove on its south side. The floor is packed dirt, as are all the walls. It is interesting to note that this dirt is typical brown loam, not the red clay that lurks beneath the surface of this area for 900 kilometers to the north, and 600 to the east. The stuff was moved in from the midland plains by the tomb's creators.
Worked into the north wall is a mosaic of the known portions of the continent...as it was known over 200 years prior. Several of the currently known features to the south and the extent of the northeastern fingers of the Wyrmteeth Mountains are not shown. The lands west of Atruaghin and Sind are also not shown.
In the alcove to the south is a finely worked statue in white marble. It depicts a scantily clad maiden holding a globe. On the globe, the only feature recognizable is the continent depicted on the wall. The globe is made of semi-precious materials (lapis, malachite, and finely worked gold inlay at the borders of the continent). It is about a foot in diameter, and could easily be worth as much as 10,000 gold in a large city like Glantri City or Thyatis. Removing it, however, proves to be a problem. If it is touched in any other manner other than to spin it, the eyes of the statue light up with a brown light and the rooms shake as if a quake were happening. A previously hidden door opens within the mosaic, releasing two specially enchanted mud-men. They have been enchanted so they may meld with any of the walls of this room, and may walk about if they choose. They have also been kept closeted in stasis for two centuries, and are grateful to be free. They are commanded to slay those who defile the globe, though they cannot leave the room. They will fight to the death. They are not considered properly animate, so they do not become zombies upon death.
There is a special restriction in this room: any magics of Water (from acting on or by water, to potions) will not work in this room. By the same token, if the characters use magics of Air (Air Elemental, Dust Devil, etc.), the mud-men take double damage.
The exit from this room curves down and out of sight to room #4. The passageways between the rooms are normal, worked subterranean passages: shored with stout timbers every six meters or so, paved with cut stone, walls done in same cut stone, ceiling of packed dirt. The drop to the next room is about 2 meters.
- 4. Air Chamber
- Similar in construction to the room at #3, this chamber is worked in a shiny yellow stone, like polished sulphur. Its alcove is in the west wall, containing another statue. This one bears wings of real feathers. If the characters attempt to remove the wings, a door opens in the mosaic in the east wall and releases two undead aarakocrae. These, like the mud-men, are commanded to destroy the infidels who defile the statue. They also fight to the death.
As in the Earth Chamber, certain magics will not work here, namely Earth magics, and Fire magics do double damage to the aarakocrae.
The mosaic on the east wall depicts a clouded scene, with a city on a hill floating within the clouds.
The wings are wings of gliding, as detailed below.
- 5. Fire Chamber
- Similar in construction to the two previous rooms, this chamber is done entirely in red marble, veined with purple. The value of this red marble is difficult to determine, but if the place could be quarried properly, it would bring somewhere between 50,000 and 100,000 gold to a builder in a large city. Of course, it would cost half that to get a team out here to quarry it properly, plus the fees a bulider or teamster would charge in transporting.
Set into the north wall is an alcove containing yet another white marble statue of a scantily clad woman who holds a torch made of the same red marble as the room. A fire burns in this torch. The torch itself is not the treasure here, however. The rubies in the statue's eyes are the real prize. Flawless rubies worth about 2,000 gp each sit in the sockets. Again, if the treasure is touched, a problem occurs for the characters. The torch is, in fact, a tiny, 3 HD fire elemental. It is also cursed to remain here for eternity. Like the aarakocrae, it can leave the room to give chase, setting alight any flammable item it touches. It will also fight to the death. Also, this elemental can fly, bringing it into contact with flammables much more easily.
The mosaic is a scene out of hell. Flames leap about a dark and rock-strewn landscape, while leather-skinned beings cavort in pools of lava. There are no doors in this mosaic.
Water magics do double damage to the elemental, though no Air magics work here. Players should get an experience point bonus for leading the elemental into the next room, where the magic of the room will automatically extinguish it.
- 6. Water Chamber
- The floor of this chamber is a shallow pool of water, about one foot deep. The walls are done in marble, sporting fountains (two on each wall) that pour continually from some unknown source into the pool on the floor, which shows no sign of a drain.
In the east wall is an alcove and in the alcove is a red marble statue, of the same design as the previous three. This one holds a white marble vessel. From it pours water from a magical source. It is a decanter of endless water. Again, if touched, a small door opens at the base of the west wall, releasing three electric eels. These are non-intelligent creatures that merely attack whatever is in the pool. They will fight to the death.
On the west wall is a mosaic of a placid pool in a dell, surrounded by nymphs and other beautiful water-dwelling females.
- 7. Escher Chamber
- This chamber is of different dimensions than the previous four, though no less regular in its construction. The floor is a huge black-and-white mosaic of dragons crawling about. In four places (northeast, northwest, southeast, southwest), the floor is joined to sculptured versions of the dragons on the floor, these joining the floor at nose and tail, blending in like the lizards in the M. C. Escher prints. In the very center of the mosaic lurks a dragon not connected to the others. This dragon's head conceals a trapdoor leading down to the warren.
In the east wall is an alcove containing a ladder. This ladder extends up from this lowest room to the highest one: the observatory. A fall from more than halfway up the ladder is instantly fatal (the sucker's long!).
- 8. Observatory
- This room is long and of the same dimensions as the Escher Chamber. In the center sits a functioning telescope on a tripod. Taking this device back to a major city intact should garner both experience points and gold. Just how much of either is left up to the DM.
Inscribed in the floor are eight semi-circles, arranged like a cross-section of a half an onion. Each is the theoretical orbit of the planets orbiting the sun of this planet. It is incidentally the number that matters most in this adventure. This room's only purpose is to drive home the importance of the number eight.
It should be noted that, even though there is a telescope here, the ceiling shows no signs of ever having been open for use as an actual observatory.
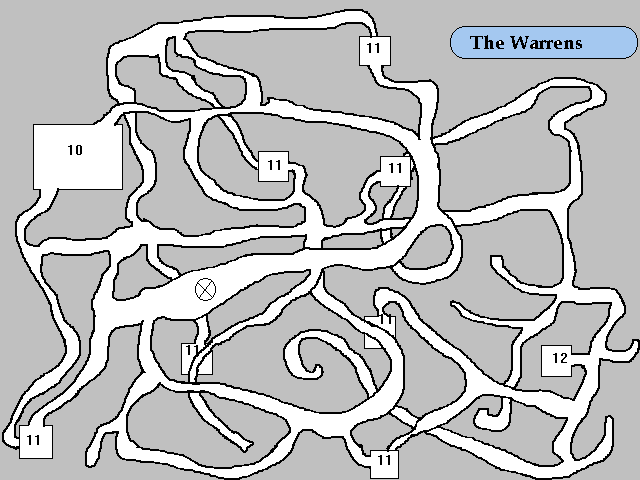
The Warrens
A general note on the warrens. They run all over, up and down, crisscrossing at every conceivable angle, and some ending in rooms, others in dead ends. They have no generic description since they have no stable features: they go from twelve feet high to a bare crawl, from level to a forty-five degree slope. Bearing this in mind, it is important to keep track of where the players are in the warrens, especially since this is most likely where they will meet and fight the party of excavators under Retro.
They are made of the clay of the hills, and offer very little in the way of markings that the players can use to get their bearings.
For every turn the characters are in the warren, they run a 25% chance of running into a pack of zombies. There are six packs total (there would be eight if the characters and the Eye party died), so when that number are defeated, there should obviously be no more zombie encounters. The packs are numbered and listed in Part III. There are also a random number of encounters possible with crazed treasure hunters, driven mad from the whisperings in the tomb. There can be up to three of these.
- 9. Warren Passage
- It is impossible to distinguish one passage from another. They weave and dip and branch in every conceivable direction. Good luck finding your way around. Some of these passages that end in blind tunnels actually have concealed doors in either the floor or ceiling that lead into End Rooms.
- 10. The Slab
- This room is an anomaly in the warren. it is a rectilinear chamber with stone walls and floor. There are eight slabs here, four lining the walls on either side opposite the entrances. They are currently unoccupied. Careful examination will reveal the symbol of a planet on each of the bases, one for each planet and base. There is nothing else of interest here.
- 11. End Room
- Seven of the rooms found at the ends of passages fit this description. The rooms are stone-lined and have a dais in the center. On the dais lies a shattered crystal sphere. Playing with the shattered sphere will trigger the doors in these rooms: either the dais will slide aside, revealing a passage down, or the dais will raise up so the characters can reach and climb through the trap door that has opened in the ceiling. Which result depends on which of these rooms are found. All of these rooms are the same dimensions: ten feet tall, by ten feet wide, by ten feet deep. The daises are five feet tall and unadorned.
- 12. Room of the Sphere
- This room is fashioned just like the seven #11s, but the Sphere on the dais is not destroyed. It is from this Sphere that the whispering that has plagued the players the entire adventure comes: the three tiny figures visible in the Sphere are arguing. See Part III for more details on the Sphere of Three.
Removal of the Sphere from the dais now clues in the remaining zombies as to the players' location. It acts like a homing beacon. The challenge now is to escape both the remaining undead and the group led by Retro.
Retrieval of the Sphere and escape from the tomb should garner players 3,000 XP each. Trapping Retro inside (without killing him), leading the Elemental into the Water Room, and retrieving the telescope (undamaged), should garner extra awards.
Part III: NPCs, Monsters, and Items
NPCs
Retro
Priest (3); Human; CN; Male; STR 14, DEX 11, CON 9, INT 10, WIS 16, CHA 13; THAC0 20; AC 6 (Scale Mail); Footman's Mace (1d6+1/2d4); HP 19
Spells: Command, Cure Light Wounds, Hold Person
Turn/Control Undead (Zombie): 7 or more on d20.
Harding
Fighter (1); Human; N; Male; THAC0 20; AC 7 (leather armor and shield); short sword (1d6/1d8); HP 7
Ignatz
Fighter (2); Human; CE; Male; THAC0 19; AC 7 (leather armor and shield); short sword (1d6/1d8); HP 15
Skor
Thief (2); Elf; CN; Male; THAC0 20; AC 8 (leather armor); sickle (1d4+1/1d4); HP 9
Nachter
Thief (1); Human; NE; Male; THAC0 20; AC 8 (leather armor); scourge (1d4/1d2); HP 4
Note: Retro and his group will not fight to the death. They will regroup and try to attack later, or flee if necessary. If the party can trap them in the tomb, they gain experience for a double-whammy against the Unseen Hand.
MONSTERS
Zombie Group #1
3 former humans. HP 8; AC 8; fist (1d8); attack last in round; THAC0 20 (see Monster Manual(first ed.) for further details)
Zombie Group #2
1 former elf, 2 former halflings. HP 6; AC 8; fist (1d8); attack last in round; THAC0 20
Zombie Group #3
4 former humans, one former dog. Human: HP 7; AC 8; fist (1d8); THAC0 20 / Dog: HP 4, AC 7; bite (1d6); THAC0 20
Zombie Group #4
2 former dwarves. HP 15; AC 6; fist (1d10); attack last in round; THAC0 19
Zombie Group #5
2 former humans. HP 8; AC 8; fist (1d8); attack last in round; THAC0 20
Zombie Group #6
6 former humans. HP 5; AC 8; fist (1d8); attack last in round; THAC0 20
Fire Elemental
AC 2; flame attack (2d8); flies; HP 20; fights to the death; THAC0 18
Mud-Man
AC 8; fists (2d6); HP 14; fights to the death; THAC0 19
Aarakocra (undead version)
AC 6; claws (2d4); flies; HP 10; fights to destruction; THAC0 19
Electric Eel
AC 9; Electric shock (x2; 2d8), bite (1d4); HP 6; fights to the death; THAC0 20
Crazed Treasure Hunter
AC 8 (leather armor); claw and bite (1d2); HP 4; fights to the death; THAC0 20
Note: There can be up to three of these.
TREASURE
The Sphere of Three
Value: 20,000 gp
In the unstable years shortly following the arrival of the Laterrans on Mystara, three figures played key roles in pushing their respective leaders into war: de Gheyn, head of the Flaemish army; Aran, a Thyatian settler/warrior and self-appointed spokesman of all non-Flaems or elves; Severn, assistant and vizier to de Gheyn. These three caused a great atrocity (an opening salvo to the Battle of Braejr) to take place, in which thousand of settlers were murdered, and hundreds of square miles laid to waste. The atrocity - covered up in the annals of Flaemish history to this day - was known as "the Crushing."
For their respective roles in starting the war, certain Immortal patrons of the Highlands (whose identities are lost to time, due to Glantrian anti-clericism) caused the three to vanish from the battlefield. No mortal knew for certain what had happened to them, but it was whispered amongst the wise that they had been made to pay for their sins.
In truth, they paid. They were entrapped bodily in the Sphere of Three, and maimed to suit their crimes. Inside the Sphere they are undying, though de Gheyn is blinded (to represent his blind ambition in attempting to rule the Highlands), Aran is immobile (to signify his lack of decisive action that could have ended the purge of settlers almost before it was begun), and Severn has a knife implanted in his spine (to signify his treachery to both sides during the conflict).
Thus imprisoned, the Immortals decreed that they should be immortal within the Sphere, and that they should lie forgotten in a tomb built for them, until some mortal with the wisdom to use their gifts and the intelligence to defeat the traps of the tomb should retrieve the Sphere.
The Three constantly bicker amongst themselves, and cannot agree on anything, except one thing: it is part of their curse to recall in detail the entirety of all battles fought in the world for the last thousand years. Of course, their bickering means that they constantly interrupt each other, and that their advice on strategy can't be trusted a stone's throw away. A person with a great deal of patience and common sense may be able to puzzle out the meanings and the histories they can relate.
No written history of the Sphere exists. It was only known that the Three disappeared during the final battle. A mage would have to study the Sphere intensively and run many tests to determine the veracity of the Three's identities.
The Unseen Hand wants the item for its power to relate past battle history, and to use those trapped within to gain control of Glantri. If the Watcher is successful, it could mean the downfall of not only the Principalities, but of many nations...
Wings of Gliding
Value: 5000 gp
The Wings of Gliding are a unique item. Fashioned by a lazy mage who was not feeling up to imbuing his creation with full flight powers, these wings look the same as wings of flying, but will only function like a hang glider. There must be sufficient wind power, and a sufficent height to start from. The only thing magic about them, actually, is their ability to keep in the air like a hang glider without actually being properly aerodynamic.
Maps
Map of the Entrance Level.
Map of the Observatory.
Map of the Warrens.
Notes
Wings of Flying and Decanter of Endless Water can be found in detail in the AD&D Dungeon Master's Guide (first edition).
Details on zombies, fire elementals, and electric eels can be found in AD&D Monster Manual (first edition).
Details on mud-men can be found in AD&D Monster Manual II.
Details on aarakocrae can be found in AD&D Fiend Folio.


Copyright (c) 2000, Kevin R. Turner. Used by permission. All rights reserved.