
Warriors of the Eternal Sun part 2
by Kyle Knight with contributions by Chris Seabrook and Giampaolo Agosta from Threshold Magazine issue 24Tabletop Conversion of the Dungeons & Dragons game for the Sega Genesis
Introduction
“Dungeons & Dragons: Warriors of the Eternal Sun” is a video game developed in 1992 by Westwood Studios under license from TSR for the Sega Genesis console. It presents a single-player computer-based RPG adventure set in the Hollow World environment, using the classic Dungeons & Dragons rules from BECMI and the Rules Cyclopedia. This article attempts to provide a conversion of the CRPG to a tabletop adventure module. This is the second part of the conversion, continuing from Threshold issue #23: http://pandius.com/Threshold_23.pdf (html copy of the article also here: http://pandius.com/wotes_1.html).
[Map:
Hidden Valley]
http://pandius.com/WotES_valley_map.png
The Valley Beyond the Island
[Table: Main Valley Swamps wandering monster list]
|
Roll d12 |
Monster |
# Appearing |
|
1 |
Beastman, Various |
1d8 |
|
2-3 |
Crab, Giant |
1d4 |
|
4-5 |
Crocodile |
1d4 |
|
6 |
Crocodile, Giant |
1d3 |
|
7 |
Dragon, Black |
1 |
|
8 |
Dragon, Green |
1 |
|
9 |
Hydra, 5-Headed |
1d2 |
|
10 |
Hydra, 9-Headed |
1 |
|
11-12 |
Leech, Giant |
1d4 |
The Hidden Forest Halls
Hidden in a thicket at hex 0523 is an artificial granite structure, built as a raiding outpost by a group of Minotaurs. It has only recently been finished and the minotaurs w/in are awaiting reinforcements before starting to raid the countryside.
These specific minotaurs come from a breed, the Sarangay, that is extinct in the Outer World, but survives in the outskirts of the Malpheggi Swamps, not far from the Hidden Valley’s Gateway Passage. They have larger horns than the Minotaurs commonly found in the Outer World, and wear their dark hair short on the side of their heads, with a longer tuft on the center of the scalp. They also wear earrings with semiprecious stones, each pair worth about 10 GP.
[Map: The Hidden Forest Halls]
http://pandius.com/forest_hall.png
Room 1: Common Room. A large hall giving access to all the chambers of the complex, it is guarded by 1 Minotaur at all times.
Room 2. Two Minotaurs live in this room. They are playing a game of knucklebones, and will be easily surprised, so much they are engrossed in the game. Still, any disturbance in room 1 will bring them out of their concentration in 2 rounds. Besides their knucklebones set, they have 15 GP in semiprecious stones they are waging against each other.
Room 3. Two Minotaur are setting up their camp in this room. They will drop their packs and join any fight that starts in adjacent room in 1 round. They have a bundle of pelts, wooden branches, and crude equipment with them.
Room 4: Lieutenant's Chamber. The Minotaur Chief's Lieutenant lives here. He is armed with a normal sword, and has a halfling-sized suit of +1 Chain Mail stored in a chest besides his cot. The lieutenant will check on any fight 2 rounds after it starts.
Room 5: Chief's Chamber. The Minotaur Chief lives in this room. He fights with a Sword +1 and has a suit of Elven Chain Mail +2 hanging from two nails in the southern wall. The chief will not join a fight in another room unless it goes on for more than 4 rounds. Otherwise he will assume his followers have dealt with the matter.
Room 6. Two Minotaurs are lodged in this room. They are sleeping, but will awaken if combat starts in another room and will join the fray in 3 rounds.
The Passageway Caverns
[Map: The Passageway Caverns]
http://pandius.com/passageway_caverns.png
This dungeon was clearly an old working mine at some point in the not too distant past, clear seams of mithril can be seen throughout with the chamber housing the Red Dragon being the deepest point of active mining. Anyone with the Mining skill will be a loss to estimate how much mithril can still be gathered from this mine. If a Dwarven crew of miners examine this chamber, they’ll be able to determine that it is in fact only the tip of the mithril source. All secret doors are of Dwarven make and thus gives Dwarves a +2 bonus to Detect them. Bringing this information to Gristling before the Burrower’s malady is removed and while the red dragon is still alive will cause him to lead his dwarves to chase the dragon. All the dwarves will perish in the attempt. Informing them after the madness has been lifted or the dragon has been killed will allow them to establish a base in the mines.
The dungeon can be entered from the Hidden Valley, south of the Beastman caves (hex 0606) as well as from the Fire Lands (hex 0507). The Fire Lands are besieged by lava, which gives off such heat that surviving without Rings of Fire Resistance is all but impossible.
Room 1: Fire Giant’s Cave. Wor Saray, a Fire Giant, lives in this cave. He knows of the secret door and actually guards it on behalf of K’atikumatz the Red, a dragon who has taken residence in the caves. Wor can be reasoned with, but the dragon pays well, and is dangerous to cross, so he will not betray him lightly.
Room 2: Secret Treasure Hall. A group of 4 HellHounds, pets of Wor Saray loiter here, baying loudly at any intruder, then charging to attack. Two secret doors protect Wor Saray’s treasure, worth a total of 1,504 GP.
Room 3: Dragon Lair. K’atikumatz, a Red Dragon, sits in this large cave. The dragon’s treasure contains a sword +2, a shield +1, a suit of plate mail +1, a short bow +1, and 10,096 GP in gems and jewelry.
Room 4. A Sabertooth Tiger -- Q’eq, another of Wor Saray’s pets -- plays with a worn teddy bear in this room. It will attack the PCs, but will flee to the dragon’s cave if it fails a morale check.
Room 5: To the Fire Lands. The heat of the Fire Lands reaches well into this cave. PCs will start feeling the heat become excessively hard to bear at this point, losing 1 HP per round, unless suitably protected.
The Warrens
[Map: The Warrens]
http://pandius.com/wotes_warrens.png
This series of natural caves is home to dangerous predators. There are three entrances to this series of caves: the northernmost entrance (from hex 2704) leads to area 1; the central entrance (from hex 2709) leads to area 2; and finally the southernmost entrance (from hex 2711) leads to area 4.
All the secret openings are merely hidden behind extremely large and thick clusters of moss (detect as concealed door). Any demi-human, or anyone with the Nature Lore or Survival: Underground general skills), will be able to identify the moss as edible on a successful check.
Room 1. 6 cave bears lair in the northernmost cavern.
Room 2. 8 sabretooth tigers lair in the middle cavern.
Room 3. 3 cave bears, companions of the one in area 4, have followed some prey -- now a mangled corpse -- beyond the thick layer of moss that separates this cave from area 4.
Room 4. 1 cave bear is loitering in the southernmost cavern.
The Web Palace
[Map: The Web Palace]
http://pandius.com/web_palace.png
Room 1. This natural cave is home to 4 Giant Black Widow Spiders. The opening to the second area is half filled from a recent cave-in with just enough room for the spiders to climb over.
Room 2. Three more Black Widow spiders hide in this tunnel.
Lair of the Cave Bears
[Map: Lair of the Cave Bears]
http://pandius.com/cave_bears.png
Room 1. This large natural cave is home to 2 adult Cave Bears and 2 young Cave Bears.
The Winding Cavern
[Map: The Winding Cavern]
http://pandius.com/winding_cavern.png
This natural cave is home to 4 adult Owlbears.
Room 1. Two owlbears are mating in this room. They will be quite outraged at the interruption.
Room 2. Two owlbears are resting in this room. There is not enough space for more than one owlbear to move to area 1 at a given time, and they will take two rounds to be roused from their sleep by the noise of battle.
A hidden passage behind a pile of debris, quite easy to find (1-3 on 1d6, 1-4 for elves and dwarves) leads to area 3.
Room 3. A small room where a skeleton lies on the ground. A small treasure in gems (752 GP) lies near to the skeleton.
Ant Nest
[Map: Ant Nest]
http://pandius.com/ant_lair.png
This dungeon is an old gold mine that has been taken over by a small colony of Giant Ants. Small seams of gold can be seen throughout the dungeon. Anyone with the Mining skill can estimate the various seams as holding roughly 3,500-5,000 gp worth of unprocessed gold. The exact amount of gold available in the mine is left up to the DM.
Room 1. This cavern is empty.
Room 2. Giant Ants (13) crawl all over this cavern. Numerous gold nuggets (total value 2,512 GP) are found on the ground, mostly near the western bend of the cave.
The Pits
[Map: The Pits]
http://pandius.com/pits.png
This natural series of caves is home to a large Giant Rat colony. The two “secret doors” are actually merely obstructed by large vines.
Room 1, 2, 3. Each of these areas is home to 10 Giant rats.
Room 4. This area is home to 13 Giant rats.
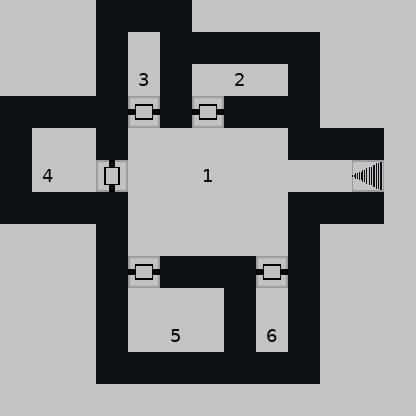
The Beastman Caves
The Beastman Caves are the first major dungeon related to the main quest. This complex is composed of multiple, independent caves disposed in three tiers across a mountain slope. The upper tier is not accessible in the game without passing through the lower tier, although the Beastmen have ladders they can lower to help their people in and out. In the tabletop version, a Thief might easily be able to climb the wall. However, the DM should assume that lookouts guarding Kacantizu's abode and the Gateway Passage would easily spot the climbers, and request also a concurrent (and much more difficult) Hide in Shadows roll. Any Thief worth his salt should be aware of this (maybe with a simple Wisdom check in case the player does not think to ask, otherwise, it should be automatically known).
Lower Tier
[Map: Beastman Caves, Lower Tier]
http://pandius.com/beastman_caves_lower.png
Room 6: Treasure Room A natural cave, 7’-8’ high, hold a single Beastman Warrior. After his defeat, the party can find a Shield Scroll and some leather charts that Marmillian will want to study (each PC will receive 20 XP for bringing this item back). This cave is on ground level to the right of the Hidden Passages ground level entrance.
Room 1: The Hidden Passage. A natural passage that varies between 5’-10’ in width and 7’-9’ in height. Near the entrance on ground level 2 Beastman Warriors are standing guard. This passage starts on the ground and exits onto the middle tier to the left of the Warrior Cavern.
Room 2. A small bone pipe is found here lying on the ground. The sage, Marmillian, will want to study this object (each PC will receive 20 XP for bringing this item back).
Room 3. A thick cluster of vines conceals a slight passage that leads upwards to the second tier. 2 Beastman Warriors stand guard at the exit.
Middle Tier
Room 4: The Warrior Cavern. This large natural cave is between 9’ and 11’ in height. 4 Beastman Warriors led by a single Beastman Lieutenant are quartered here.
Room 5. This chamber is 9’ high. A Beastman Lieutenant and 4 Beastman Warriors are found here. A pile of loot, including a Scroll of Darkness, 96 gp worth of gems and some culturally relevant objects (pottery fragments and carved bones) can be found in a corner (each PC will receive 20 XP for bringing these items back).
Upper Tier
[Map: The Beastman Caves Upper Tier]
http://pandius.com/beastman_caves_upper.png
Room 1. This natural cavern varies between 5’-10’ and 5’-7’ high. Kacanitzu has set a trap built with wooden spikes in the corridor leading to her chamber (area 3). The trap deals 1d4 damage to the first character attempting to pass through the corridor, unless he or she makes a successful Alertness or Danger Sense check (or the trap is found by a Thief).
Room 2. A discarded stone dagger lies in one corner of this cave.
Room 3 Kacanitzu's Abode. The Azcan Warrioress, Kacanitzu, resides in the farthest chamber to the left of the entrance and hoards 300 gp worth of gems and jewels. Rumored among the beastmen to be Uklangor’s mate, she is in fact the sole survivor of an Azcan war party ambushed by the beastmen when they tried to explore these caves. As her war party was slaughtered, Kacanitzu took refuge in here and has been surviving on food thrown in by Uklangor. His one, and only, attempt to mate with her resulted in Uklangor almost losing his manhood. He hasn’t dared try stepping foot within since.
Room 4 Shaman's Lair This natural cavern is home to the beastman tribe’s only Shaman, Grulapp and to two Giant Rats. Upon entering the caves, the party must make a Save from Breath Weapon or take 1d4 dmg from the heavy amount of smoke. These caves and passageways vary between 4’-7’ high.
Room 5. 2 Giant Rats in this small chamber to the right of the entrance guard their nest which is made up of pottery shards. Marmillian would want to examine the pottery shards for any traces of the culture that created them (award 20 XP to each PC for recovering these objects).
Room 6. Grulapp can be found in this room, inhaling the toxic fumes coming from a fireplace in the center of the room.
Room 7. Grulapp hides his treasures behind a poorly arranged set of boulders. His treasure consists of a Scroll of Protection from Evil and a Sword +1. The PCs need an appropriate skill check (e.g., Escape, Engineering) to bypass the boulders without causing them to fall upon them (1d6 damage per PC involved) or the use of great strength (18, such as that conferred by Gauntlets of Ogre Power) to move them. A very small character, such as a Halfling, has a +2 bonus to any skill check to pass through the opening and reach the treasure without moving the boulders. Award 20 XP to each PC for bypassing or removing the boulders.
Room 8. 4 Beastman Lieutenants and 2 Beastman Captains guard the entrance to this complex. Furthermore, Uklangor in area 10 might come to help them if he hears the battle.
Room 9. This winding natural passage forms Uklangor's lair.
Room 10. The Beastman chieftain, Uklangor (6 HD, 30 HP, AC 3, Att 1 spear +1, Dmg 1d6 +3), dwells in this chamber. Upon spotting the PCs, he'll shout: "Uklangor kill!", and will then rush at the adventurers.
A stone tipped Spear +1 leans against the wall of the alcove to the right, and a scroll with Detect Magic, Light, and Entangle is discarded on the ground, amid a set of gems worth a total of 400 GP. Uklangor wields another spear +1 and a wooden shield, and wears heavy bone plates sewn into thick leather (equivalent to AC 5). Marmillian will offer 2 1st-3rd level Magic-User scrolls (of the groups choice) for this armor.
Room 11. A tangled mass of vines blocks the northern passage. These vines are obviously magical to anyone able to pass an Alternate Magics or Nature Lore skill check. A Pass Plant spell would bypass them, or the PCs may decide to seek the help of the sage Marmillian -- any of the above mentioned skill checks will also let the PC know that Marmillian, as a sage, may know more about such vines and magics to counter them.
Beyond the mass of vines lies the Gateway Passage to the Malpheggi Swamp.
Returning to the Castle
When the PCs return to the castle with news of the Beastman caves and the mysterious blocked passage beyond the vines, Duke Barrik will congratulate them. However, he will be unusually suspicious and will put great pressure on the adventures:
“It is good that you have found a passage to another realm. Perhaps there you will find the aid I sent you for. Tarry no longer; you must make haste if you are to carry out your charter. I expect you to return with an army to aid me. I’m afraid the people plan to revolt. Beware of that scheming Marmillian. I do not trust anyone anymore.”
Speaking with Marmillian will be more fruitful. The sage will compensate the PCs for bringing back any further artifact of cultural and historical relevance, and will further provide the following information:
“I am so glad to see you all again. People here are becoming edgy. It seems that all they do is bicker and snap. Even our well mannered Duke seems a bit paranoid. Perhaps it is this infernal sun or the feeling of imprisonment in this strange valley. I do hope you will find some allies soon. It may be just what the people need to lift their spirits. The artifacts from the beastman are patterned from items made by an ancient race known as the Azcans. It's amazing that art lost for centuries has remained unchanged in the beastman culture. The creatures you describe are long extinct outside this valley. I feel like we're in a giant museum. I have an item that may help you pass the tangled vines you found in the beastman caves. It is a withered vine that repels normal vines. I only have one, so guard it well. Please hurry. I fear we haven't much time.”
At this time, Marmillian is forming a tentative hypothesis that the castle has been shifted to some kind of "lost world" area -- maybe he has heard of the Isle of Dread. Anyway, he wants to know more, and has started detecting the maddening effect of the Burrower, although he is not yet able to identify it correctly.
The Gateway Passage
When the PCs are able to bypass the vines, they can explore the remaining part of the Gateway Passage.
This entire complex is carved from the earth and bedrock. Walls, floor and ceiling have a moss-green tint; anyone with Alchemy or Nature Lore will be able to identify the moss-green tint as a sign of a rare salt-like substance that is highly prized in the creation of healing potions. There are wooden support beams, as this complex was altered from a natural cave system to a mine by the Lizardmen of the Malpheggi Swamp to help them raid into the valley. Since the Troglodytes and Beastmen have taken them over, Lizardman raids are few and far between. All three groups spend considerable time attacking and raiding one another.
[Map: The Gateway Passage]
http://pandius.com/beastman_caves_passage.png
Room 1: A Carrion Crawler prowls this area and room 2. There is a 50% chance to meet it here. If this is the case, the monster is hanging from the ceiling, and has a 1-2 on 1d10 chance of surprising the PCs.
Room 2: A Carrion Crawler prowls this area and room 1. If it is not met in room 1, then it will be here. It is eating a paralyzed troglodyte, and may be surprised if the PCs are stealthy.
Room 3: A Black Widow spider nestles here. Some unlucky lizardman was captured and eaten by the spider, so the PCs can find its belongings among the webs: two potions of Cure Poison, as well as 48 GP.
Room 4: Owlbear Nest Entrance. An owlbear is guarding the “secret” entrance to where its young are hidden (actually, this is a tunnel blocked with large rocks that the owlbear moves in and out of the passage whenever it needs to enter the nest). Once the passage is detected, to move the boulder requires either someone wearing Gauntlets of Ogre Power (or having naturally 18 Strength) or 2 successful Engineering checks (1 if a Dwarf.) There is only room enough for one person to tackle the boulder at a time.
Room 5: Owlbear Nest. The two owlbear younglings will fight for their lives. Among the remains of some unfortunate adventurer who ended up as owlbear food, the PCs can find a Scroll Dispel Magic, two Potions of Healing and 80 GP.
Room 6. Troglodyte stink can be felt in this cave, as well as in area 9 and in all areas 11-18. 8 Giant Rats nest in the tunnel branching out from this cave to area 7.
Room 7. 3 Giant Toads are found in this damp cave.
Room 8: Racer nest. 2 Giant Racers and their 6 offspring lair in this area.
Room 9: 8 Troglodytes and 3 Tuatara are off hunting in this area. They are trying to ambush the Giant Rats from area 6.
Room 10 Spider Nest. 6 Crab Spider nest in this deep, dark cave. The area is completely silent, and devoid of the Troglodyte stink that pervades areas 11-18.
Room 11: Troglodyte warrens. The Troglodyte stink is strong here, but none of the humanoids is in sight.
Room 12: Tuatara pens. The Troglodyte herd their tuatara in this area. Adult Tuatara are currently out hunting or guarding the warrens, but 6 younglings are found here. They are harmless, but can be harvested for food.
Room 13: Troglodyte warrens. Signs of habitation are found in this cave -- crude cots and small, primitive artifacts. The latter can be collected for Marmillian (20 XP per each PC to bring back Troglodyte artifacts).
Room 14: Troglodyte warrens. This cave is currently empty. Stealthy PCs may bypass the Troglodytes in room 15 by passing through here.
Room 15: Troglodyte warrens. This cave houses 8 Troglodytes. They are busy preparing food for the tribe.
Room 16: Troglodyte warrens. The passage to Room 17 is guarded by 4 Troglodyte Sub-Chiefs.
Room 17: Troglodyte Chief’s Hall. This large cavern houses the Troglodyte Chief, his 4 wives, 4 warriors, and 8 younglings. Two trained Tuatara lizards patrol the passage towards area 18. A scroll with the Haste spell is abandoned among the Troglodyte wastes there.
Room 18: A Phobosuchus stalks the area. The Troglodytes use their hideous scent to keep the gigantic crocodile from entering area 18 and eating their pet Tuatara, but the Phobosuchus will not have the same concerns for the PCs.
At the exit to the swamp, the west wall has a strange pattern of holes in it. This pattern can be noticed by the party with a successful Intelligence or Search check. This pattern is the combination needed to open the secret door leading to the main Azcan passage later.
The Malpheggi Swamp
[Map: The Malpheggi Swamp]
http://pandius.com/malpheggi_swamp.png
The party can reach the Malpheggi Swamp, home of the Lizardmen, through the Gateway Passage beyond the Beastman caves. The swamp is a labyrinth where unsafe grounds often give way to spans of almost impassable waters. Random encounters here can be deadly, since escape is difficult in this terrain. Three main locations are found in the swamps: the Tree of Life, the Well of Souls, and the village of the Lizardmen.
[Table: Malpheggi Swamp wandering monster list]
|
Roll d10 |
Monster |
# Appearing |
|
1 |
Allosaurus |
1 |
|
2 |
Ankylosaurus |
1d2 |
|
3-4 |
Aurochs |
1d3 |
|
5 |
Hydra, 5-Headed |
1d2 |
|
6 |
Hydra, 9-Headed |
1 |
|
7-8 |
Lizardman |
2d10 |
|
9-10 |
Robber Fly |
1d6 |
The Lizardman Village
Lizardmen, at least in this area of the Hollow World, are typically hostile to humans. This hostility is generated by bad relations with the Azcans, not by the effects of the Burrower's malady, which only affects the Hidden Valley. When the PCs reach the village, the Lizardmen have already evacuated it, leaving only a chieftain and 12 warriors to ambush the party.
Indeed, when the party finally finds the main lizardman camp, the Lizardman leader hisses:
"Deathhh to the humansss!"
His warriors quickly move to attack. After the ambushers are defeated, the Lizardman leader hisses:
"Curssse you… and your… gold skinned brethhhern to the northhh… hissssss...."
He then disappears in the waters. The PCs can scavenge from the bodies of the fallen a map of the swamps, several minor artifacts (mostly pottery of Azcan making) that Marmillian can use to study the Lizardman culture and those of lands they trade with or raid, as well as 600 GP. If the party searches behind the largest lizardman hut, they’ll find a magical Azcan Cloak haphazardly hidden beneath some rocks. If a Detect Evil is cast on the cloak, it will radiate strong evil; but, Amelya can cast either a Remove Curse or Dispel Evil on the cloak to rid it of the evil taint. Doing so will cost the party 5,000 gp.
Azcan magical cloak: base AC of -2, +2 to all saves, grants a basic saving throw of 16 against any spells which normally don't allow saving throws (e.g. maze, power words) and allows the wearer to cast each of the following spells once per day: Protection from Normal Missiles, Wizard Eye, Cloudkill, Death Spell and Dance. The cloak is made of colorful feathers such as those of the quetzal bird.
DM note: The PC wearing this magical cloak in Azcan lands will be the primary target of all Azcan attacks, as they try to kill the PC in order to reclaim the cloak. While the attackers won’t be suicidal, they will refuse to retreat. Consider them as having a +2 bonus to Morale.
The Well of Souls
This pool of deep, murky water gives off powerful magical vibes. A Detect Magic spells shows it shining, and even characters with suitable but less effective abilities, such as Second Sight or the Alternate Magics skill can detect it (for skills, a successful skill check is needed). The pool, known to the Lizardmen as the Well of Souls, has the unique property of causing the effects of a Raise Dead spell (cast by an 8th level cleric) on a body that is fully immersed in the waters. The body cannot have been dead for more than 4 days when it is immersed in the waters, and the Well cannot raise more than one person per month.
There is a 4 in 6 (1-4 on 1d6) chance that a group of 1d4+4 Lizardmen are found here, including 1-2 Shamans of Ka, performing a lengthy ritual that is supposed to revive the body of one of their companions. The ritual per se is not effective, it merely forces the Lizardmen to remain here for a time long enough that the Well will recover its powers. As such, the dead Lizardman is likely an important figure who suffered an untimely death.
The Tree of Life
A large oak incongruously grows in this larger area of solid ground. An elf or anyone succeeding at a skill check in Nature Lore or Alternate Magics will recognize it as an elven Tree of Life. The Tree will use its healing powers to help the PCs, as it would other non-evil creatures. It has the capacity to cast up to 72 Cure Serious Wounds (or Neutralise Poison, Cure Disease, or Cure Blindness) spells, but once this capacity is spent it will take two days to recover one spell use1.
Due to the properties of this massive tree, there is a 5 in 6 (1-5 on d6) chance of there being wounded creatures here healing.
The Tree of Life would be especially important for Palens and the other elves. Unfortunately, by the time the PCs discover the Tree and get back to the Castle, the elves are succumbing under the effects of the Burrowers, and will not be able to take any action. On the other hand, after they recover their sanity, they will tend to the Tree. Informing Palens of this discovery earns the PCs 200 XP each plus a 1st-3rd level Magic-User scroll for each Elf in the party, of the players choice (within the limits of the spells available to Palens).
Back to Barrik's Castle
When the party returns to the Duke with the bad news -- the inhabitants of the swamps are hostile to humans, they find him in a haggard state and a bad mood. The Duke is not anymore the stalwart commander they remember from the Goblin Wars, and reacts badly, showing a stronger streak of paranoia:
“I am losing my patience with you bumbling fools! I send you for help and again you tell me of more enemies! In case you haven’t noticed, we have plenty of foes. What we lack are friends! Spies are everywhere! I have not slept for days! My guards are with me wherever I go. You must bring help soon. I need help.”
As usual, Marmillian is definitely in a better state of mind. He quickly scans through the artifacts, which confirm his latest idea:
“The artifacts were created recently! I can’t explain this, and I may be going crazy, but, I would swear that we have been sent back in time. I know you think me mad, but, it is the Duke who is mad. He threw me in irons, then released me. Both actions were without warning or explanation. I have been burning incense to keep my senses. I am certain the sun or the earth is distorting our minds. You must bring me more clues. They are the key to our survival.”
Marmillian asks the party to search for even more information. He is now clearly aware of the Burrower's maddening presence, although he can't place it and does not recognise it for what it is, attributing it instead to some effect of the weird, eternal sun or the earth itself. Luckily, his incense is at least partially effective, and his mental health is not declining as quickly as that of the Duke and other inhabitants of the castle, all of whom now have progressed to a state where their conversation is downright bizarre.
*2nd run at the Beastman Camp.
To be continued in Threshold issue #25, with Passage to Azcan Lands!
Credits
Special thanks to Sega, TSR & Westwood Studios for making such a great game.
Special thanks to Mr. Douglas Lanford for his permission to use that vast majority of the maps & for all his hard work as part of the team that made & tested this wonderful game.
Special thanks to Chris Seabrook for his permission to use his castle map & opening Prologue from his walkthrough.
1See Gazetteer 5: The Elves of Alfheim, page 69 for more details.